Table of Contents [Show]
This guide is strictly a PvE guide. It will have less emphasis on survival and VE stats.
If you want to build for PvP, the general idea is to replace IgnoreDEF% with survivability stats and have enough VE to do insta sig.
This is my personal recommendation for builds.
I have not used, nor have, every knight. Some of these builds are untested but are based on similar units of the same role.
This guide assumes all knights are at F0. Please keep in mind that 5★ knights with higher Fate might have different stat priorities.
With that said, this game doesn't offer much freedom to unit building. Some relic sets are vastly stronger than others, and some stats are not desirable at all.
For non-Raid content, all knights should be built as a Damage Dealer or an Overload Support by following this simple guideline:
For non-Raid contents, all knights should be built as a Damage Dealer or an Overload Support by following this simple guideline:
Damage Dealer

- Relic: Silent Slave
- Stat Priority: ATK% = Elemental DMG% = Crit = IgnoreDEF% > ATK > RVEC% > VER% = VE
- Ring Stats: ATK% = Crit = IgnoreDEF% > ASPD%
- Necklace Stats: RVEC% > VER% > ReduceDMG% > HP%
- Enchants:
- Weapon: Elemental DMG%
- Accessory: Crit = IgnoreDEF%
- Notes:
- Damage Dealer doesn't mean DPS role specifically. All knights can be built as Damage Dealers, some more than others.
- Replace ATK with DEF or HP depending on the knight’s scaling stats.
Overload Support

- Relic: Historian Recording the Truth
- Stat Priority: Overload% > RVEC% > VE > VER% = VE% > CDR%
- Ring Stats: CDR%
- Necklace Stats: Overload% > RVEC% > VER% > ReduceDMG% > HP%
- Enchants:
- Weapon: VE
- Accessory: Overload% > RVEC%
- Notes:
- Outside of Raid, there is no need to build a dedicated Tank, Support, or Healer. Build Overload% on top of their roles to boost your Damage Dealer.
- In Raid, remove Overload% for defensive stats (DEF%, HP%, Reduce Incoming DMG% Gem, etc.).
If you see this icon next to a build: 🔋 it means the knight is recommended to be built as an Overload battery. You can read about Elemental Overload and its importance below.
Abusing Res Shield
There are two major mechanics you need to know for PvE in this game: Res Shield and Elemental Overload.
Res Shield
When you deal a high amount of damage of one element in a short period, the enemy will gain a bubble-like Res Shield of that element which does the following:
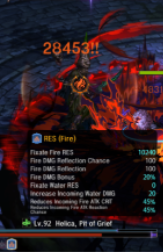
- Forces RES to 10240 for the element of the Res Shield, heavily reducing the damage.
- A negligible amount of damage will be reflected back when you deal damage of the element of the Res Shield.
- -45% Reduced Crit Chance from attacks of the element of the Res Shield.
- +20% DMG bonus for the enemy, if the enemy is the same element as the Res Shield.
- Forces RES to 0 for the element the Res Shield is weak to.
- +20% Incoming Elemental DMG Bonus for the element the Res Shield is weak to.
- New Res Shield will not proc.
Elemental Overload
In battle, the bar at the top of the screen is the Overload bar.
You fill the bar by using attacks and skills. Some skills need to hit an enemy to gain Overload, but a few don't.
Using Signature Skills significantly increases Overload depending on the Signature Skill cost.
"Elemental Overload Charge%" stat increases these gains.
However, the more Overload you have of an element, the harder it is to gain more, meaning the Overload bar cannot be filled by a single element.
Once the bar is filled, Elemental Overload of the element that contributed the most can be activated.
When Elemental Overload is activated, knights of the same element gain full energy and receive the following buffs:
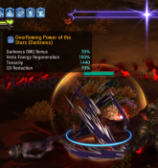
- +30% Elemental DMG Bonus
- +1440 Tenacity
- +100% VER
- +70% Cooldown Reduction
- Res Shield of the same element will not proc
With Res Shield mechanics, almost all content can be cleared by simply following one of these two strategies:
Two DPS Combo
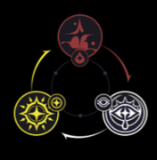
- Use a Damage Dealer of the element advantageous over the enemy to proc Res Shield.
- Use another Damage Dealer of the element advantageous over the Res Shield.
- Note: Your second Damage Dealer can use Overload as well, but not the first.
- Example: Use Eliyar (Blood) to pop Blood Res Shield on a Dark enemy, then switch to Aurora (Light) to abuse the shield.
One Hypercarry
- Use two Overload Supports to fill the Overload bar and activate it.
- Note: The Overload bar cannot be filled by one single element.
- Use a Damage Dealer of the element advantageous over the enemy.
- Example: Use Lucian (Light) to gain over half the Overload bar, and the rest with another support.
Then activate Light Overload to let Aurora (Light) damage Blood enemies without popping Light Res Shield.
- Example: Use Lucian (Light) to gain over half the Overload bar, and the rest with another support.
You might need a healer in some content, but there is still no need to maximize their healing stats. Just build them as an Overload Support.
Supports in Golden City Raids / Beast Battlefront
For Raid and Battlefront, Res Shield and Overload don’t exist. This means Elemental Overload Charge% stat is useless.
Instead, all support/tank/healer knights should build specifically to survive boss attacks and apply debuffs to boost your Damage Dealer.
Prioritize survivability stats and use "Reduce Incoming Ele DMG%" gems on every slot.
Bosses have 0 RES for the element they are weak to. There is no need for Legendary Oceanographer set effect or any other set at all. Use whatever set you like.
(Or use the 2-set Sculptor of Despair for a bit of DEF%)
Some notable buffs/debuffs that affects the whole party:
Accessory Sets
You should have this set on all support/tank/healer knights if possible:
- Warrior Turned to Ashes (Fire Set)
- 2 Set: Hitting an enemy reduces enemy’s DEF by 23% for 8s.
- Voyager Across the Sea (Water Set)
- 2 Set: Hitting an enemy reduces enemy’s ATK and DEF by 5% for 5s (Max 3 stacks).
Support Skills
| Eliyar | Signature | Reduce DEF by 40% for 3s at F6 | |
| Gabi | Normal | Increase Bleed acceleration to 389% for 10s | 855% at F4, 990% at F5 |
| Atterisee | Normal | Reduce DEF by 30% for 5s | The pool stays for a while and reapplies the debuff |
| Signature | Reduce ATK by 20% or DEF by 30% for 3s | The pool stays for a while and reapplies the debuff | |
| Reduce ATK and DEF at F4 | |||
| Reduce ATK by 30% and DEF by 50% at F6 | |||
| Bikki | Normal | Increase Incoming Poison DMG by 38% for 6s at F1 | |
| Albert | Normal | Reduce ATK by 42% for 8s | 50% at F1, 56% at F5 |
| Yanko | Signature | Increase Incoming DMG by 25% for 6s | 35% for 7s at F4 |
| Iris | Normal | Increase Incoming DMG by 10% for 5s | The summon applies the debuff on hit |
| Signature | Increase Incoming DMG by 35% for 5s | Doesn't work on enemies that are immune to the grab | |
| Marthel | Normal | Increase Incoming DMG by 16% for 8s | 19% at F3. Doubled for water enemies |
| Signature | Increase ASPD by 16% for 20s | ||
| Reduce All DMG by 9.5% for 20s | 11% at F3 | ||
| Violet | Normal | Reduce DEF and Increase Incoming DMG by 23% for 8s at F4 | |
| Ellen | Normal | Increase Incoming DMG by 10% for 6s | 15% at F1 |
| Rhynara | Normal & Signature | Increase Incoming Water DMG by 36% (Max 3 stacks) for 7s at F2 | 54% at F7 |
| Increase Incoming Light DMG by 36% (Max 3 stacks) for 7s at F2 | 54% at F7 | ||
| Emile | Normal | Reduce ATK SPD by 9.5% for 15s | 12% at F5 |
| Signature | Reduce ATK SPD by 0.5% for 7s (Max 15 stacks) | ||
| Sansar | Normal | Increase self and allies' ATK by 3.8% of her HP for 20s | 4.4% at F5 |
| Increase self and allies' Crit Chance by 19% for 20s | 22% at F5 | ||
| Signature Extend | Increase Incoming DMG by 15% for 5s | The summon applies the debuff on hit | |
| 30% at F2, 60% at F6 | |||
| Reduce DEF by 20% at F4 | |||
| Shikh | Strong Attack | Increase Incoming DMG by 15% for 6s at F1 | |
| Signature | Increase Incoming DMG by 20% for 6s | 30% at F4 | |
| Arin | Normal | Increase Incoming Dark DMG by 15% for 5s | 20% for 7s at F1 |
| Xanthia | Normal | Increase Incoming DMG by 10% for 2s (Max 10 stacks) at F4 | |
| Nec | Signature | Reduce DMG Dealt and DEF by 5% for 5s (Max 2 stacks) | The summon applies the debuff on hit |
| 20% per stack at F4 | |||
| Death Crown | Signature | Increase self and allies' RES by 30% and 50% respectively for 15s | 40% and 60% at F6 |
| Liam | Signature | Reduce DEF by 10% for 4s at F4 | |
| Anais | Feather | Increase ATK by 25% for 8s (Max 4 stacks) at F2 | 25% (Max 6 stacks) at F4 |
| 50% (Max 6 stacks) at F6 | |||
| Andrei | Signature | Increase Incoming Fire DMG by 6% for 3s (Max 5 stacks) | |
| Bjorn | Normal | Reduce DMG dealt by 30% for 8s | 36% at F5 |
Notes:
- RES Reduction is not included – bosses already have 0 RES for the element they are weak to.
- ASPD and Movement Speed Reduction are not included.
