


Blood Wave Necromancer is built around an ultimate ability that deals an enormous amount of damage, but normally it is limited by it's long cooldown.
This build uses a lot of clever interactions to drastically reduce that cooldown and allow you to use
It also boasts great survivability due to an abundance of Blood Orbs being spawned and
This build is perfect for high level Nightmare Dungeons and excels at destroying giant packs of monsters.
IMPORTANT: Because this build relies on particular combos and interactions between multiple endgame Aspects and Items, the Blood Wave Necromancer is not recommended for leveling.
It is advised that you would first assemble your gear playing a different build that is more suitable for leveling (for example, check out our Minion Necromancer guide!) and only respec in to a Blood Wave Necromancer once you have all of the important pieces.
Look to collect well-rolled versions of the Aspects which can more than double your damage compared to the low-rolled versions.
Gameplay Showcase
Skills Overview
This is our most damaging ability and we use a lot of Aspects to transform how it works. When you press this button you're going to spawn 3 waves, that will Knock Back and Slow all of the enemies they hit, spawn a trail of Shadow Damage Over Time and generate 9 Blood Orbs. Each Blood Orb we pick up, reduces the cooldown of this ability.
This ability will spawn Corpses, detonate them, heal you and deal damage to nearby enemies while keeping you Unstoppable and Immune to all damage. Our build has a great uptime on this ability allowing you to cast it all the time. One of the main ways we'll deal damage in this build is by simply activating Blood Mist and moving next to enemies to automatically detonate Corpses.
Bone Prison is the silent hero of many Necromancer builds. It has many weird and unexpected interactions. One of them is the fact that each wall counts as a separate Minion. By combining it with

This swiss army knife of a skill, gives us great control over the battlefield. We can group enemies together, Stun them and prime them for the rest of our kit to deal damage to them. With

Big chunk of our damage will come from Corpse Explosion.
The last slot can be used for Decompose,
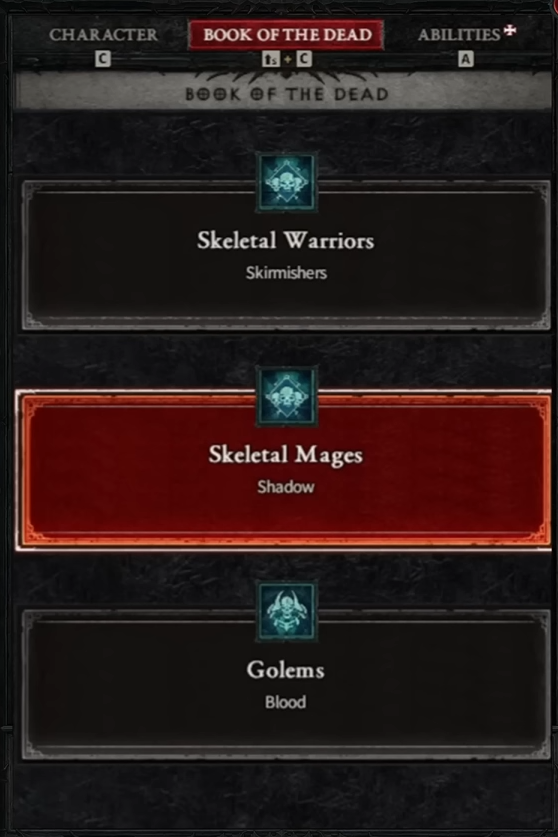
Book of the Dead
In this build, we'll be sacrificing all Minions in favor of the extra player bonuses.
- Skeletal Warriors
They are going to be sacrificed for the Reaper bonus which grants increased Shadow Damage, as most of our damage will be of this type. - Skeletal Mages
These will be sacrificed with the Cold Mages option. This provides additional bonus damage to Vulnerable enemies, which will increase the effectiveness of our Bone Prison. - Golem
Sacrificed in the Blood form for extra Maximum Life, since we don't benefit that much from extra Attack Speed provided by another option.
Malignant Hearts
Our Wrathful Heart provides a huge bonus to Damage Over Time which increases for every Crowd Control effect active on the enemy. Our build reliably Slows and Stuns enemies with a chance to Immobilize them as well. That gives us up to 150% increased damage which is also the bonus we get against Unstoppable monsters and Staggered Bosses.
This is a Vicious Heart which requires an orange Socket in your gear. It will periodically trigger your
This is a Brutal Heart which means it requires a blue Socket. The highest level version of this Heart will have a permanent aura around you even when there are no enemies nearby. Aim for at least Level 4 Heart which will activate once there is at least one enemy nearby. That way you'll always be cursing nearby enemies and lowering all of your cooldowns through
Aspects
Helmet
- Aspect of Disobedience
Because this is a Damage over Time build, we're dealing damage in frequent increments. This is perfect for stacking Aspect of Disobedience and keeping our Armor value high while in combat. It's an excellent defensive Aspect. You should look for gear with a lot of Armor in order to maximize it's benefit.
Chest Armor
- Aspect of the Protector
The chest slot is intended for theBlood Artisan's Cuirassunique, but before you find it, you should simply use a Chest with any good defensive aspect. Aspect of the Protector is a decent generic option that will increase your survivability in the early game.
Gloves
- Tidal Aspect
This Aspect will spawn two additionalBlood Wave's behind the first one. This adds extra Crowd Control in the form of a Knockback and it will extend the duration of lingering Slow and Shadow Damage Over Time. It also triples theSupreme Blood Wavepassive, which normally would spawn only 3 Blood Orbs, but with this Aspect, it spawns 9.
Pants
- Aspect of the Embalmer
Generating Blood Orbs is very important for this build and this Aspect will help you do that. It's a defensive Aspect so we can put it on Pants and keep the more valuable Aspect slots free for our offensive options.
Boots
- Aspect of Explosive Mist
This Aspect turns ourBlood Mistinto another damage ability. Even if there aren't any nearby Corpses, it will generate them throughGhastly Blood Mistpassive and detonate them while lowering the Blood Mist cooldown. Combined with theDecrepifyaura, you will often be able to chain consecutive casts of Blood Mist.
Weapon
- Blighted Aspect
The default version of the build uses a Two-Handed Scythe as the weapon. This allows us to double the effectiveness of one offensive aspect. A well-rolled Blighted Aspect is a great choice because when it's active you will gain up to 240% increased damage. An absolutely massive number.
Amulet
- Aspect of Ultimate Shadow
This Aspect allows ourBlood Waveto deal Shadow Damage Over Time. The Aspect comes with a flat numerical value for the base damage, which normally tends to be a drawback, because it doesn't scale from your weapon. However the base damage on this Aspect is absurdly high. My current Amulet with this Aspect gives the Blood Wave extra 45 000 base Shadow Damage over 4 seconds.
Rings
- Aspect of Plunging Darkness
This Aspect will allow us to utilize theBlight, without having to manually use it. Instead it becomes attached to theBone Prison. With it, our Bone Prison not only applies Vulnerable and traps the enemies inside, but also deals damage, Slows them and allows us to benefit from the Blight passives. - Fastblood Aspect
Crucial piece of this build that helps us reduce theBlood Wavecooldown by a huge amount. Instead of waiting almost a minute for another cast, we can simply pick up the Blood Orbs spawned by our Ultimate and reduce the cooldown to about 20 seconds. We can further reduce this cooldown by hitting enemies affected byDecrepify, and spawning Blood Orbs with other skills as well.
Unique Items
This Unique Chest Armor takes advantage of the constant Blood Orb supply and turns it into free
The Unique Gloves are completely optional. They add quality of life to our
Item Modifiers
The Blood Wave Necromancer is a Shadow Damage over Time build, so we do not care at all about Critical Strike Chance and Critical Strike Damage.
Your damage will be boosted by bonus Ranks to Skills, Damage over Time modifiers, Damage to Crowd Controlled enemies and Vulnerable Damage. You should also highly prioritize Cooldown Reduction on your gear.
Defensively you want to stack as much Armor as you can, and supplement it with Damage Reduction and Maximum Life. You don't need any Life recovery because that will be taken care of by Blood Orbs and your Scythe's Life on Kill.
| Equipment | Best-in-Slot | Good Stats |
| Helm | - Cooldown Reduction - Maximum Life - Total Armor - Intelligence | - All Stats - Willpower - Damage After Picking up Blood Orb |
| Chest | - Maximum Life - Total Armor - Damage Reduction - Damage Reduction While Fortified | – Intelligence – All Stats - Willpower – Damage Reduction From Close Enemies – Damage Reduction From Distant Enemies |
| Gloves | - Lucky Hit Chance - Shadow Damage Over Time - All Stats - Chance to Heal on Lucky Hit | - Intelligence - Willpower - Attack Speed |
| Pants | - Maximum Life - Total Armor - Damage Reduction - Ranks Of Corpse Explosion | - Intelligence - All Stats - Willpower - Damage Reduction From Close Enemies - Damage Reduction From Distant Enemies - Damage Reduction while Fortified - Dodge Chance |
| Boots | - Movement Speed - Ranks of Bone Spirit - Intelligence - All Stats | - Damage Reduction While Injured - Dodge Chance |
| Amulet | - Movement Speed - Ranks Of All Corpse Skills - Cooldown Reduction - Damage Reduction | - Damage Reduction From Close Enemies - Damage Reduction From Distant Enemies - Total Armor |
| Rings | - Lucky Hit Chance - Vulnerable Damage - Maximum Life - Shadow Damage | - Damage Over Time - Damage to Affected by Shadow DoT |
| Weapon | - Intelligence - All Stats - Damage to Affected by Shadow DoT - Damage to Crowd Controlled Enemies | - Damage to Close Enemies - Damage to Distant Enemies |
Weapon Base
Two-Handed Scythe is the ideal choice of a weapon for the Blood Wave Necromancer build.
A slow but hard-hitting weapon is great for a Damage Over Time build. The Scythe also gives us a lot of Life Recovery On Kill, which can heal us through a lot of damage.
Gems
- Armor: Sapphire
This build has access to Fortify, which makes the Sapphire a good choice for our armor sockets. Sapphire provides an extra 3% Damage Reduction while Fortified which adds to this build's already impressive durability. If you find yourself often without the Fortify buff active, you can also use the Ruby, for extra Maximum Life. - Weapon: Amethyst
The only gem enhancing our damage well is the Amethyst, providing 8% increased Damage over Time. You might be tempted to use Diamond with the extra damage to our Ultimate ability, however theBlood Wavewill already do more than enough damage to destroy everything in its path, so it's better to buff our other skills to be on par with it.
Skill Tree
Because Blood Wave Necromancer build is not intended for leveling, we won't be covering the order of Skill Point allocation.
You will be simply transitioning into this build from another leveling setup and immediately specializing into the entire Skill Tree. In this section of the guide we'll briefly go over the reasoning behind each of our choices.
You can find the Skill Tree HERE (powered by D4Builds.gg), under the “Skill Tree” tab.
- We put two points in one of the basic abilities. You will not be using them much, but ideally you want to use DecomposeorReapfor extra Corpse generation.
- Next we take BlightforEnhanced BlightandParanormal Blight. This is going to work withAspect of Plunging Darknessand provide extra Crowd Control forCreeping DeathMalignant Heart damage multiplier.
- Hewed Fleshwill generate Corpses for our other skills andFueled by Deathwill simply boost our damage after we've consumed a Corpse with any ability.
- Corpse Explosionis the ability we max out, investing 5/5 points into it and pickingBlighted Corpse Explosionto deal Shadow Damage over Time with it.
- Bone Prisoncan be used with just one rank in the main skill passive, however if you're doing very challenging content you might need to put more points in it for increased Maximum Life of the walls.Ghastly Bone Prisonis important for Vulnerable application.
- Blood Mistrequires only one rank, after which we pickGhastly Blood Mistto generate more Corpses.
- Decrepifyis granted automatically byThe Decrepit AuraHeart, but we need to put a point in it in order to select theAbhorrent Decrepifypassive which will lower our cooldowns if we damage Cursed enemies repeatedly.
- Corpse TendrilsplusBlighted Corpse Tendrilswill provide massive utility and spawn additional Blood Orbs.
- Bone Spiritis an ability which we will max out, but only if you have the Blood Artisan's Cuirass Unique Armor. We do not cast this skill ourselves.
- Max out Reaper's Pursuit,GloomandTerrorand put one point inCrippling Darkness. This Shadow synergy cluster gives us a lot of utility and damage.
- Because we sacrifice all of our minions, we can take the Memento MoriandStand Alonepassives, for better Sacrifice bonuses.
- Finally we pick Blood Wavewith all it's passives andShadowblightKey Passive which the entire build is based around.
Paragon Boards & Glyphs
The Blood Wave Necromancer build uses a total of five Paragon boards and utilizes the Legendary passive in every one of them, including the newly buffed Wither node, which boosts our Shadow Damage over Time.
You can find the full Paragon setup you can follow HERE (powered by D4Builds.gg).

Starting Board
In the starting board we'll have a lot of generic bonuses coming from Magic passives and a lot of Intelligence in the Glyph radius. That's why we're using the

Flesh Eater
This board and it's Legendary passive - Flesh Eater - gives us 40% multiplicative damage increase after we've consumed at least 5 corpses. Since this build generates a lot of them, we'll have this buff working a lot of the time. The Glyph we use in this board is

Blood Begets Blood
From the previous board, we'll be branching off into two other boards. The first of them is Blood Begets Blood with its Legendary passive that grants us up to 15% multiplier to our damage after we pick up a Blood Orb - which we do all the time. We'll use the
Wither
This board has been buffed in Patch 1.1.1 and the Legendary passive lets us deal even more Shadow Damage over Time based on how much Willpower we have. The board itself features a lot of smaller Magic and Rare passives that give us Shadow Damage Over Time increases. The Glyph slot is surrounded by a good amount of Willpower, which helps the
Scent of Death
The last Paragon Board in our setup features the Legendary passive Scent of Death which will either increase our damage or provide us with 15% damage reduction depending on the number of nearby corpses. It takes very few Paragon points to pick up this node, so it's an easy choice. The last Glyph we'll use is the
Gameplay Tips
- Let a pack of monsters follow you and drag it to the next pack, then cast Blood Waveat an angle that will hit both packs. Blood Wave does incredible damage, has giant Area of Effect and repeats two more times, so take full advantage of it.
- Utilize Corpses to deal damage whenever possible with Corpse ExplosionandCorpse Tendrilswhich can be used manually despite the automatic trigger.
- When Blood Waveis down, initiate withBone Prisonand either castCorpse Tendrilsfollowed byCorpse Explosionfrom a safe distance or just use Blood Mist and get into the Bone Prison on top of the monsters.
- You can cancel the Bone Prison and Blood Mist by pressing the hotkey again after they're active.
Many people are unaware of the massive power of the Blood Wave Necromancer Build. It requires a few key pieces to function and it's unintuitive to play at first, but once you get the hang of it after a dungeon or two, it becomes incredibly fun.
Harnessing the power of this build will allow you to farm high level Nightmare Dungeons with ease. You can feel truly overpowered when you obliterate gigantic packs of monsters while being completely immune to their damage and Crowd Control.