
Table of Contents

https://dotgg.gg/brown-dust-2/october-25th-utc-routine-maintenance-and-update
Overview
Pros:
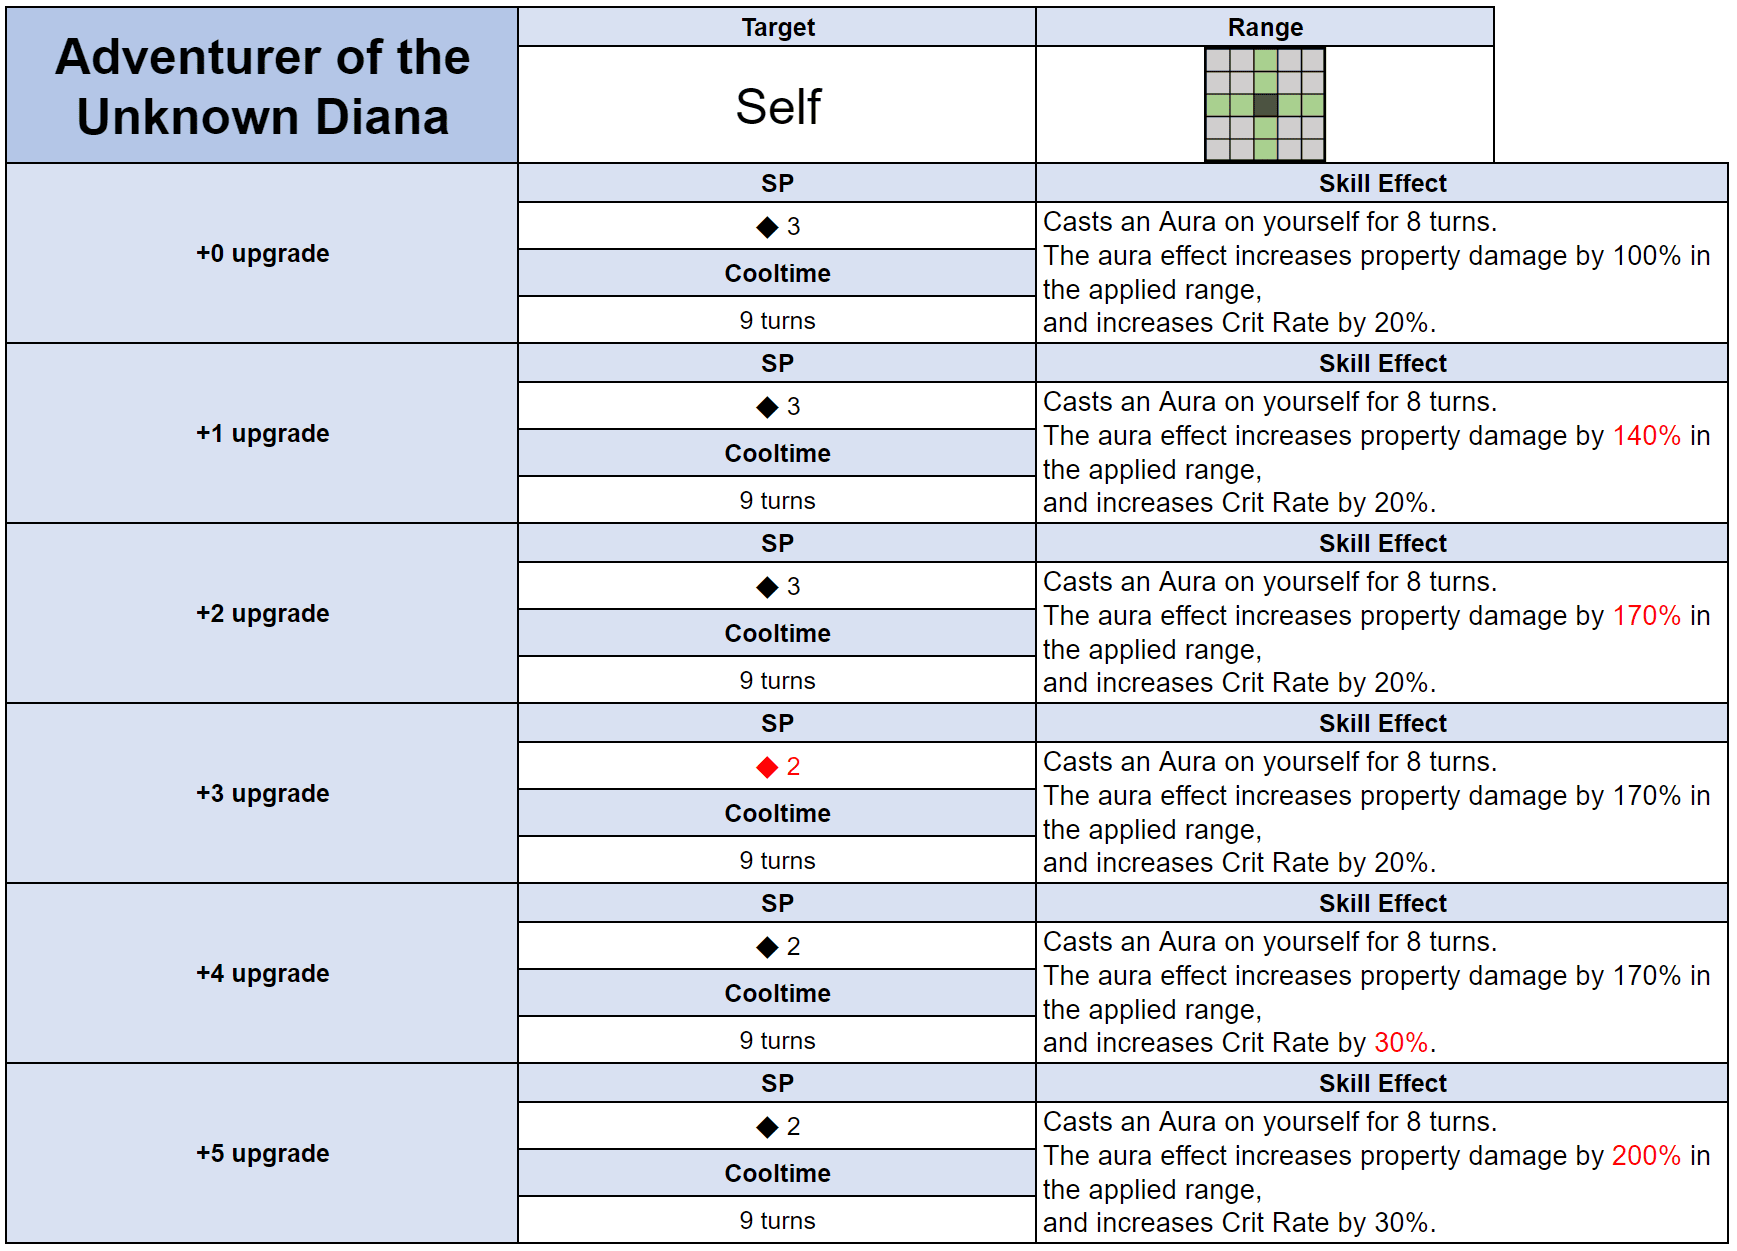
- Consistently one of the best supporters in terms of pure damage potential, increasing element damage by 220% and crit rate by 30% at +5 full potential.
- Versatile for both physical and magical teams.
- Reasonably low SP cost (2 SP at +3 onwards).
- Long buff time (8 turns) and long aura range.
- Exclusive gear has the 54% HP stat and 9% magic resist stat which means that she is reasonably tanky.
- Dispatch field ability is one of the most useful field abilities, and has the chance to earn Dia.
- Works perfectly well without any investment in potential upgrades.
- Anti-Dystopian Diana complements this costume well, making Diana a great defensive buffer too.
Cons:
- Aura means that she must stay alive for her support skill to take effect: if she dies, you lose your support power.
- Aura range does not affect the whole field, which means that placement options are limited each turn (though she can move around).
- You need multiple copies for her to be worth it. Diana at +0 is not very good, given that 3-star Arines (available free to all players) has comparable support abilities for less SP cost.
- Element damage is not very useful for PVP.
Diana for PVE
Diana is a staple supporter for those looking to take on end-game PVE content. No other supporter in the game can reach her level of damage potential.
To understand why she is so strong, first it's important to understand the game's damage mechanics.
Buffs of the same type add to each other. Buffs of different types multiply each other. Therefore, it's most effective to use multiple different types of buffs in order to maximize the multiplication effect (e.g. one ATK buffer, one property damage buffer, one damage amplifier, etc). The formula below gives a simplified overview of how damage is calculated.

"Property damage" means the bonus damage that is dealt when attacking a weak element enemy (e.g. Fire type attacking Water type). For most units (without potential upgrades), base property damage is 50% (i.e. you deal x1.5 damage). With Diana +5 full potential buff, property damage becomes 50%+220% = 270% (i.e. you deal x3.7 damage).
This effectively means that Diana improves your damage by x2.47 (i.e. 3.7/1.5), which is a lot. No other unit has a property damage buff that even comes close.
Although Diana has the limitation of only boosting damage against weak element enemies, this is not really a limitation at all in end-game PVE, because most of the time you will already be using strong-element attackers to maximize damage.
Diana can be easily paired with another supporter to reach near 100% crit rate. For example, AOU Diana +5 and B-Rank Helena +5 together would give 80% crit rate boost, (most units have innate crit rate of at least 10%). This makes AOU Diana a perfect choice for end game PVE story content, which requires very high damage to clear.
This also makes AOU Diana a perfect choice for Evil Castle Tower of Pride high scoring, as high scores are calculated on the basis of the highest damage in one turn.
The only unit that comes close to Diana's buff power is Pure White Bride Refithea. However, Refi is more situational than Diana, because she requires a specific kind of team formation and placement to make good use of her skills.
Does Diana need her potential upgrades?
The short answer is that Diana works perfectly fine without her potential upgrades, and only requires her potential upgrades once you really approach end game content.
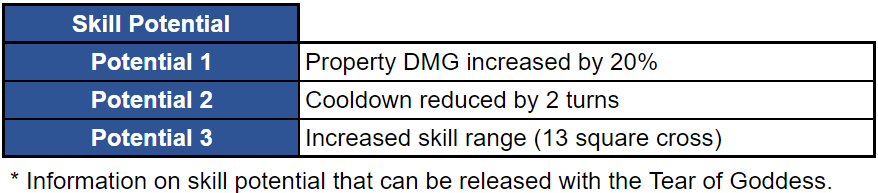
The potential upgrade for +20% property damage buff is must for veteran players who want to maximize their damage in Evil Castle Tower of Pride and fiend hunts, but it's not very important for other players that have not yet reached the end game. The effective improvement in damage from this potential upgrade is only around 5.7% (3.7/3.5).
The potential upgrade for cooldown reduction means that there is no downtime on her aura skill. For most game modes, 8 turns is more than enough. The cooldown reduction mainly makes a difference in fiend hunts, which will often last 10 turns (just outlasting Diana).
The potential upgrade for range is not all that useful. The additional horizontal range is meaningless. The only difference is the increased vertical range, which means that Diana is able to stand at the very front or very back and still reach the full row. This is very rarely needed.
Diana in PVP
AOU.Diana is not very useful in PVP as elemental damage is highly situational. In addition, the overkill damage from Diana's skill is not really necessary in PVP (especially if you are already attacking with a strong element). Diana is therefore primarily a PVE unit.
Dispatch field skill
Diana is worth having at least one copy of for her field skill, Dispatch.
Like Olstein's skill, you can use Dispatch daily to earn free rewards. Diana's dispatch is arguably even better than Olstein's though, because you have a chance to earn Dia every day.
For this reason alone, it's worth getting at least 1 copy of Diana from the Chapter 10 pub.

Conclusion
Since launch, Diana has been the best offensive supporter for PVE content. Having her at +5 is a prerequisite for beating a lot of end game levels.
A free copy of Diana is available from the Chapter 10 pub after clearing Chapter 10.