
Table of Contents [Show]
For yet another patch, Tempo showed us they aren't afraid to experiment with their game, once again flipping the meta on its head with another level up revamp and tons of other changes.
There are multiple consequences to those changes:
- Skills are now mostly obtainable through leveling up, putting even more emphasis on experience gains once you found your core items. Also, Monster skills can have a huge impact on a run, considering we see fewer skills compared to the previous patch.
However, Skills got buffed, meaning bronze skills have an impact on a build. I've felt the desire to pick skills from A Strange Mushroom much more in this patch compared to the previous one.
- Charge items are now the kings of The Bazaar, and all the best builds you will see listed in this article use them. Actually, the best build for each character (Our #1, #2 and #3 overall) are all based on charging items and creating infinite loops of constant triggers.
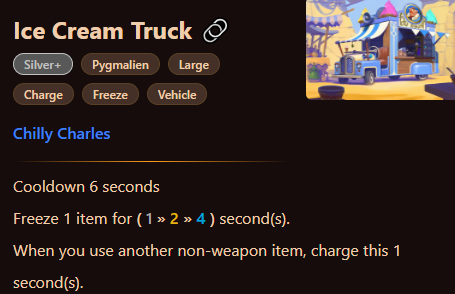
- Disruption is much harder to rely on. Indeed, slow isn't very effective against charge items, which can advance their cooldown through their ability anyway. As for freezing, the lower amount of skills we come across during a run makes it difficult to assemble enough freeze skills to make it reliable. Only Pygmalien's Ice Cream Truck feels like a good disruptive choice at the moment.
Character wise, I would say Dooley still is the best character in the game, but the margin is much thinner than it was last month, barely visible really. Sure, Dooley has access to the only weapon build able to pierce through the tons of Shield Pygmalien and Vanessa are able to build thanks to Bellelista. Plus, it is the only character with two distinct Charge builds, with the Ignition Core still being a decent option.
Yet, the other two have improved enough to both feel competitive, with Pygmalien becoming the best disruptor while Vanessa got Pufferfish back.
Overall, the metagame is more balanced than it was in December if we look at the potential of each character. The black spot would be that all three are forced to build in the same direction : charging items, limiting the feeling of diversity.
| Tier | Build |
| Tier 1 | Dooley's Companion Bellelista |
| Tier 1 | Pygmalien's Charge Fortward! |
| Tier 2 | Vanessa's Charge and Shield |
| Tier 2 | Dooley's Ignition Core |
| Tier 3 | Pygmalien's Medium Weapons |
| Tier 3 | Vanessa's Weapons |
| Tier 3 | Vanessa's Slow |
Builds are ranked based on three criteria:
- Raw Power: The ability to dominate against a random opponent through the sheer power of your synergy.
- Reliability: The likeliness to find the items required for the build to function in time.
- Flexibility: The ability to surround your key items with support, or to rebound if you aren't able to complete the build as planned.
Although we all aim for the perfect build and 10 wins, The Bazaar rewards finding a way to win consistently, and achieving 4 wins with a bad run is just as important as making it to 10 during a good one.
This is why you won't see full builds on this Tier List; instead, I'm highlighting the influential items you should have in mind for each build. The ultimate goal is to help everyone become a great player, and flexibility is the most essential skill you need to acquire to post consistent results.
Tier 1
Dooley's Companion Bellelista - 8 / 10
Raw Power: 10 / 10 ⭐⭐⭐⭐⭐⭐⭐⭐⭐⭐
Bellelista gains so much damage so quickly that there is very little anyone can do against this build when it gets all the right items in time.
Reliability: 8 / 10 ⭐⭐⭐⭐⭐⭐⭐⭐
The Companion Core has to be in your opening choices, and Bellelista is critical to the build's success. You can get through the first days with only a Brick Buddy building a ton of Shield and letting the storm take care of the damage, which alleviates the need to find your Weapon immediately.
Flexibility: 6 / 10 ⭐⭐⭐⭐⭐⭐
There are ways to rebound if you can't find Bellelista, such as Clawrence, Bill Dozer, and even giving the Dinosaurs a chance. However, the build is much worse without its core damage item, and you will begin to struggle to get through the Shield Pygmalien and Vanessa are able to build.
Key Items
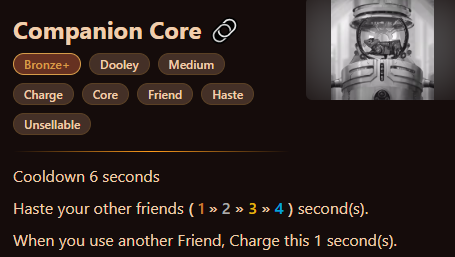
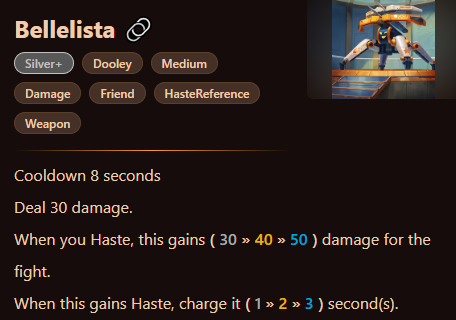
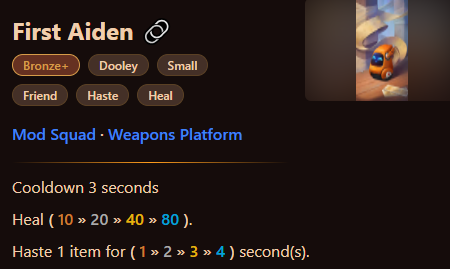
Dooley basically replaced Monitor Lizard with Bellelista and kept its Companion Core going with this patch. Once again, the need to Haste as much and as early as possible makes First Aiden a great item to have alongside the mandatory two.
Great Support Items
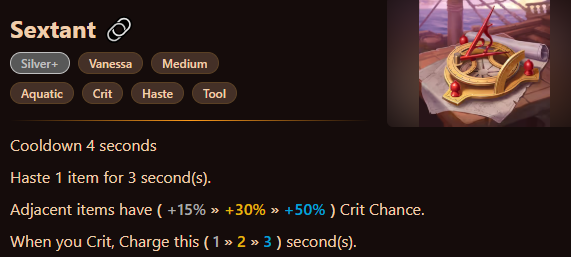
Once you find Bellelista, your goal is basically to Haste as much as you can to grow its power. To that end, you are looking for the fastest Friends possible to charge your Core and get that loop going.
Bomb Squad
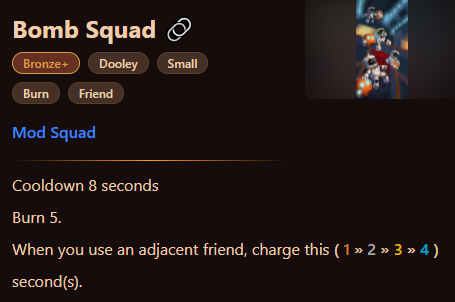
Next to the Core and another fast Friend, this should trigger nearly constantly.
Race Carl
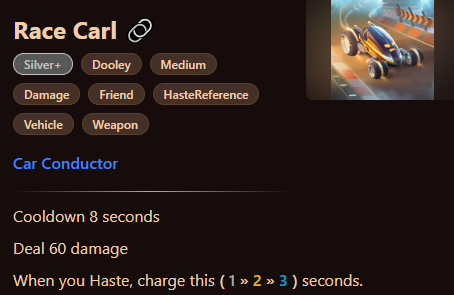
This should trigger constantly, which charges up your Core.
Miss Isles
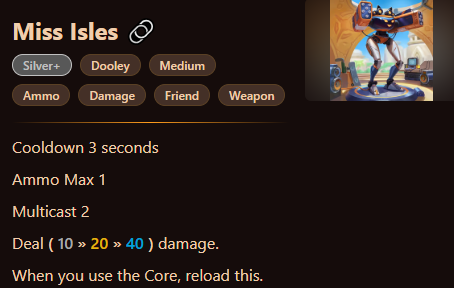
One and a half second for two triggers is pretty damn fast.
Metronome
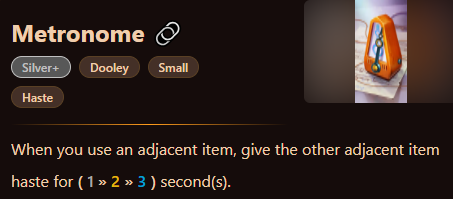
This is not a Friend, but it is able to grant constant Haste if it's adjacent to the right items.
Brick Buddy
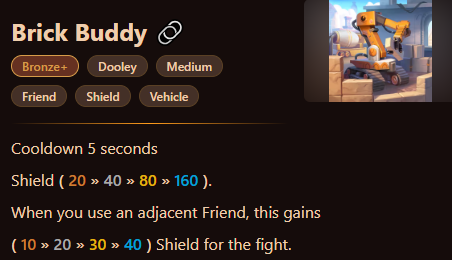
Brick Buddy is a great way to buy some time if your build isn't fast enough, but it's typically not required if you get all the items you want.
Clawrence

This is a much worse Bellelista, but things can't always be perfect.
Pygmalien's Charge Fortward! - 7 / 10
Raw Power: 9 / 10 ⭐⭐⭐⭐⭐⭐⭐⭐⭐
This build goes in all kinds of directions, which makes it a great all-around option. However, it is often better to maximize one source of damage—especially against builds you don't have a counter skill or item for.
Reliability: 7 / 10 ⭐⭐⭐⭐⭐⭐⭐
While the early items aren't that difficult to find, Fort is a bit more elusive, and it needs to be upgraded to Diamond to really be a problem for your opponent. Plus, you not only need to find your Charge items, you also need a way to scale their power and upgrade them to improve their Charge capacity.
Flexibility: 5 / 10 ⭐⭐⭐⭐⭐
Because the weapon build is vastly different from this one, it is difficult to make a clean switch if you don't find your items in time, in addition to requiring a large stack of gold to even consider it.
Key Items
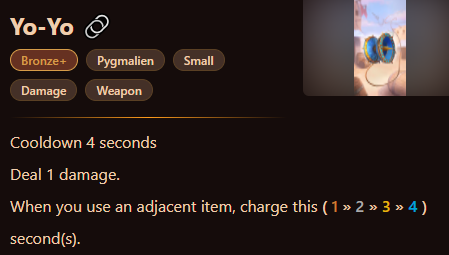

Early on, you basically want to find these three items and figure out a way to scale either your Matchbox or your Yo-Yo.
Great Support Items
Fort
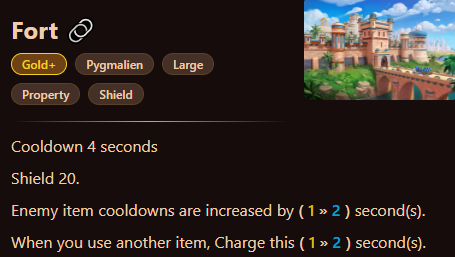
For will make your build go from solid to fantastic, and it will give you an edge against other Charge builds.
Weights
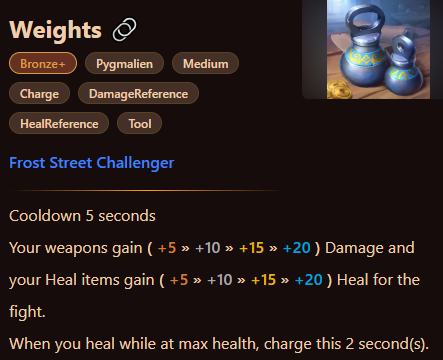
Unless you find a skill to scale your Yo-Yo, Weights are a solid way to accomplish the same goal. It also synergizes with your Heal items.
Bushel

A solid Charge item, especially if you have Weights to double up on your charging.
Vineyard

Vineyard is easier to Charge than Bushel, but it requires more space and can't be offered as a starting item.
Landscraper
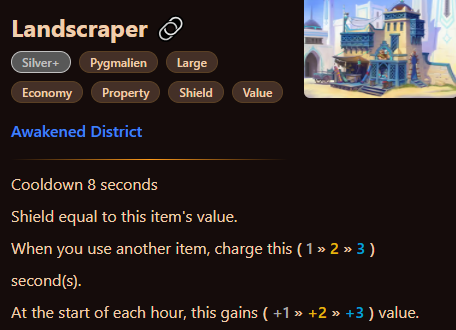
This has good synergy with Bushel, but it's basically a worse Fort since you only get the Shield and not the cooldown increase.
Ice Cream Truck
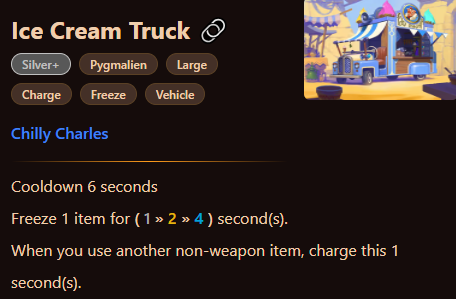
Ice Cream Truck is a great disruptive item if you can Charge it fast enough. When paired with certain Freeze skills, it can be a fantastic support item to scale your other items, too.
Tier 2
Vanessa's Charge and Shield - 6.67 / 10
Raw Power: 8 / 10 ⭐⭐⭐⭐⭐⭐⭐⭐
At full force, this build is fairly close to the Monitor Lizard build from Dooley in the previous patch. The main difference is that every character has a Charge build available now, so this isn't as dominant as that other Poison build was. Also, the amount of Shield created can shut down almost any Weapon based build (except for Bellelista).
Reliability: 8 / 10 ⭐⭐⭐⭐⭐⭐⭐⭐
Most Vanessa items are Small or Medium and Aquatic, which makes this a fairly simple build to target. Plus, the majority of them start at the bronze rarity, so you don't have to wait to start looking for them. I feel like this is a build you can force and will get more often than not.
Flexibility: 4 / 10 ⭐⭐⭐⭐
If you don't get Pufferfish and enough Shield items, or if you can't upgrade them enough, there really isn't any plan B that will you get much results.
Key Items
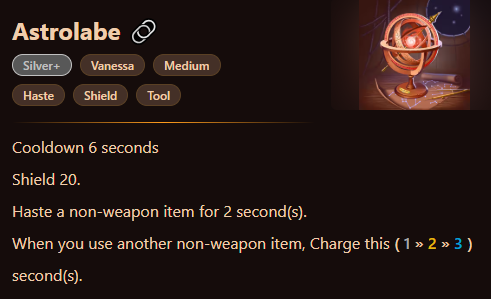
The need to find more items than the other characters to make this Charge build work is the reason I put Vanessa a tier lower. You might get away with just Pufferfish and Astrolabe, but the Shield is typically required to stay alive against Dooley's Damage or Burn builds and Pygmalien's Yo-Yo and Matchbox duo.
Great Support Items
Seaweed
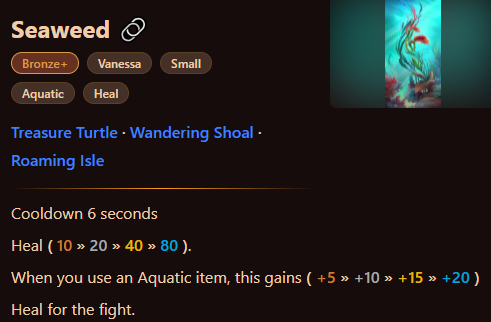
Healing can help against other Poison builds, but Shield is often enough. Plus, this is quite slow so the only upside is being Aquatic.
Jellyfish
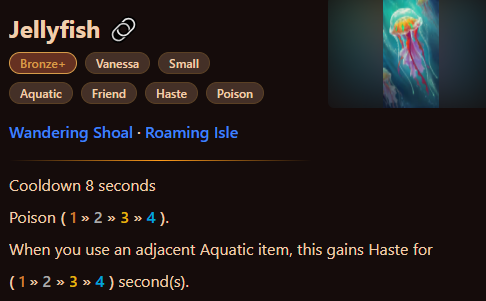
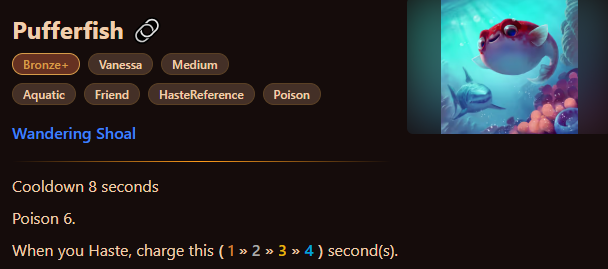
This should gain Haste constantly to charge Pufferfish.
Beach Ball
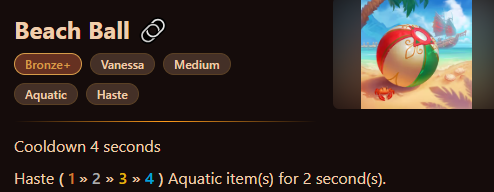
This provides lots of Haste, but it typically only stays in your build long term if it's enchanted.
Barrel
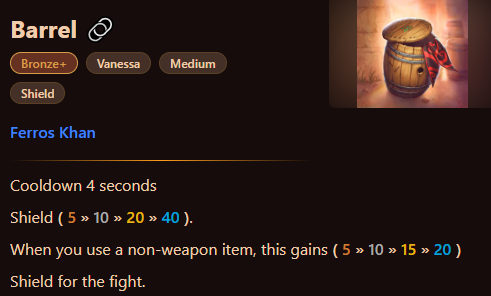
Barrel provides tons of Shield, but it doesn't charge and isn't Aquatic. This is really only for blocking Weapon or Burn builds.
Waterwheel
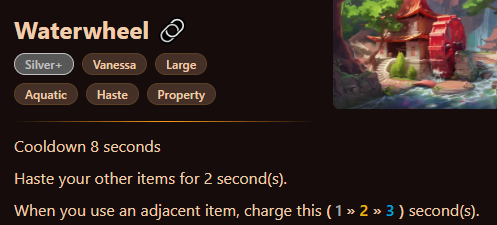
This is a great Haste item, but it takes a lot of space on your board, which blocs you if you find all your key items.
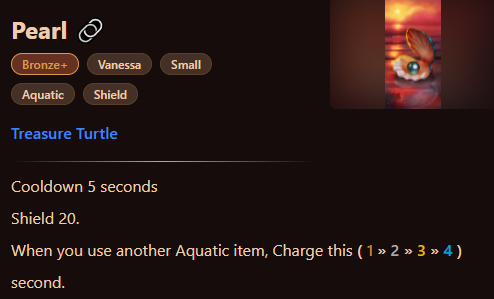
Fishing Rod
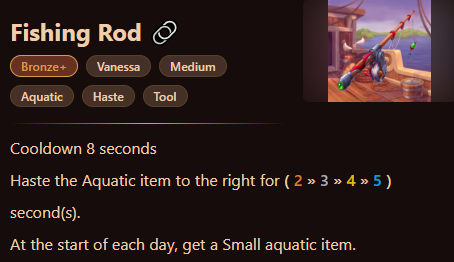
This is a great item to keep in your stash to generate more Pearls.
Iceberg
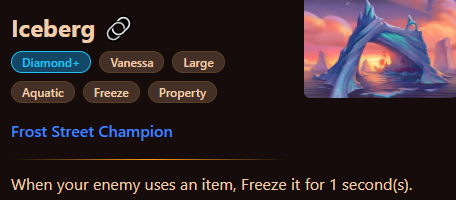
In this Charge heavy meta, Iceberg can be a great disruption tool to complete your build.
Dooley's Ignition Core - 6.33 / 10
Raw Power: 6 / 10 ⭐⭐⭐⭐⭐⭐
While this build can deal an absurd amount of Burn, the top builds all generate some Shield, which limits the impact of your Burn. Plus, Stout Fire is a very annoying skill to go against; it can single-handedly cause you to lose some PvP battles.
Reliability: 7 / 10 ⭐⭐⭐⭐⭐⭐⭐
Apart from the Omega Ray—which remains the most important item even after its nerf—the Ignition Core can be charged with various items. It may even be faster than in the previous meta.
Flexibility: 6 / 10 ⭐⭐⭐⭐⭐⭐
There are enough Burn items to always find a way to get a decent build. You can either use your Core as the Burn dealer or boost your other items. You are forced to rely on Burn damage, though, which isn't the best way to win PvP fights at the moment.
Key Items
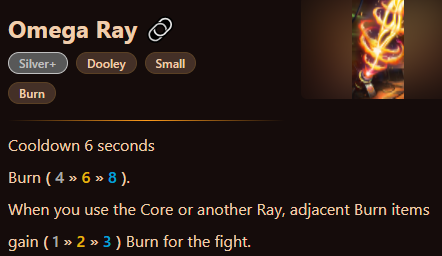
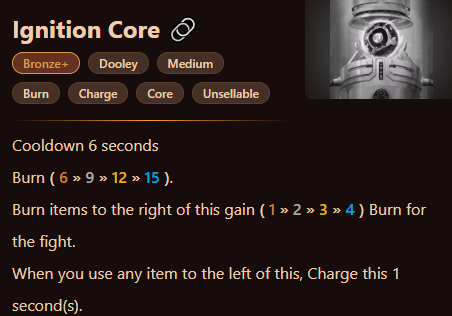
The core of this built hasn't changed, but the Omega Ray is now limited to only adjacent items. This does open up your possibilities when it comes to support items because you can build your damage output with just one more Burn item.
Great Support Items
Bomb Squad + Micro Dave + First Aiden
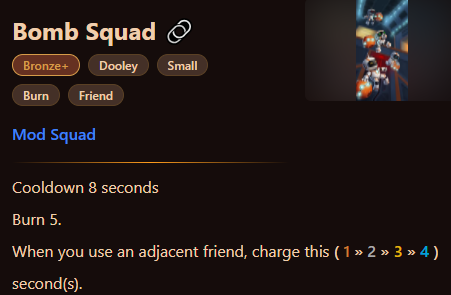
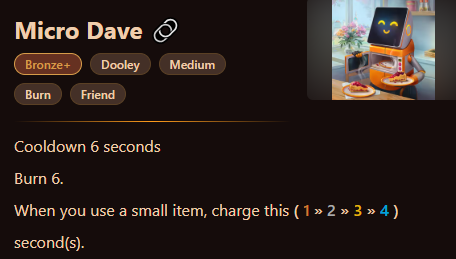
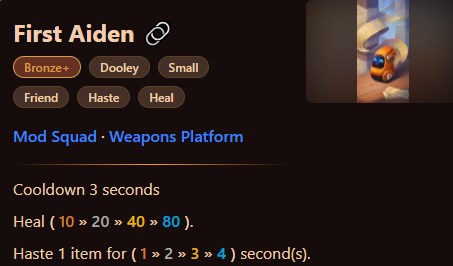
This trio of friends works very well together. You can maximize the Charge abilities of both Bomb Squad and Micro Dave, and First Aiden is just an overall great item.
Pierre Conditioner
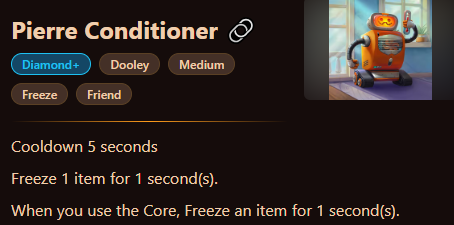
Pierre Conditioner provides solid disruption to slow down all the Charge builds, which is usually enough to let you grow your Burn damage for the win.
Chronobarrier
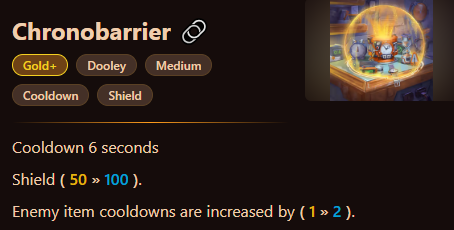
This is another form of disruption, but you're basically only running this for the increased cooldowns.
Cool LEDs
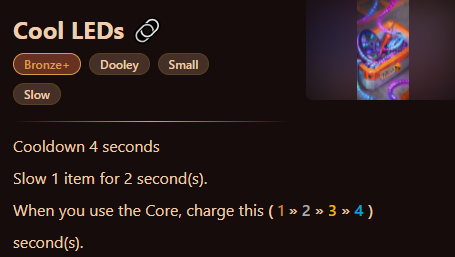
Using your Core charges Cool LEDs, which then charges your Core. This also allows you to play other items in your build, such as Fiber Optics and Hammlet.
Solar Farm
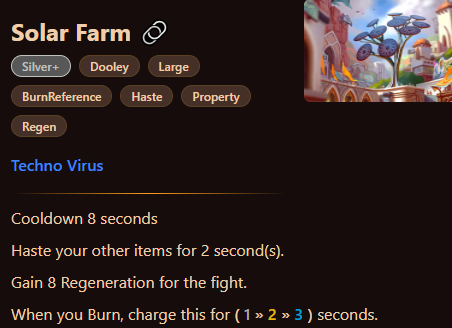
Solar Farm increases your overall speed and resiliency, but it requires a very fast build to surround it.
Chris Army Knife + Soldering Gun
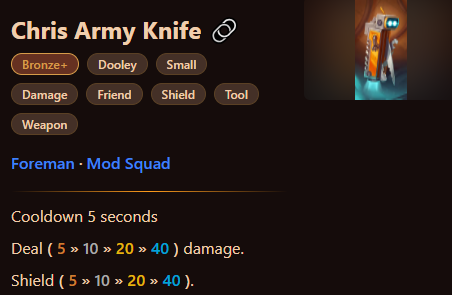
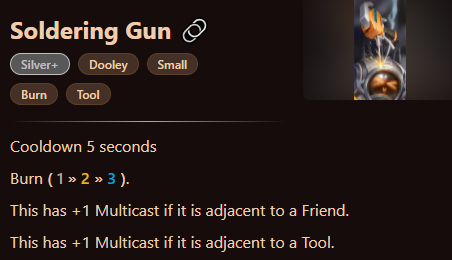
Invest all your cooldown reductions in Soldering Gun, use Chris Army Knife to satisfy both conditions at once for +2 Multicast, and then boost its Burn with Omega Ray for huge damage.
Tier 3
Pygmalien's Medium Weapons 5.33 / 10
Raw Power: 6 / 10 ⭐⭐⭐⭐⭐⭐
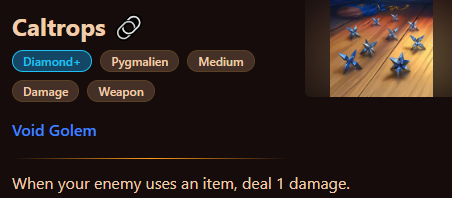
Caltrops is basically the only reason this build can compete with the current top tier builds. Otherwise, this build really needs to find the right skills or the damage output won't ever be enough to break through the Shield that the Charge builds are able to create.
Reliability: 6 / 10 ⭐⭐⭐⭐⭐⭐
You will typically pick this build because your starting item pushed you in that direction and the key Charge items didn't show up early on. If you focus your encounters around skills and Medium items, you should find enough to make it work. Plus, a good early skill or Multicast item can carry you through the first few PvP battles and at least secure 4 wins.
Flexibility: 4 / 10 ⭐⭐⭐⭐
Apart from when Regal Blade is your starting item (and it was boosted enough to be surrounded with Shield and Healing items), there is no coming back. Indeed, Trashtown Mayor is now a Day 5 elite, which means it is often too late to go for a switch if the Augmented Weaponry skill doesn't drop. From there, you have to force something to make Atlatl fast enough or find another way of scaling your damage output.
Important Items & Skills

Vanessa's Mono Weapon - 4.66 / 10
Raw Power: 6 / 10 ⭐⭐⭐⭐⭐⭐
Just like Pygmalien's Medium Weapons, the grade for this build isn't a jab at its ability to produce damage. Rather, it is a reflection of how difficult it is to pierce through the thousands of points of Shield from the Vanessa and Pygmalien Charge builds since that limits how effective weapon based strategies can be.
Reliability: 6 / 10 ⭐⭐⭐⭐⭐⭐
Silencer is the most important item, and you will typically go for this build when it is your starting item since you won't have to find it. However, I can't give this build a great reliability grade due to the need to upgrade most of your items in order to keep up with the other builds. This is often very difficult, and it might require you to sacrifice picking a skill from a level up reward.
Flexibility: 2 / 10 ⭐⭐
The other competitive Vanessa build is based on completely different items, so once you go for this one there is usually no coming back.
Important Items & Skills


AND / OR
AND / OR
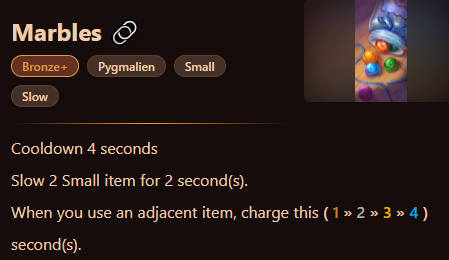
Vanessa's Slow - 4.33 / 10
Raw Power: 7 / 10 ⭐⭐⭐⭐⭐⭐⭐
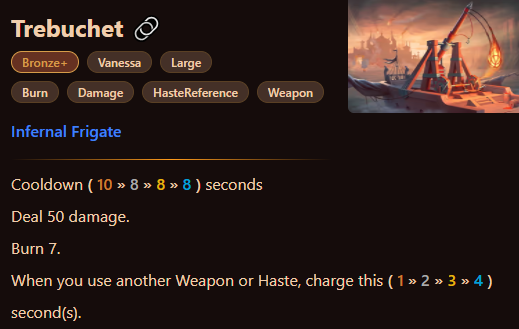
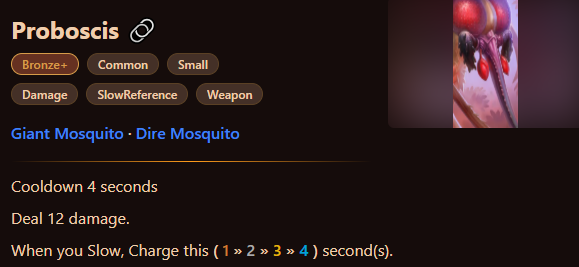
In a meta where all characters are looking to Charge their items and build infinite loops of constant triggers, Electric Eels is the fastest of them all. Unfortunately, the item alone is far from enough to take you to 10 wins. You will also need some scaling capacity and the ability to stay alive while that scaling happens. Power isn't the problem (hence the solid grade), but that's the only thing this build has going for it.
Reliability: 3 / 10 ⭐⭐⭐
Finding both Electric Eels and Trebuchet isn't that difficult, but getting them both upgraded enough for them to carry your run is a different story. Plus, you also need to find some way to scale their power. This build can at least rely on Proboscis as well to synergize with Electric Eels, but, once again, you will need to find a way to get that damage up.
Flexibility: 3 / 10 ⭐⭐⭐
Apart from the scaling skills, this build has nothing in common with the One Weapon Build and is as far from the Charge & Shield one as possible. You would typically pick this route when you find Trebuchet early and Electric Eels quickly after, or if you had to go for the monsters that drop those items to salvage your run.
Important Items

Closing Words
That's it for our second Tier List for The Bazaar! This pretty much covers the entire meta for patch 0.1.4 (also called "The Charge Patch"). I hope it helped a few players out there to get a better feeling of the current environment and maybe some ideas for their next run. I would love to say The Bazaar is a game that rewards flexibility first, but the current meta kind of rewards your ability to find Charge items a bit more at the moment.
I'm not sure when the next update will be, but I trust Tempo will monitor the game and keep trying to improve this promising game. If anyone needs to get in touch, feel free to reach out through discord @den_ccg.
Also, a massive shootout to Meomix for their awesome website (www.howbazaar.gg)! It is a great source of information about all the items, skills, and monsters in the game. The images used in this report come from there.
Good Game Everyone.