Table of Contents
- Key Points
- Damage Thresholds
- Skill Rundown
- Turn 2 — Unleashed Resentment
- Turn 4 — Breaking Sky Flame Tiger Roar
- Turn 6 — Right Flame Demon’s Halberd
- Turn 8 — Left Flame Demon’s Halberd
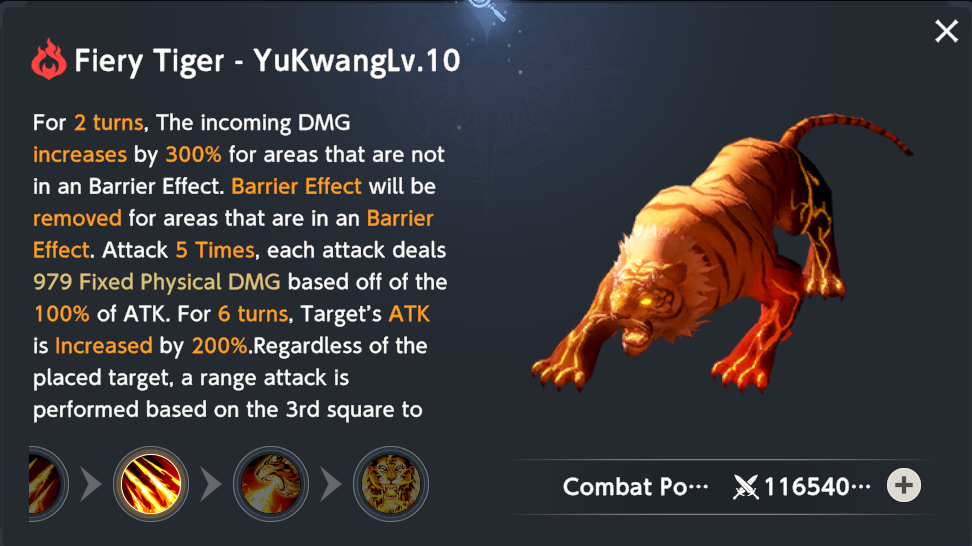
- Turn 10 — Breaking Sky Flame Tiger Roar
- Turn 12 — True Annihilation Flame Rain
- Total Damage Taken (DPS Units)
- Team Building — Survivability
- Team Building — DPS Selection
- Closing Remarks
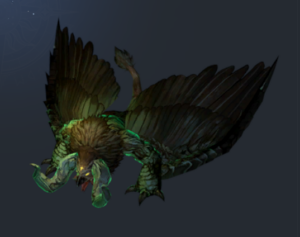
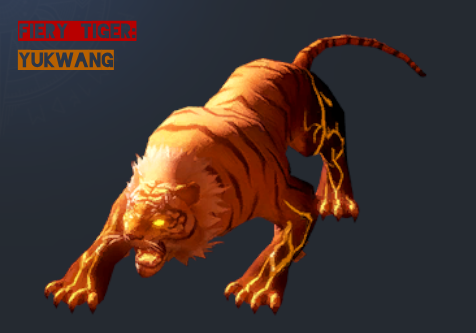
The season of water upon us, and with it, a brand new fiend to hunt! Located within the Terrorfiend Realm in Character Pack 6: Tale of Sword, this fiery beast will be bombarding your party with true physical damage every turn. Unlike the previous fiends, however, battles against the YuKwang will last for 12 turns, and not the usual 10. The Hunt for the Fiery Tiger will begin on December 13, so prepare accordingly!
Key Points
- YuKwang deals 50% more damage and takes 25% less damage against wind. He also has 0 resistances, so rejoice! We won’t be needing to shred in this fight.
- This fiend deals exclusively true damage. This means you should stock up on HP gear on all your units. Healing and Energy Guards will be incredibly helpful!
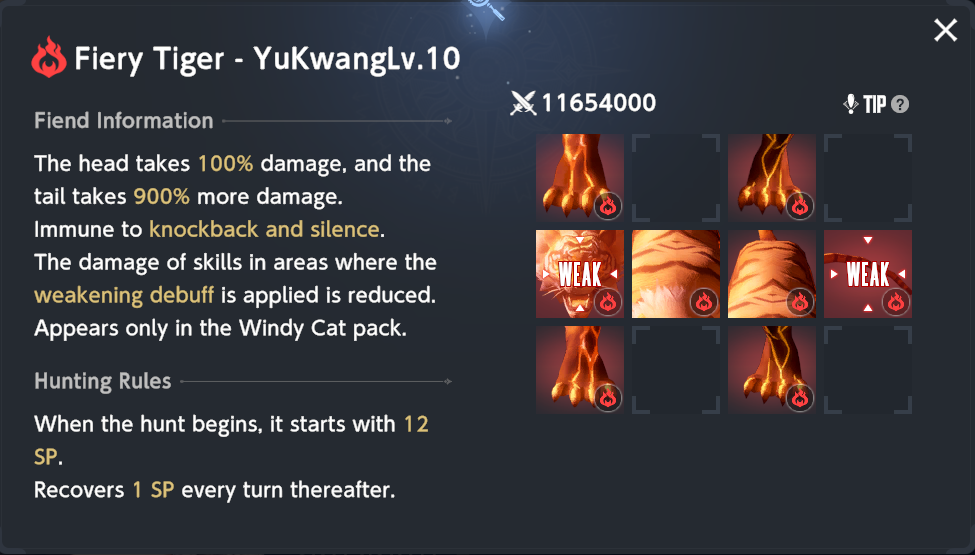
- The tiger’s head takes double damage, while its tail takes *ten times* the damage. Targeting its rear will be incredibly effective.
- YuKwang’s damage reduction barriers on turns 2 and 6 cannot be dispelled. You can only remove them through multihits. Chain starter units will be very useful!
- The nuke turns in this hunt are on turns 5, 9, and 11. Make sure to break the barrier effects on turns 3 and 7 to amplify your damage on turns 5 and 9. If you’re running Sylvia, turns 4 and 9 are nuke turns as well.
- Given that this Hunt lasts for 12 turns, turn 11 may be under the effects of death timer! This could be a helpful boost to your damage output.
- SP is tight this Fiend Hunt (12 initial SP, 1 SP gain per turn). We will definitely want a battery on the team.
Damage Thresholds
For the uninitiated, we will have 7 days to hunt the fiend. Each day we can fight the fiend any number of times. If we can beat the YuKwang on a given day, we can immediately challenge the next level. If not, then at the end of the day, our best run is saved, and we fight the fiend with that much damage taken on the next day. Thus, we can convert the Tiger’s HP values to Damage Thresholds, which tells us how much damage we need to be able to deal in a single run to clear a certain level by day 7:
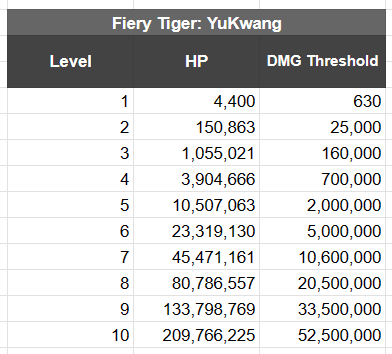
The damage thresholds are *way* higher compared to previous hunts. Not to worry, however, for there are plenty of damage increasing mechanics in this hunt. So make sure to take advantage of them!
Skill Rundown
YuKwang deals true physical damage every turn. You can naturally mitigate this through the fire resistance of water units, but you’ll definitely appreciate units with heals, energy guards, or ATK debuffs. The fiend deals 50% more damage against wind units, and 50% less damage against water units.
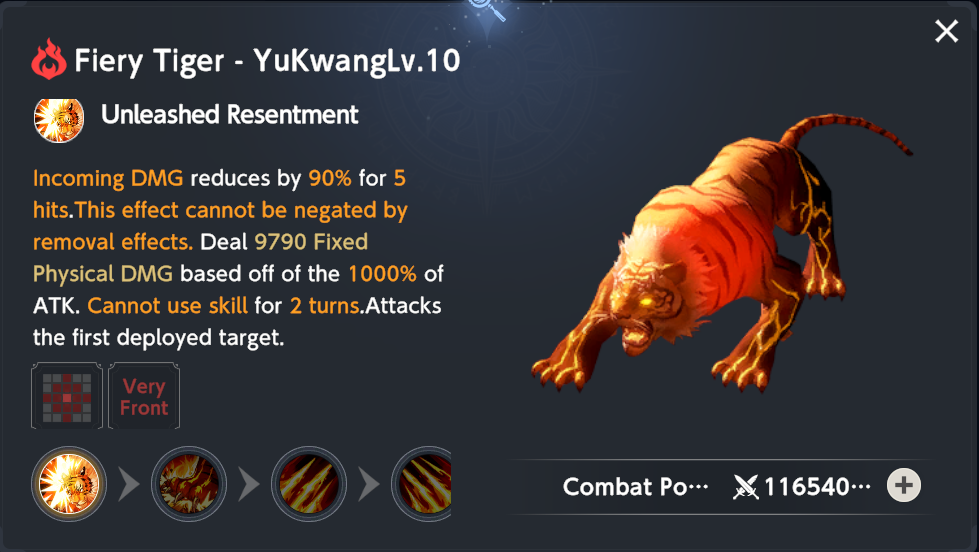

Turn 2 — Unleashed Resentment
Let’s start with the damage part. YuKwang simply deals true damage on turn 2, silencing all units hit. He targets the first deployed target, as in, the unit who acts first on turn 1. Designate a unit who will take this first hit and silence, positioning them on a corner to prevent others from getting hit.
The tiger also gives itself a damage reducing barrier that cannot be removed by dispel effects. The only way to remove it is by hitting it 5 times. Keep in mind that this barrier is applied on each of its tiles separately, so you will want to use a multihit AoE skill for this.
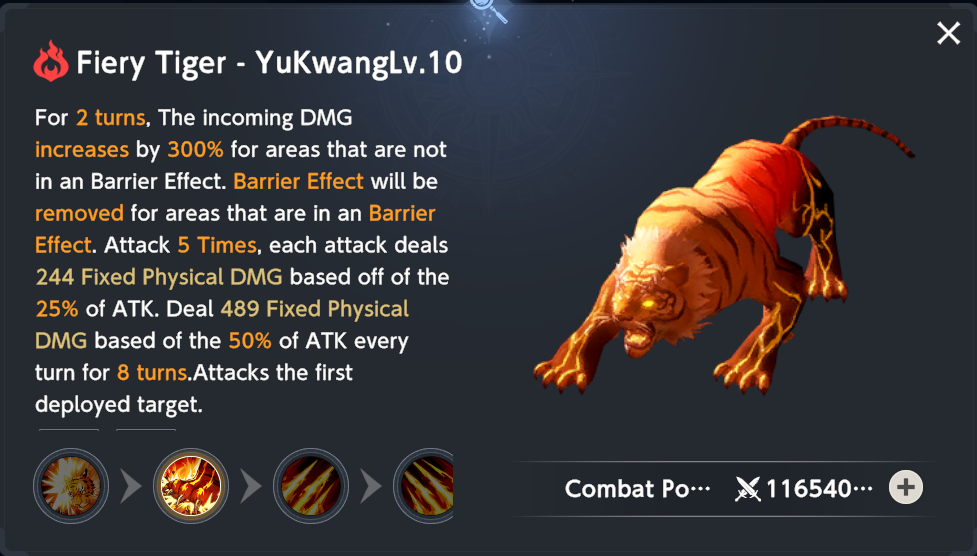
Turn 4 — Breaking Sky Flame Tiger Roar
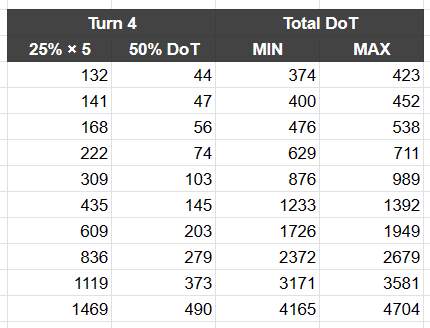
The Fiery Tiger draws breath onto your entire team dealing true damage and applying a DoT. The initial hits are a slap on the wrist, but the DoTs will definitely add up over time. You can mitigate the damage through healing or energy guards, or if you’re really out of options, you can slot in Lisianne to counter this mechanic (not recommended).
Note that I’ve listed down two total DoT values. This is because the total damage depends on the number of chains afflicted onto your units throughout those 8 turns (min 5 chains and max 16 chains).
Moreover, the Tiger gives 300% vulnerability to tiles without the damage reduction it received on turn 2. In other words, it gets vulnerability on tiles that were hit 5 times on turn 3.
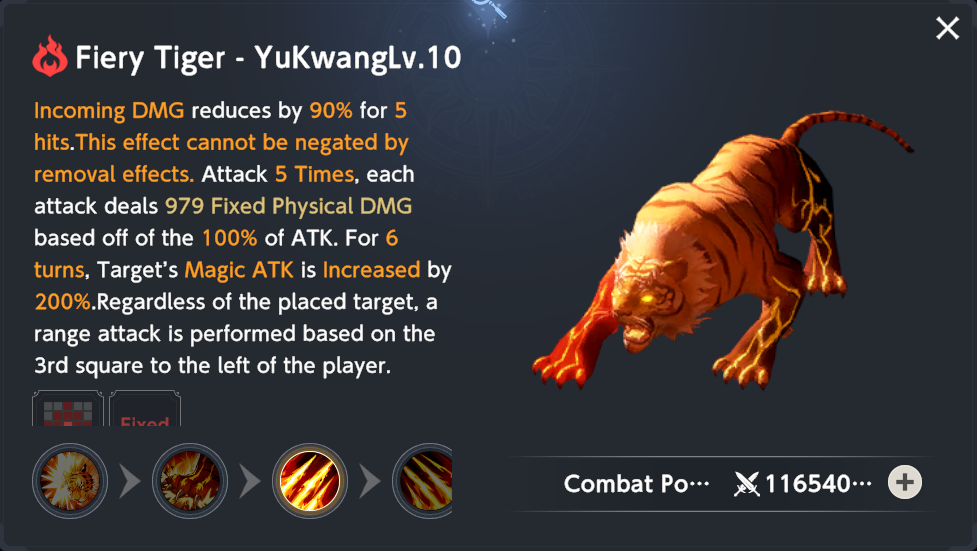


Turn 6 — Right Flame Demon’s Halberd
The Tiger does the same thing it did in turn 2: giving itself a 5 hit damage reduction, then dealing true damage. This attack however has a fixed range; it will always attack the same tiles (see above). Additionally, any targets it hits will be granted a 200% Magic ATK boost, so you will want your magic DPS to actually take this hit.
Make sure to remove the damage reduction on turn 7 to have tons of damage on turn 9.


Turn 8 — Left Flame Demon’s Halberd
The Tiger mirrors the attack it did on turn 6, granting hit units a 200% ATK boost. Have your physical DPS take this hit for tons of damage.
Just like in turn 4, the Tiger also gives itself vulnerability on tiles without damage reduction.

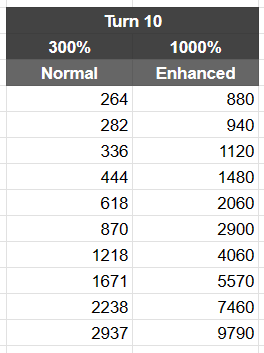
Turn 10 — Breaking Sky Flame Tiger Roar
If you thought you basically got a free buff from turns 6 and 8, think again—the fiend deals true damage to all of your units, dealing significantly more damage to units it buffed on turns 6 and 8. This is the final hurdle to maximize our damage on turn 11. Water DPSs will find it much more manageable to survive since they take half damage.
The fiend also gives itself 300% vulnerability—no strings attached this time!
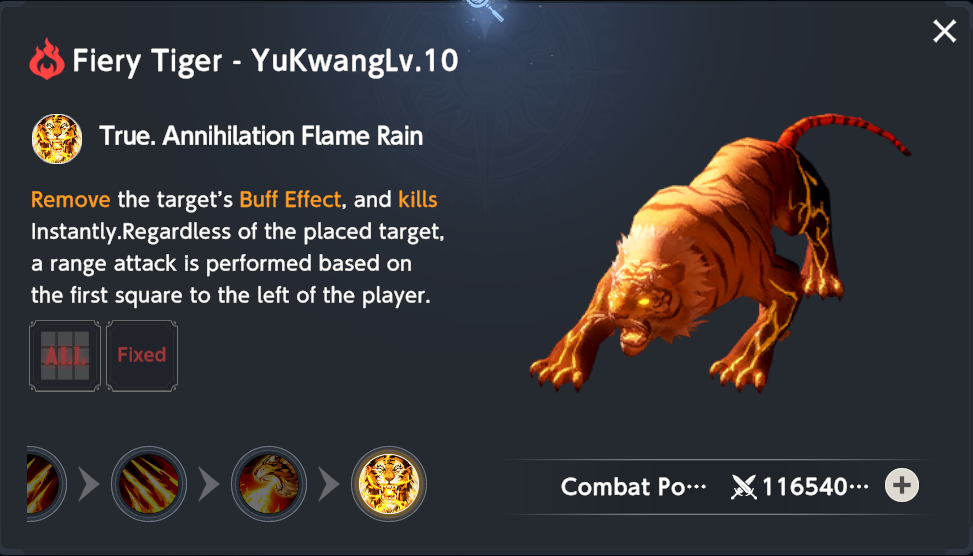
Turn 12 — True Annihilation Flame Rain
YuKwang wipes the entire party, ending the battle. Keep in mind that since we get to have a turn 11, our units get buffed by the death timer (an additive 100% M/ATK buff), so make the most out of these amplifiers before the end of the fight.
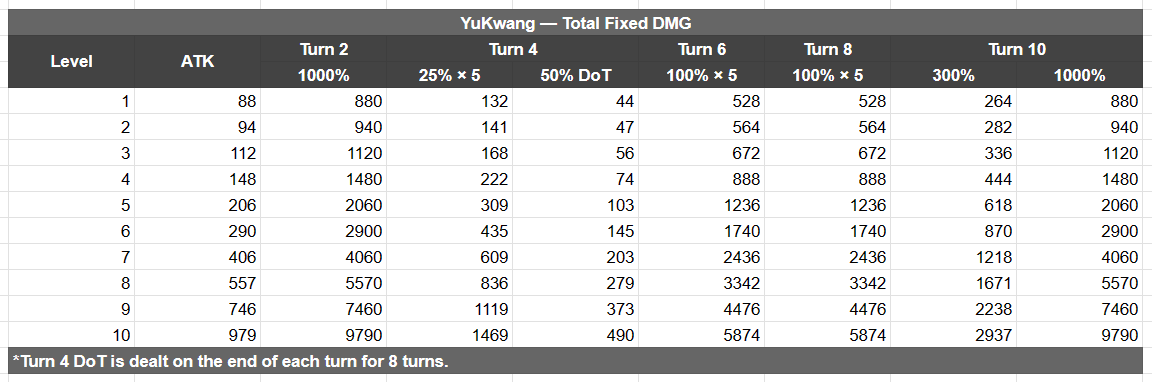
Total Damage Taken (DPS Units)
Since we want our DPS to take either the turn 6 or turn 8 hit (and take the enhanced turn 10 hit), we will be in for a world of hurt. Here is the total DMG taken by a DPS getting hit on turns 4, 6/8, and 10 (enhanced):
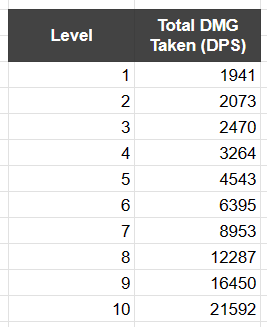
We will definitely want some form of mitigation to protect our DPS.
Team Building — Survivability
Given the relentless barrage of true damage coming our way, we will definitely be needing a defensive support. The candidates won’t be much of a surprise:


Helena
B-Rank Idol Helena can outheal the damage done by the fiend, although she requires that your units don’t get one shot in the first place. In exchange, she provides a higher damage ceiling for magic teams, and is SP neutral with Base Helena (SP positive at +3 Base)
Rou
Red Riding Hood Rou can mitigate most if not all of the damage taken by your DPS with two skill casts if you build 10k HP on her. Her crit buff is also very helpful.
Celia
Celia not only significantly reduces the fiend’s ATK stat, she also provides multi hit skills that disable the T2 and T6 barriers on the fiend. She’s pretty expensive to use, however.
Team Building — DPS Selection
There actually are a lot of DPS options for this Fiend Hunt, so I will first list them down then discuss each of them in detail.


Schera
Most likely the best DPS option, capable of nuking the Tiger on Turn 11 if you have all the pieces for her setup. She will require Zenith/Rigenette to get tail access, Neon Liatris or Code A Rafina for chains, and Diana to double her damage. The fifth slot will go to either Helena or Rou for defensive utility.
Cynthia
F2P alternative to Schera, focusing on a T11 nuke as well. Refer to the comp above, replacing Schera with Cynthia.
Sylvia
Sylvia doesn’t get tail access, but she is able to take advantage of multiple nuke turns if you have her costumes. With Sword Queen and Base, she can nuke on both T4 and T8, and with Admiral, she can do an additional nuke on T11. Using Sylvia may be finicky, given the 9 turn cooldown on Admiral, which makes you want to save it for T11 (Turn 1 Base, Turn 3 Sword Queen, Turn 7 Base).
Potential team comp: Sylvia Homunculus Lathel, Diana, (Celia or Liatris), (Helena or Rou)
Liatris
Liatris can be a dedicated DPS since Neon Stalker has tail access, but her main role is chain support, in order to break the barrier effects of the Tiger. She can be used in tandem with another DPS, provided you already have enough defensive utility.
Dalvi
Slightly cope since she’s wind, but Dalvi can use her skill thrice in a row, so she can activate it on turn 7 after receiving the MATK buff on turn 6, then use it again on turns 9 and 11. The energy guard she generates per turn is amplified by the MATK buff, allowing her to survive the other attacks despite being wind. Biggest downside to Dalvi however is that she cannot get to the tail.
Nartas
Nartas has natural tail access, allowing you to forgo Zenith. Nartas also gets a whopping 850% multiplier against the Tiger since it is physical. Liatris + Nartas will be a formidable duo due to this, although they won’t have access to elemental advantage and Diana.
Rafina
Code A Rafina has natural tail access, and also gets elemental advantage. She is reasonably tanky, so the defensive requirements for her is significantly lower. The trade off however is that she has much less damage than Schera, and only Code A can reach the tail. If you somehow have a lot of dupes on Code A, you can give it a try. You can also use her as a chain starter for the tail on a Schera/Cynthia comp over Liatris.
Potential team comp: Rafina, Diana, Homunculus Lathel, RRH Rou, Liatris
Closing Remarks
Thanks for reading this guide! Happy hunting.