Table of Contents
Yuri, Granhildr, Ventana. All of the banners leading up to this upcoming Fiend Hunt are light units, and they’re about to shine a searing light against this fiend. The Gridlin applies heavy magic DoTs, while also debuting a new damage type — Pure Damage. Read on to prepare for the Hunt on the 7th of February (UTC).
Key Points
- Build as much MRES as you can to survive the fiend’s DoTs, while also using mitigation from heals or MATK debuffs to survive its pure damage attacks.
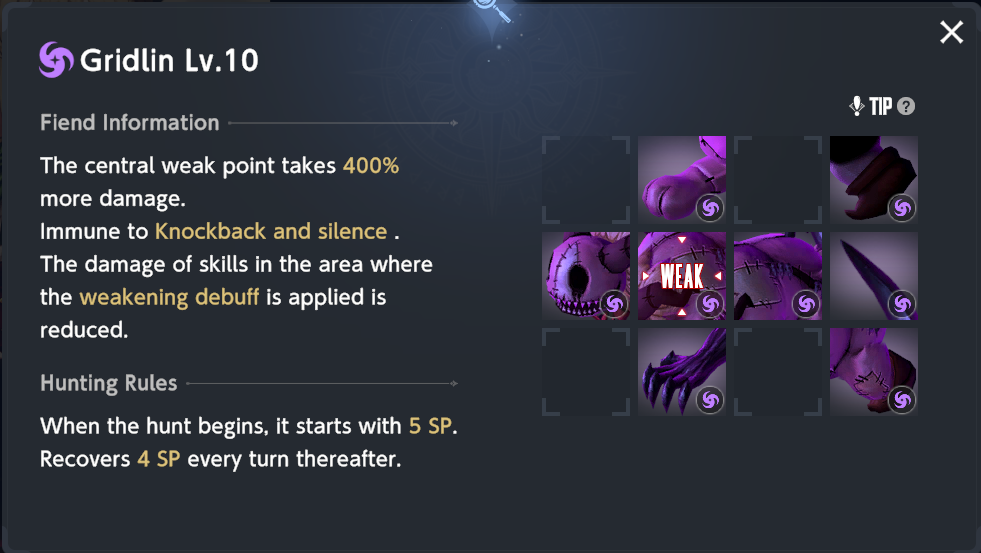
- The Gridlin does NOT deal bonus damage to light units. Praise the sun!
- The Gridlin has 0 MRES, but has 50 DEF. My guess is that this narrows the gap between Yuri and Ventana’s damage output to Angelica’s, since HP based damage is easily outscaled.
- 5 Initial SP, 4 SP gain per turn. We won’t be needing a battery for this Hunt (sorry Layla).
- Key turn is turn 9! The Gridlin gives itself massive vulnerability right before this turn.
Damage Thresholds
For the uninitiated, we will have 7 days to hunt the fiend. Each day we can fight the fiend any number of times. If we can beat the Gridlin on a given day, we can immediately challenge the next level. If not, then at the end of the day, our best run is saved, and we fight the fiend with that much damage taken on the next day. Thus, we can convert the Gridlin’s HP values to Damage Thresholds, which tells us how much damage we need to be able to deal in a single run to clear a certain level by day 7:

These are the highest thresholds to date— a bit higher than the Fiery. But that’s okay, since the boss rewards backloading your damage output.
Pure Damage
As mentioned in the outset of this guide, the Gridlin deals pure damage. Here’s a quick rundown on how it works:
- Pure damage works like Fixed damage, in that it ignores DEF, MRES, and damage reduction.
- Pure damage can CRIT! (Doesn’t matter in this Fiend Hunt, however)
- Pure damage also ignores energy guards. Anti-Dystopia Diana is crying in a corner.
It’s a scary mechanic that I hope never makes it to a playable character.
Skill Rundown
The English translations for this fiend’s skills are incomplete (and in one case, outright wrong), so I will refer to the skill descriptions as laid out in Korean. Shout out to 현우 for helping me out with the translations!
Turn 2 — Rampage Blow
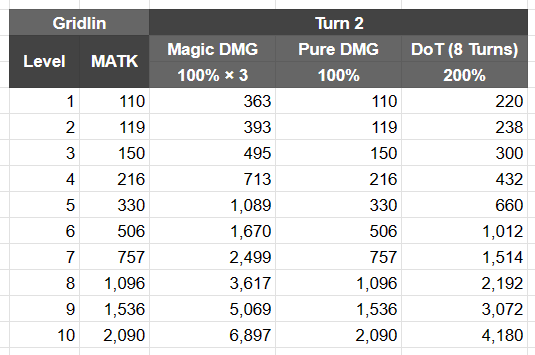


The Gridlin deals a heavy blow to the front three rows (based on the KR description). It also deals pure damage to any physical unit caught in its attack, although this damage is a bit of a joke. It then applies a 200% DoT that persists for the rest of the battle.
Turn 4 — Death☆Punch


The Gridlin targets the back left corner (based on the KR description) and near identical damage to its turn 2 attack, the only difference being that its pure damage only affects magic units, and it hits thrice as hard. Granted, this damage is a bit of a joke until maybe level 9, so an MATK debuff or simply dodging the attack should suffice. You likely won’t want the units who took the turn 2 hit to also take the turn 4 hit, for reasons explained in the next section:
Turn 6 — Creepy Bubble


The Gridlin creates a creepy bubble, which is an energy guard that scales off its MATK (based on the KR description). That multiplier might seem scary, but it is actually the opposite! It’s very fragile since it scales off MATK and not max HP. Furthermore, we don’t actually want to burst this bubble, at least not until turn 9 (explained in the next section).
The Gridlin also gives itself a Crit Rate and Crit DMG buff, which further boosts the DoT damage it deals to your units (see chart for remaining DoT damage). If one of your units got afflicted with both DoTs, they’ll be in for a rough time, so try to make it so that each unit only takes at most one DoT from the fiend.
Turn 8 — Fatal Temptation

The Gridlin gives itself a 300% vulnerability debuff. However, it instead gives itself a 500% vulnerability debuff to tiles that still have an energy guard applied (not sure how the EN translation got this wrong, but it’s 500% in KR). As stated earlier, this energy guard is very fragile, so take your units off Diana’s buff, and use a minimal number of attacks on turn 7.
With both debuffs applied, you can deal 6 times more damage to the fiend on turn 9. This is your opportunity to rack up tons of damage.
Turn 10 — Merry Bad Ending
The Gridlin wipes out the entire party.
Surviving the Gridlin
Simply building MRES gear can trivialize the fiend’s damage. Make sure to position correctly so that your units don’t take multiple DoT debuffs or the pure damage. As usual, healing, MATK debuffs, and energy guards can help against the DoT damage.
Team Building — Slots
- Diana
- DPS
- DPS
- Buffer
- Flex
Diana

The staple in PvE content, Diana at +5 can double the damage your DPS units deal to the Fiend. Unfortunately, the Fiend deals mostly DoT damage, so Anti-Dystopia won’t be super impactful for this fight.
DPS
Ideally you should have two DPS units for this Fiend, since Diana doubles both their damage outputs, and we have a lot of DPS options for this Fiend Hunt:


Angelica is the easiest way to a level 10 clear, given that HP scaling was recently buffed, and the fact that the Gridlin has no MRES. Slap Diana and Celia onto her team and watch her deal tons of damage. She needs her Pool Party costume in order to function in this Fiend Hunt, given that her Fallen costume does not hit the weak spot. If you have Neon Savior, you will also have to be careful not to break the fiend’s bubble with her DoT.
Comeback Idol Yuri has a ton of damage that lines up against the weak spot. However, her Whitebolt costume may be a bit awkward here since she needs to use it on turn 7 to boost her turn 9 nuke, but she ends up dispelling the energy guard on a couple tiles. Since she never hits the weak spot with Whitebolt, the damage loss shouldn’t be that significant, and the attack buff should more than make up for that.
Snow White Ventana also has tons of damage that lines up against the weak spot. We don’t know what Ventana’s costume does yet, so she may improve even further. Consider using Zenith to enable her conditional damage.
Jayden is a F2P option as a 4* magic DPS. However, he is sorely lacking in crit stats and his exclusive gear is unusable for this fight.
Buffer


The usual culprits, B Rank Idol Helena for a magic team (with healing too), and Lathel or Arines for physical teams (Yuri and Ventana). I’ve opted to put Celia in the buffer category this time around for Angelica teams, since chains are the only way besides Diana to buff her damage, and Celia is the best chain stacker in the game.
Flex


Elise or Gray for physical teams can shred the Gridlin’s DEF, unlocking their potential to deal damage. Consider putting another chain stacker or buffer for Angelica or Jayden teams here.
Closing Remarks
Angelica should be able to clear level 10 without a second DPS with enough investment. I predict that physical teams (Yuri, Ventana) should surpass Angelica teams for the top scorers.
This is not exactly a definitive guide to this Fiend Hunt just yet, given that we have no idea what Granhildr and Ventana’s idol costumes will do. Stay tuned for an update to this guide later on!