Introduction
Welcome to our Last Epoch Rogue Build Tier List. The contents of this guide were sourced from Bina's Last Epoch Master Spreadsheet, where he details the builds that have been used and tested. The builds are tested against the following categories: Speed, Corruption, Arena, Tankiness, Single Target, Cycle Start, and Hardcore.
Tier List Explanation
S-Tier:
- What They Are: The best of the best. These builds outshine others in strength, flexibility, and effectiveness in almost every game scenario.
- Why Use Them: Perfect for players who want to excel in the game, tackling the toughest content with ease.
A-Tier:
- What They Are: Really powerful, just a notch below S Tier. Great at certain things, but not as universally adaptable.
- Why Use Them: Great for those who want a potent build that can handle most challenges without needing the absolute best.
B-Tier:
- What They Are: Dependable and effective, B Tier builds are good but lack the edge to push them to the top. They're balanced, offering a mix of damage and survivability but not excelling in any particular aspect.
- Why Use Them: Ideal for players who prefer reliability or are still mastering the game. They're good all-rounders.
C-Tier:
- What They Are: Average builds that can get the job done but might struggle with higher difficulty levels or efficiency. They might have notable weaknesses or require specific setups to shine.
- Why Use Them: Good for experimenting or for players who enjoy a challenge. They might also cater to unique, niche playstyles.
D-Tier:
- What They Are: The least powerful builds that are generally outclassed by other options. They might be fun or interesting but don't expect top-tier performance.
- Why Use Them: Best for casual play, trying something different, or self-imposed challenges. Not recommended for competitive or high-difficulty content.
S Tier
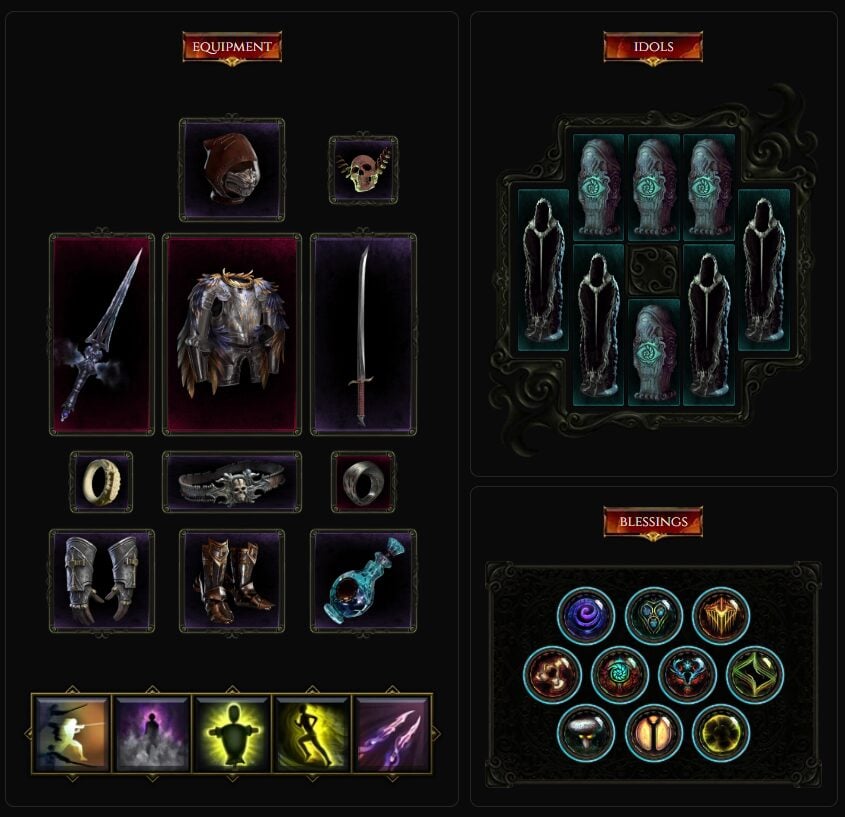
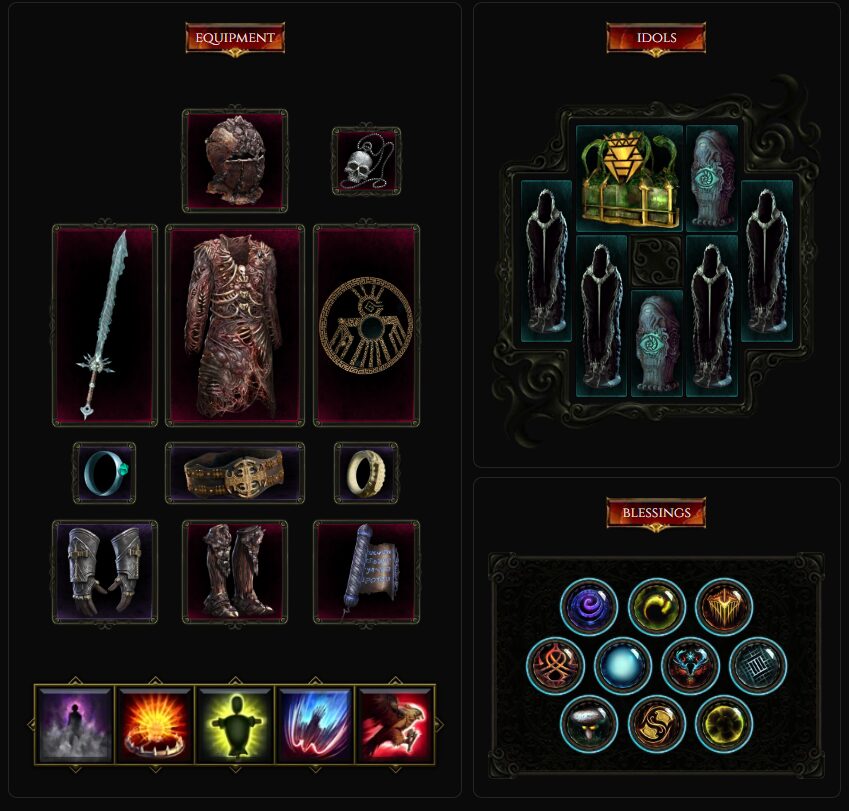
Shadow Daggers Bladedancer
The Shadow Daggers Bladedancer is a symphony of speed and precision, crafted to navigate through the game's challenges with unparalleled agility. This build isn't just fast; it's lightning-fast, clearing content at a pace that sets it apart from the rest.
Core Mechanics:
- Speed as a Virtue: This build takes the adage "speed kills" to heart, ensuring that the faster you move, the more lethal you become. Speed here is not just a means to an end but an integral component of your offensive and defensive arsenal.
- Art of Evasion: Fully immerse yourself in the Bladedancer's ethos, leveraging every aspect of the build to enhance your evasive maneuvers. The Evasion, Asuvon's Pact, Perfection, and Confidence Nodes are not just skills; they're your bread and butter, rewarding you for your agility and your ability to dodge death at every turn.
- Precision Strikes: Get up close and personal with your foes, dispatching them with the precision and efficiency of a master assassin. This build is about making every move and every strike count.
- Decoy and Reposition: Utilize Decoy to not just distract your adversaries but to manipulate the battlefield to your advantage. This skill allows you to cluster your enemies, setting them up for devastating attacks as you reposition to strike with deadly efficiency.
Gear Synergy:
- Build Amplifiers: Take your speed and lethality to the next level with Smoke Weaver, Wings of Argentus, and Siphon of Anguish. These items don't just complement your playstyle; they enhance it, turbocharging your capabilities and ensuring that you're always a step ahead.
- Shift for Survival: In the heat of battle, Shift is your guardian angel, offering a brief respite from the onslaught. Timing this skill perfectly can make you untouchable, turning potential defeat into a strategic retreat or a counterattack.
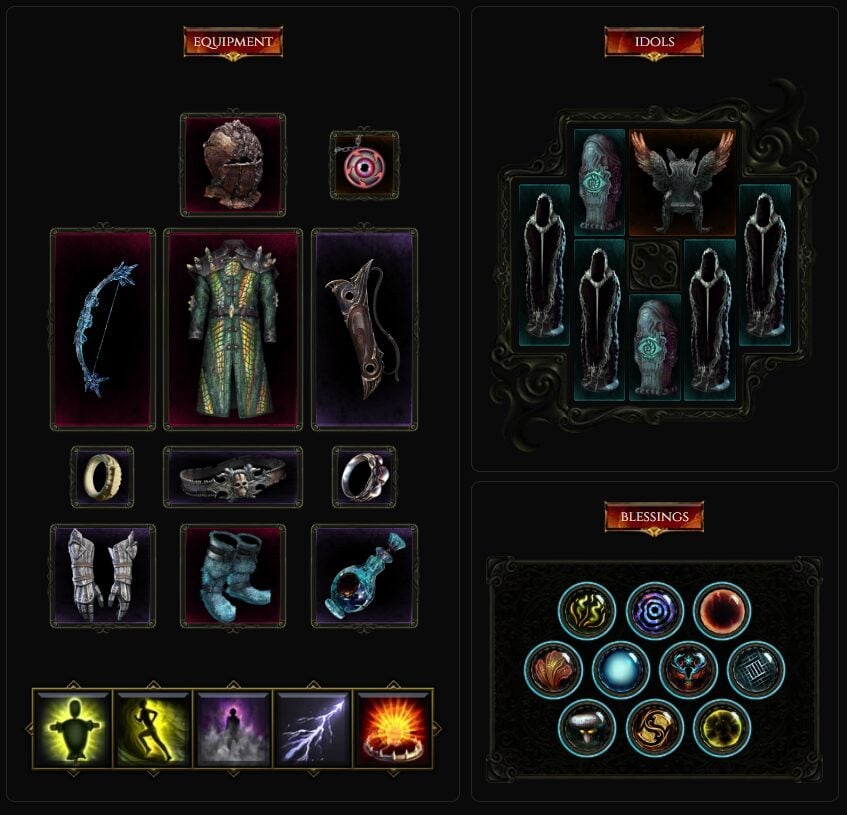
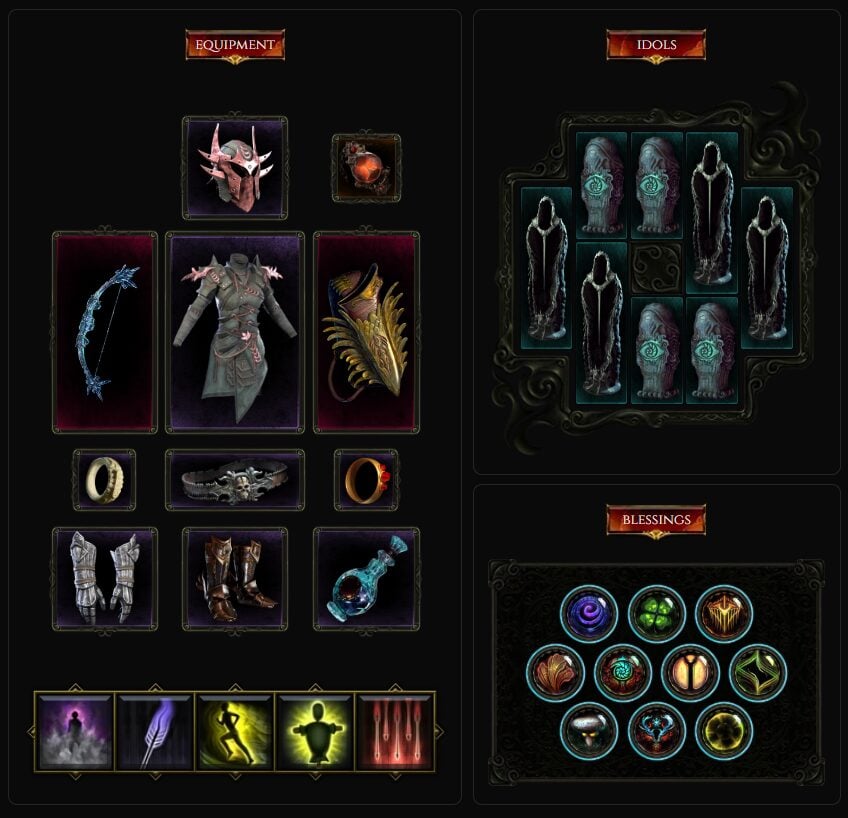
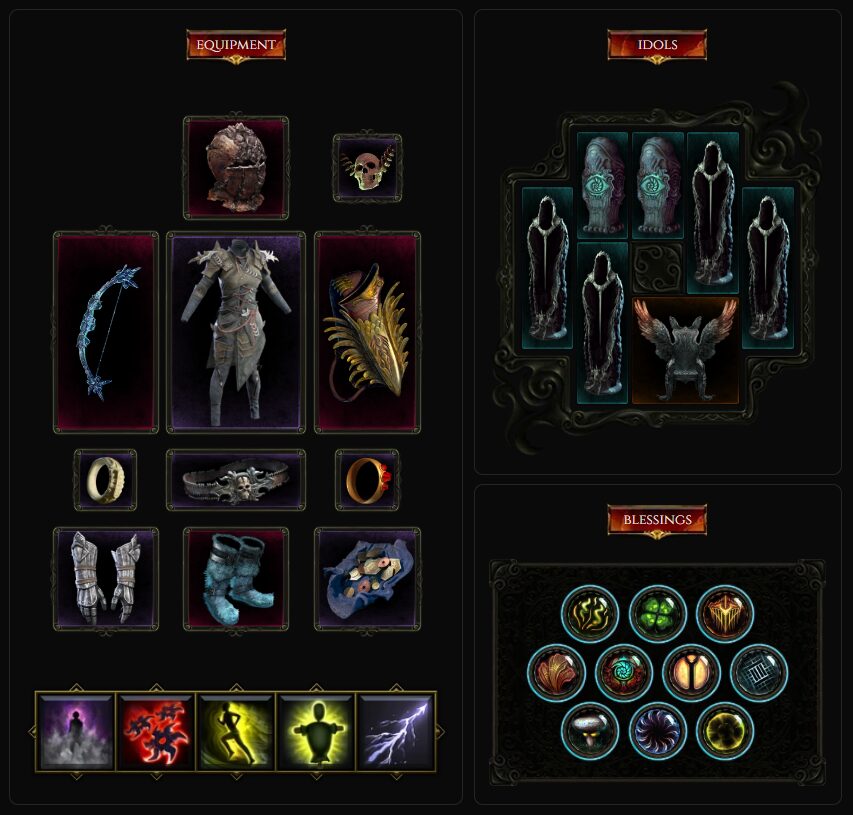
Blast Rain Marksman
Championing skillful gameplay and dynamic combat, the Blast Rain Marksman is a powerhouse capable of overcoming any challenge thrown its way. This build combines the thrill of archery with explosive elemental effects, making every encounter both a strategic battle and a visual masterpiece.
Core Mechanics:
- Explosive Orchestration: At the core of this build lies the synergy between Explosive Trap and Detonating Arrows, creating a cascade of explosions that decimate your foes. This explosive dance is not just about damage; it's about controlling the battlefield with each detonation, setting the stage for a deadly rain of icicles.
- Dexterity & Resistance Balance: The foundation of your power lies in the careful stacking of Dexterity, significantly amplified by Mourningfrost boots. This stat not only boosts your damage but also your agility, allowing you to weave through combat with grace. However, the key to survival is maintaining this delicate balance without compromising your Resistances, ensuring your defense is as strong as your offense.
- Tactical Decoy: Decoy is more than a simple tool for distraction; it's an essential tactic in your arsenal. Use it to manipulate enemy positions, clustering them for maximum impact with your explosive traps, creating the perfect setup for your devastating barrages.
- Optimal Engagement & Defense: Mastery of the Blast Rain Marksman comes from maintaining the perfect distance from your enemies, ensuring you're close enough to unleash hell but far enough to evade their grasp. Complement this with the protective aura of Smoke Bomb and Shurikens, fortifying your defenses while you rain destruction from afar.
- Shift for Evasion: Shift is your emergency maneuver, a skill that offers more than mobility—it offers a moment of invulnerability. Timing this skill perfectly can be the difference between life and death, allowing you to dodge lethal damage and reposition under the most dire circumstances.
- Freeze Variant for Control: For those seeking an extra layer of defense and crowd control, the Freeze Variant of this build is a formidable option. Equip Frostbite Shackles and focus on stacking Cold Resistance to leverage the Frozen Resonance Node within Detonating Arrow, turning your explosive arsenal into a frosty trap that locks your enemies in place.
Equipment Recommendations:
- Arsenal of the Marksman: While the build is potent on its own, certain unique items can elevate your capabilities to new heights. Mourningfrost, Orian's Eye, Prism Wraps, Peak of the Mountain, and Troaka's Teeth are not just gear; they're extensions of your will on the battlefield, each piece enhancing your build's potential and ensuring that you're equipped to face the toughest challenges.
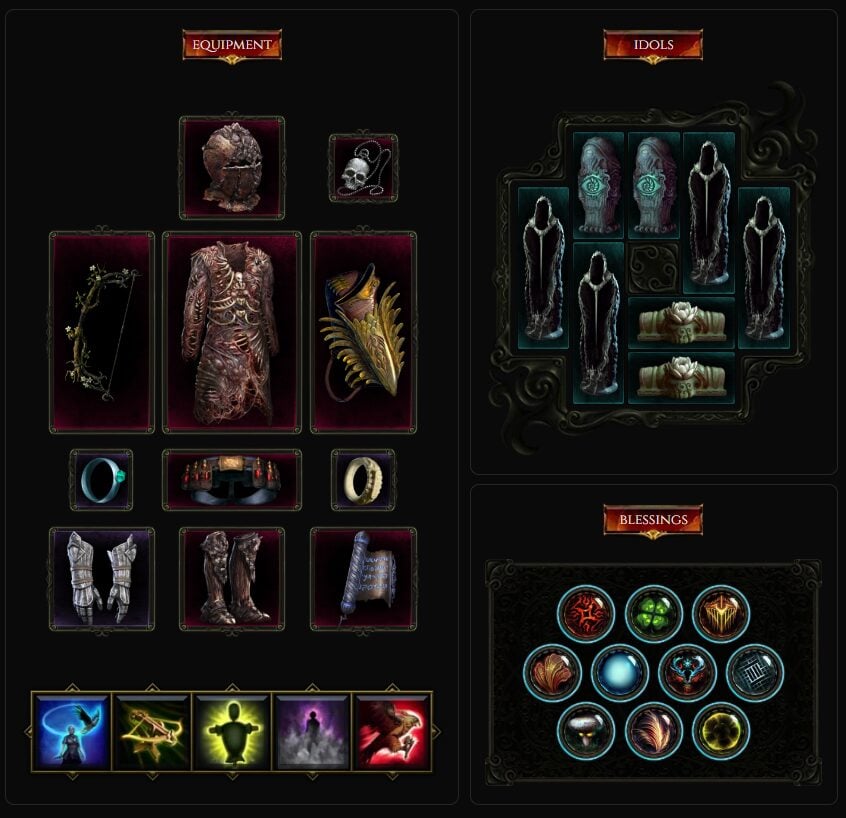
Ballista Falconer
Embracing the role of a master tactician, the Ballista Falconer excels in summoning a formidable arsenal of Ballistae, each buffed and enhanced to deal devastating damage. This build is about creating and maneuvering a lethal array of automated allies, making it a unique and powerful approach to gameplay.
Core Mechanics:
- Mobilized Arsenal: The crux of this build lies in your ability to summon multiple Ballistae, turning any location into a fortified position. The Experimental Minions Transported with Traversal Skills ensures that your summoned Ballistae move with you, allowing for fluid combat and strategic positioning.
- Stat Synergy: Dexterity and Intelligence are the pillars of your Ballistae's strength, directly influencing their damage output. By stacking these stats, you enhance the lethality of your summoned arsenal, making each Ballista a deadly force on the battlefield.
- Mana Sustenance: A key aspect of maintaining your summoned Ballistae is ensuring a steady flow of Mana. Investing in Mana Regeneration allows you to continuously summon and support your Ballistae, keeping your firepower at its peak.
- Critical Precision: Your Crit stats have a direct impact on your Ballistae, making each summon not just a source of damage but a potential critical hit powerhouse. This synergy allows you to amplify the threat level of your Ballistae significantly.
- Damage Efficiency: While your Damage stats also benefit your Ballistae, it's important to note the reduced % Effectiveness. This nuance requires a balanced approach to gearing, ensuring that your enhancements translate effectively to your summoned arsenal.
- Targeted Gearing: Peak of the Mountain emerges as a standout item for this build, particularly for capping your Crit. This item is not just powerful; it's also target farmable in The Lightless Arbor Dungeon, making it a crucial piece of your build's puzzle.
Recommended Equipment:
- Unique Arsenal: To fully unlock the potential of the Ballista Falconer, certain Unique Items are recommended. Flight of the First, Woven Flesh, Death Rattle, Arrowguard, Melvern's Writ, Jungle Queen's Chaps of Holding, Foot of the Mountain, and Red Ring of Atlaria each bring something special to the table, enhancing various aspects of your build from survivability to damage output.
A Tier
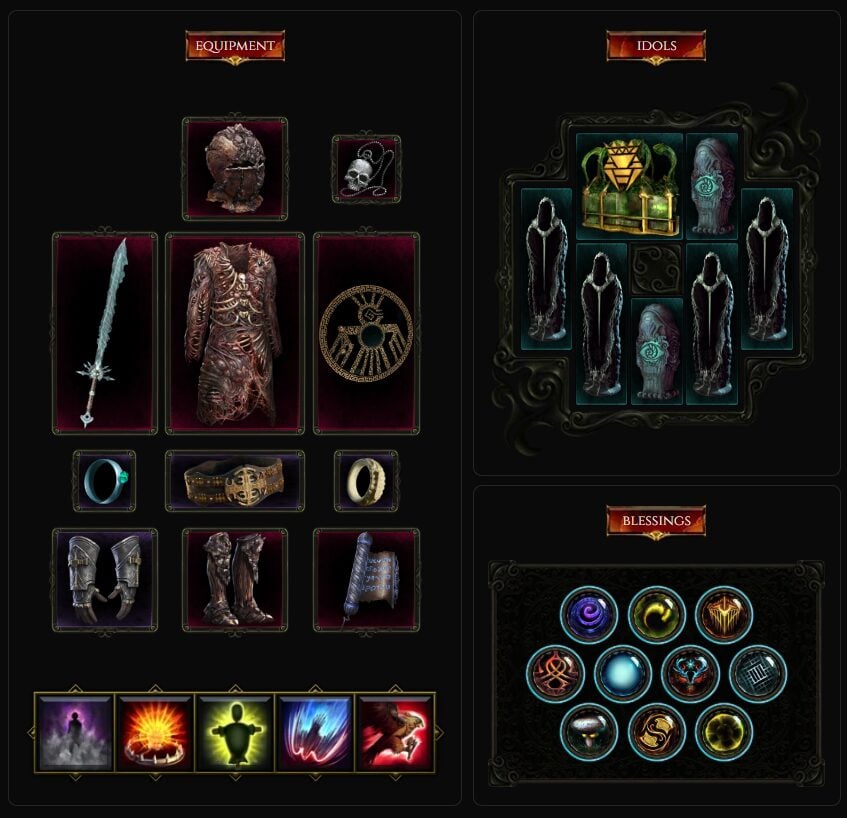
Explosive Ballista Falconer (DPS)
At the heart of the Explosive Ballista Falconer lies a strategy that converts the battlefield into an explosive minefield. By using Explosive Trap to summon Ballistae, you create zones of devastation, making this build a master of area control and high-impact strikes against clusters of enemies.
Core Mechanics:
- Mana Cost Management: A critical aspect of this build's functionality is achieving a total of -8 Throwing Attack Mana Cost. This adjustment ensures that your Explosive Trap can be used seamlessly, allowing for continuous deployment of your explosive Ballistae without draining your mana reserves.
- Explosive Trap as a Catalyst: The Explosive Trap isn't just a damage dealer; it's the trigger for your Ballistae, turning each trap into a potential barrage of explosive projectiles that dominate the battlefield with their AoE impact.
- Precision Strikes: Dive Bomb and Falcon Strikes are your tools for dealing with high-priority targets. These skills allow you to focus your firepower on key enemies, ensuring that your explosive arsenal is directed where it's needed most.
- Dexterity and Armed Construction: Stacking Dexterity is vital for this build, enhancing both the damage output and the AoE of your Ballistae via the Armed Construction mechanic. This synergy ensures that your explosions not only hit hard but also cover a wide area, maximizing your battlefield control.
- Critical and Damage Stats: Your Crit stats are fully transferred to your Ballistae, amplifying their threat level with each proc. While your Damage stats also benefit the Ballistae, the reduced % effectiveness means that strategic gear choices are essential to optimize this transfer of power.
- Critical Gear Piece: Peak of the Mountain stands out as an invaluable item for capping your Critical Strike Chance. Its utility, coupled with the fact that it's target farmable in The Lightless Arbor Dungeon, makes it a cornerstone piece for this build.
Recommended Equipment:
- Unique Enhancements: To maximize the potential of the Explosive Ballista Falconer, consider incorporating Uniques such as Apogee of Frozen Light, Woven Flesh, Death Rattle, Cradle of the Erased, Melvern's Writ, and Foot of the Mountain. Each of these items brings a unique set of benefits that can elevate your build, from enhancing your survivability to boosting your damage output and critical capabilities.
Explosive Ballista Falconer (Trap)
The Explosive Ballista Falconer is a master of area control, utilizing Explosive Traps to summon a barrage of explosive Ballistae. This build excels in creating zones of high damage, ideal for both clearing groups of enemies and focusing firepower on high-priority targets.
Core Mechanics:
- Mana Cost Optimization: Achieving a total of -8 Throwing Attack Mana Cost is essential for the smooth operation of this build. This optimization allows for the continuous use of Explosive Trap without depleting mana, ensuring that your explosive arsenal is always at the ready.
- Explosive Trap Synergy: The Explosive Trap is the catalyst for your Ballistae, with each deployment having the potential to unleash a devastating array of explosive projectiles. This mechanism is central to the build's AoE capabilities, allowing for widespread destruction across the battlefield.
- Targeted Strikes: For dealing with high-priority threats, Dive Bomb and Falcon Strikes are your precision tools. These abilities enable you to direct your firepower effectively, ensuring that key targets are quickly neutralized.
- Stat Focus: Dexterity is a crucial stat for this build, enhancing both the damage output and the AoE radius of your Ballistae through Armed Construction. This focus on Dexterity ensures that your explosive impacts are both powerful and far-reaching.
- Critical and Damage Efficiency: Your Ballistae benefit from your Crit stats, enhancing their potential for critical strikes. While Damage stats also influence Ballista damage, it's important to note the reduced % effectiveness, making strategic gear choices essential for maximizing this aspect of the build.
- Essential Gear: Peak of the Mountain is a key item for this build, particularly for maximizing Critical Strike Chance. Its availability in The Lightless Arbor Dungeon makes it an attainable target for enhancing your build's critical capabilities.
Recommended Equipment:
- Unique Item Synergies: To fully unlock the Explosive Ballista Falconer's potential, incorporating specific Unique Items can provide significant benefits. Apogee of Frozen Light, Woven Flesh, Death Rattle, Cradle of the Erased, Melvern's Writ, and Foot of the Mountain each offer unique enhancements that can boost various aspects of the build, from survivability and damage output to critical strike enhancements.
B Tier
Dancing Strikes Bladedancer
At the heart of the Dancing Strikes Shadow Daggers Bladedancer lies a unique harmony of melee combat and swift movement, making it a formidable force against any content in the game. This build is about fluidity, rhythm, and the grace of a dance, where each step is both an attack and a dodge.
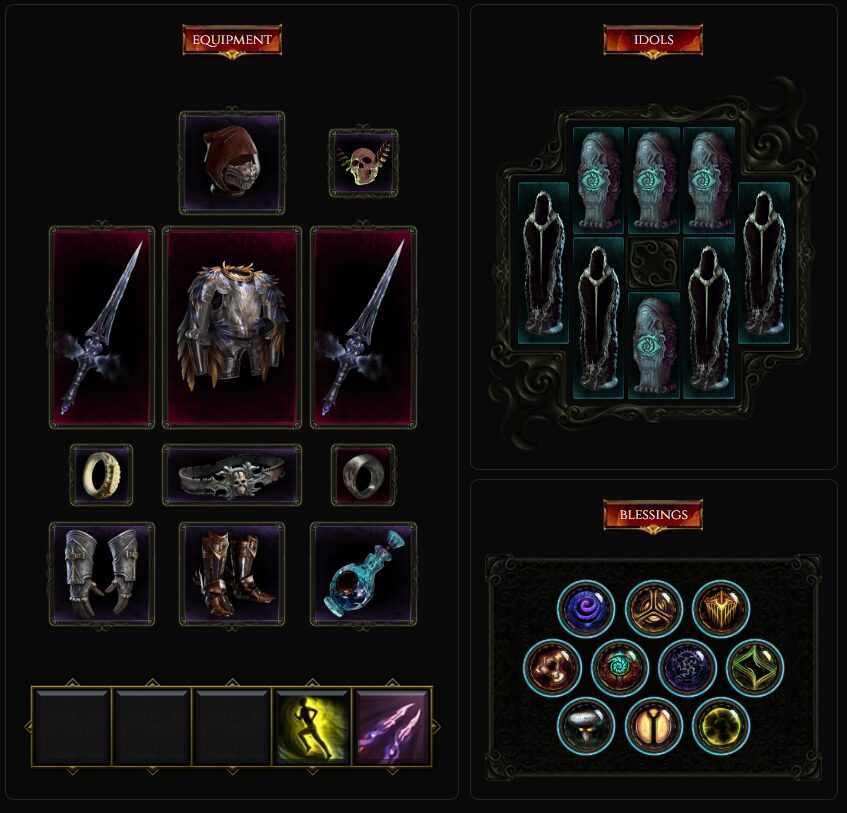
Core Mechanics:
- Dance of Blades: Dancing Strikes isn't just an ability; it's the centerpiece of this build, offering a playstyle that's refreshingly different. Each movement is part of a deadly dance, where you're both the performer and the choreographer, dictating the flow of battle with your rhythm.
- Rogue Brawler Hybrid: Embrace the duality of being a rogue with the heart of a brawler. This build allows you to weave through the battlefield with the agility of a shadow while engaging enemies up close and personal, blending subtlety with brute force.
- Art of Evasion: The build's philosophy extends beyond mere movement; it's about making every move count. The Evasion, Asuvon's Pact, Perfection, and Confidence Nodes aren't just skills; they're the principles of your dance, rewarding you for your continuous motion and your ability to remain untouched by your foes.
- Decoy and Strategy: Use Decoy not just as a means of distraction but as a tactical tool to control the battlefield. It allows you to cluster your enemies, creating the perfect stage for your deadly dance, enabling you to strike efficiently and effectively.
Gear Synergy:
- Build Enhancers: Propel your playstyle to new heights with Smoke Weaver, Wings of Argentus, and Siphon of Anguish. These items are not mere accessories; they're extensions of your build, amplifying your agility and your striking power, ensuring that your dance is both beautiful and deadly.
- Shift for Survival: In the intricate dance of battle, Shift is your escape move, a way to momentarily step out of the fray and avoid incoming damage. Mastering the timing of Shift is crucial, as it can grant you a moment of invulnerability, turning a potential hit into a missed beat by your adversary.
Hail of Arrows Marksman
The essence of the Hail of Arrows Marksman is found in its ability to navigate and control the battlefield from a distance, offering a gameplay style that rewards patience, precision, and tactical acumen. This build is a fortress of strategic play, allowing you to dismantle any challenge the game throws at you safely.
Core Mechanics:
- Umbral Ballet: At the core of this build is the dance between creating and consuming shadows. Use Smoke Bomb to lay down a veil of shadows, then artfully Shift through them to activate the Umbral Resolution Node within Dark Quiver. This sequence significantly amplifies the damage of your subsequent Hail of Arrows, turning it into a devastating barrage.
- Patience and Precision: Engaging with this build requires a careful approach. The DPS combo, while powerful, demands timing and awareness. Missteps can lead to harsh punishment from enemies, emphasizing the need for calculated execution.
- Distance is Your Ally: Embrace the role of a distant harbinger of death. Maintaining space between you and your adversaries is not just a tactic; it's a fundamental principle of this build, ensuring your safety while you whittle down enemy ranks.
- Tactical Decoy: Leverage Decoy not just as a mere distraction but as a strategic tool to manipulate enemy positioning. This ability allows you to cluster foes, setting the stage for a perfectly placed Hail of Arrows, maximizing your DPS potential while minimizing risk.
- Defensive Layers: Beyond offensive might, this build fortifies your defenses through the buffs provided by Smoke Bomb and Shurikens. These skills offer more than just damage; they weave a protective net around you, enhancing your survivability.
- Shift for Survival: Shift is more than a movement skill; it's a lifeline. Mastering its timing can be the difference between life and death, granting you a moment of invulnerability that can evade potentially fatal blows.
C Tier
Multishot Marksman
At its core, the Multishot Marksman is about turning the battlefield into your personal shooting range. It's beginner-friendly, offering straightforward gameplay that's both satisfying and effective. Whether flying solo or contributing to a party, this build ensures you can take on the game's challenges head-on.
Core Mechanics:
- DPS Turret: Embody the role of a human turret, with Flurry serving as your trigger to unleash a ceaseless volley of Multishot projectiles. The key to this build's overwhelming firepower lies in the Fusillade, which ensures that your channeled attacks translate into a devastating barrage covering the screen.
- Strategic Playstyle: This build isn't just about raw firepower; it's about smart engagement. By leveraging components like the Grand Patience of Herkir Blessing and the Pavise Node, along with optimizing for All Resistances While Channelling, you create a fortress of defense around your offensive might.
- Maintain Distance: As with many Marksman builds, your strength lies in your range. Keeping a safe distance from your enemies allows you to maximize your DPS while minimizing the risk to yourself, making positioning a critical element of your strategy.
- Decoy and Reposition: Utilize Decoy not merely as a means of distraction but as a strategic tool to manipulate enemy movements. This skill is invaluable for clustering your adversaries, allowing you to reposition for optimal damage output or to create a momentary respite for regrouping.
- Defensive Stacking: The build also incorporates a defensive strategy through the buffs provided by Smoke Bomb and Shurikens. These skills bolster your survivability, adding a layer of protection that complements your offensive barrage.
- Shift for Evasion: The Shift ability is your ace in the hole, offering a crucial means of evading incoming damage. Timing this skill correctly can provide you with moments of damage immunity, crucial for dodging lethal attacks or repositioning under heavy fire.
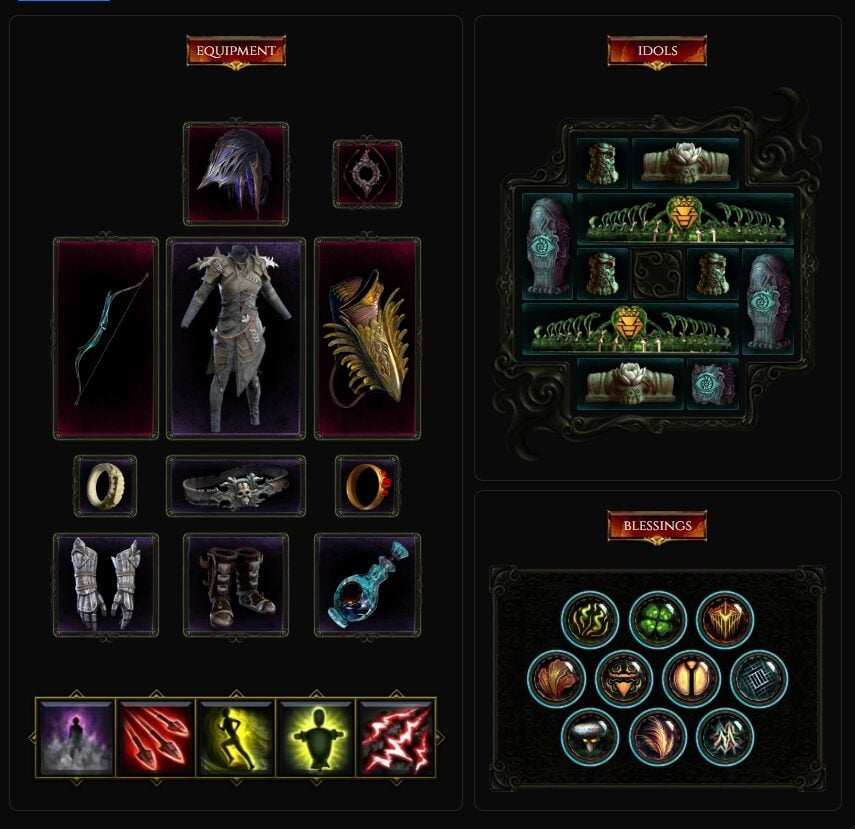
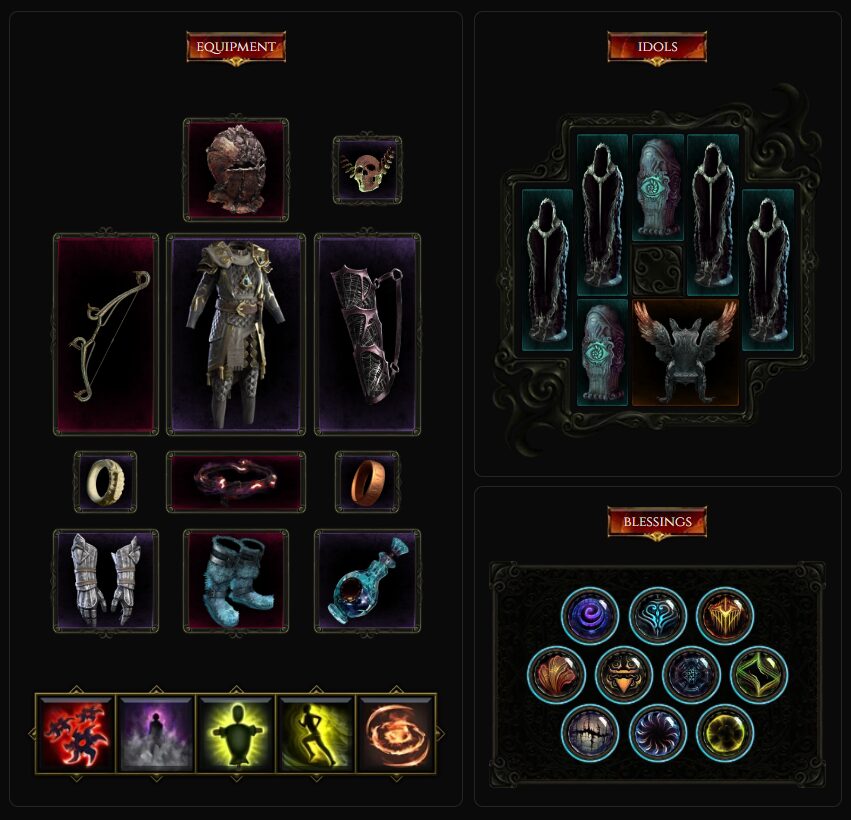
Reign of Winter Bowmage Marksman
The Bowmage stands as a testament to the fusion of martial prowess and arcane might. It's not just about firing arrows; it's about weaving spells into each shot, turning your volleys into a spectacle of destruction. This build is for those who seek a gameplay experience that's as satisfying to execute as it is effective.
Core Mechanics:
- Detonating Arrow & Icicle Symphony: At the heart of the Bowmage's arsenal is the Detonating Arrow, which you'll spam as you dance around the battlefield, kiting your foes. The key is to align your shots so that when the arrows explode, they trigger a cascade of Icicle procs from Reign of Winter, turning each detonation into an icy death sentence for clustered enemies.
- Dexterity & Mourningfrost Synergy: The build thrives on a high Dexterity stat, amplified by the power of Mourningfrost boots. Your goal is to stack as much Dexterity as possible, enhancing your damage output, while maintaining a careful balance to keep your Resistances at optimal levels.
- Tactical Repositioning with Decoy: Decoy is more than a mere distraction; it's a strategic tool that allows you to manipulate the battlefield. Use it to draw enemies together, creating the perfect setup for your explosive and icy onslaught, all while repositioning yourself for the next devastating volley.
- Safety in Distance and Defense: Maintaining distance from your foes is crucial, not just for your safety but to maximize your effectiveness. Complement this with the defensive layers provided by Smoke Bomb and Shurikens, which not only enhance your survivability but also add depth to your tactical options.
- Shift for Evasion: The Shift ability is your emergency escape, a way to dodge incoming damage with impeccable timing. Mastering this skill can provide you with brief moments of invulnerability, crucial for avoiding lethal attacks or navigating through dense enemy formations.
D Tier
Dragonsong Marksman
Embodying the ferocity and majesty of dragons, the Dragonsong Marksman is a build that excels in all aspects of gameplay. From its impressive damage output and area clear to its robust defenses, this build ensures that you can face the game's toughest content with confidence and flair.
Core Mechanics:
- Cinder Strike & Dragon's Wrath: The cornerstone of this build is the Cinder Strike, a skill that you'll use to rain destruction as you elegantly kite your enemies. The goal is to engage groups of foes, maximizing the devastating Dragonfire and Meteor procs from Dragonsong and Harbinger of Stars, turning each encounter into a cataclysmic event.
- Dexterity & Mourningfrost Balance: Dexterity is a crucial stat for this build, significantly enhanced by Mourningfrost boots. The aim is to stack as much Dexterity as you can manage without compromising your Resistances. It's a delicate balance, ensuring that your damage scales beautifully without leaving you vulnerable.
- Tactical Decoy Usage: Decoy is more than just a diversion; it's a strategic element that lets you manipulate the battlefield to your advantage. Use it to cluster your enemies, setting them up for a meteoric downfall, all while repositioning yourself for the next salvo.
- Optimal Engagement Range: Mastery of this build comes from finding and maintaining the perfect engagement range—close enough for your Dragonfire to sear through your foes but far enough to stay safely out of their reach. This, combined with the defensive layers from Smoke Bomb and Shurikens, makes you an untouchable force on the battlefield.
- Shift for Evasion: Shift is your ace in the hole, a skill that offers more than mere mobility. It's your ticket to invulnerability, allowing you to dodge potentially fatal damage with precise timing. Mastering Shift can mean the difference between victory and defeat, providing a crucial edge in the heat of battle.
Conclusion
And that wraps up our journey through the Rogue build tier list! I hope this exploration has shed some light on the various paths you can take with your Mage, from the unbeatable strategies of the S Tier to the unique quirks of the D Tier. It's been great diving into the strengths and nuances of each category with you.
Whether you're about to embark on a new adventure or refine your current strategy, I wish you thrilling battles and epic victories in Last Epoch. If you ever want to revisit this or delve into new builds, you know where to find me.
Until next time, may your choices lead you to triumph!