Table of Contents
In this article we will go over which students to prioritize when rerolling for Blue Archive. If you are looking to learn how to reroll in Blue Archive, we recommend checking out this Reroll Guide. Rerolling in Blue Archive is not necessary to progress through the game, but some students can help you progress through stages more easily or are essential for team building in the late game. If you plan on rerolling, we recommend getting at least 2 students listed below.
| Tier | Student |
|---|---|
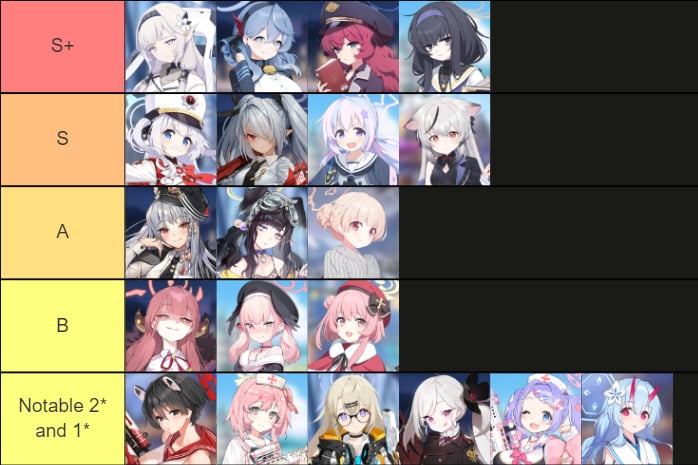
| S+ | Himari, Ako, Iroha, Ui |
| S | Cherino, Iori, Reisa, Kokona |
| A | Haruna, Hibiki, Nodoka (Hotspring) |
| B | Aru, Azusa, Koharu, Serina (Christmas) |
| 2* and 1* | Tsubaki, Serina, Kotama, Mutsuki, Hanae, Chise |
Notes
- Ratings and reviews are based on my personal opinion.
- This tier list aims to help players have an easier start or get core students that can be used in multiple raids.
- This tier list does not cover raid-specific ratings due to how armor types affect damage. While also catering towards specific niches, making some characters that are BIS (best-in-slot) in some raids and unusable in others. (e.g Chihiro is a strong pick for HOD but finds no usage anywhere else)
- All students are viable and have their own use cases. It's a matter of how much you willing to invest in them.
- Due to the sheer number of students in the game (Currently 160-ish), we will only be going over standout options and non-limited/welfare students.
- A student's base rarity is not indicative of their strength in General Content, PvP, or Raids. The difference between 3* and low rarity students is their accessibility, low rarity students perform similarly or sometimes outperform 3*.
Tier S+
Students in this category have found usage in most if not all raids or make progressing through the early game a breeze.
Himari
| Role | Position | Attack Type | Armor Type | Usecase | Farmable? |
| Damage Buffer | Special | Piercing | Light | Raids, General Content | No |
Starting this off we have Himari, a core pick-up to any Hyper-Carry team composition. Her EX Skill buffs the ATK stat of a student by 103%, this allows some team compositions reach damage thresholds to skip through raid mechanics/phases. In addition to this, she also has one of the best buffs on her Sub Skill Cost Recovery. She also finds usage in General Content since you will want to rotate through your skills quickly to clear the stage.
A minor nitpick would be her ATK buff is generally overkill for most General Content stages and is a Single-Target buff. For the early game, multi-DPS team compositions are far more common and do not have a high damage threshold you have to meet. In addition to this, Himari does not deal damage herself, which requires you to have a relatively built damage dealer to take advantage of her buffs.
Ako

| Role | Position | Attack Type | Armor Type | Usecase | Farmable? |
| Damage Buffer | Special | Mystic | Heavy | Raids | No |
Next, we have Ako, another core component of the Hyper-Carry team. Ako's EX Skill is similar to Himari, but instead of buffing ATK, she increases Crit Rate and Crit DMG. This buff is usually more potent when only considering damage potential and means less resetting for crits when trying to get a top score in raids. However, Ako has sometimes been swapped out for Fuuka (New Year) in top score teams, for her ability to cut a student's EX Skill cost to half.
Ako has similar problems to Himari in General Content but overall finds less usage, as her damage buffs are overkill for those stages and the Basic Skill cannot be targeted or triggered manually. Note that some raid bosses have high Crit RES, which may make Crit RES shedders a better option in raids like HOD.
Iroha
| Role | Position | Attack Type | Armor Type | Usecase | Farmable? |
| Tactical Support | Special | Mystic | Heavy | Raids, General Content, PvP | No |
Iroha should be your go-to pick if you are looking for a student to breeze through the early game. Iroha's EX Skill summons a tank on-field that is treated like a Striker Student. This allows her to receive buffs from other Special students like Ako or Himari.
The main highlight of her EX Skill is the secondary effect tied to it, which triggers every 15 seconds and deals damage that ricochets between enemies. This effect alone is enough to clear out waves of enemies in General Content regardless of armor type. She can do all that with low-skill investments (1/1/1/1). On top of this, she is also a core damage dealer in Perorodzilla and a potent ATK stat stick in other raids.
Iroha's only drawback would be the high EX Cost at Skill level 1, which requires a whooping 8 SP to cast and cannot be reduced by traditional cost supports like Ui and Fuuka (New Year). However, this is only a minor drawback, as once her EX Skill is activated, it can essentially clear the stage by itself.
Ui
| Role | Position | Attack Type | Armor Type | Usecase | Farmable? |
| Support | Striker-Back | Explosive | Light | Raids | No |
Unlike the rest of the students in this tier, Ui does not have any significant damage buffs or deal any significant damage herself. However, she packs unique utility in her EX Skill, which decreases the skill cost of any Striker student by half for two uses.
Note that the Cost Reduction has NO DURATION, allowing you to keep the buff indefinitely or apply the effect to two students. In addition to this, she also has a Crit buff on Basic Skill with a relatively good uptime.
However, this does not come without any drawbacks. As a Striker Support, she will generally be at a low rarity which makes Ui prone to getting one-shotted in raids. In addition to this, her EX Skill is expensive at level 1 (5 cost), and Cost Reduction is not required to clear early game stages.
Tier S
Students in this category are generally strong pick-ups without any major weakness
Cherino
| Role | Position | Attack Type | Armor Type | Usecase | Farmable? |
| Support, AoE DPS, Debuffer | Striker-Middle | Piercing | Light | Raids, General Content | No |
Cherino is an all-rounder student who has an insane amount of utility packed into her kit. She is most commonly used for the Cost Recovery on Sub Skill to help with skill point generation. Alongside a potent Crit DMG RES shred on Basic Skill making her a strong pick-up in both General Content and Raids. In the late game, she finds usage in Chesed as an AoE damage dealer for both phases and as a tank, support, or debuffer depending on the raid.
With all that going for Cherino it may sound like she belongs in the S+ tier. However, there are some issues in her skillset and stat spread. The most glaring issue is an extremely low Accuracy stat, this causes her EX Skill to miss the majority of its damage and makes the damage output unstable.
Next, Cherino's Basic Skill applies Focused Assault, which forces the entire team to attack the target of this skill. This can cause the team to attack the wrong enemy or reposition them to an unfavorable area. In addition to this, the debuff has a short duration of 15 seconds and triggers every 40 seconds. This affects the skill's overall uptime and requires you to adjust your skill rotations accordingly to take advantage of the debuff.
Iori
| Role | Position | Attack Type | Armor Type | Usecase | Farmable? |
| Damage Dealer | Striker-Back | Piercing | Heavy | Raids, General Content, PvP | Yes |
On the game's release, Iori was one of the best students you could reroll to ensure easy progression. However, with the release of newer students, there are now several alternatives available. In addition to this, she is now farmable via Hard Stages making it hard to justify prioritizing her over the rest of the students in the S+ tier.
Reisa
| Role | Position | Attack Type | Armor Type | Usecase | Farmable? |
| Tank, Debuffer, CC | Striker-Front | Piercing | Heavy | Raids, General Content | No |
If you are looking for a do-it-all tank, then Reisa is the tank you're looking for. Her skillset provides self-healing via Basic Skill while also increasing the team's damage output with a DEF debuff.
Reisa's EX Skill deals damage to enemies in a fan-shaped AoE and removes one debuff on herself. This is mainly catered towards a specific raid Perorodzilla to cleanse the laser debuff, which can KO a tank or wipe the party if the effect is not cleansed.
Lastly, her Sub Skill decreases DEF and applies a Taunt on enemies hit by the EX Skill. Both of these effects allow her to find usage in raids namely Gregorius and HOD.
Unfortunately, being a jack of all trades means there are usually better alternatives available. However, she can still be brought in as a backup tank or stand-in for newer players who do not have the specific students to her niches.
Kokona
| Role | Position | Attack Type | Armor Type | Usecase | Farmable? |
| Healer | Striker-Middle | Piercing | Special | Raids, General Content | No |
Kokona is somewhat in a unique position as you could argue that she belongs in the tier below since there are always 2* or 1* healers available, but unlike most Striker healers Kokona is the only student who can reduce the entire team's EX Skill cost by 1 INCLUDING Special students. In addition to this, her EX Skill provides a hefty heal at an extremely low cost (2 Cost).
Her main drawback comes from being a Striker healer. She can be KO'd by enemies unlike traditional Special healers. In addition to this, you will have to take the enemy's damage type into consideration to ensure she does not get one-shotted (Only relevant for Insane+ raids).
Tier A
Students in the A tier are still general strong pick-ups but are either farmable or are not essential in the early or late game
Haruna
| Role | Position | Attack Type | Armor Type | Usecase | Farmable? |
| Damage Dealer | Striker-Back | Mystic | Heavy | Raids, General Content, PvP | Yes |
On release, Haruna was one of the few Mystic students available in the game. This led her to find wide spread usage in General Content. Haruna has also found usage in all 3 Mystic raids, as she can deal both AoE and Single Target damage. In addition to this, she is also farmable allowing you to fully raise her to Unique Equipment 50 for free. But in the same light since she is farmable, there is little reason to prioritize Haruna over the students in the tiers above.
Hibiki

| Role | Position | Attack Type | Armor Type | Usecase | Farmable? |
AoE DPS, Buffer | Special | Explosive | Heavy | Raids, General Content | Yes |
Similar to Iori, Hibiki was the go-to reroll target on the game's launch. The large AoE on the EX Skill made her a top choice when progressing through the early game, as it could clear out a wave of enemies. However, with the release of Iroha, She has mainly been relegated to being a secondary option in General Content. In raids, Hibiki can be used in all 3 Explosive raids as a damage dealer or a Crit DMG buffer with her Sub Skill for other raids.
Nodoka (Hot Spring)
| Role | Position | Attack Type | Armor Type | Usecase | Farmable? |
| Healer, Buffer | Striker-Back | Explosive | Special | Raids, General Content, PvP | No |
If you don't have a Striker healer and Serina is in another team, Nodoka (Hot Spring) will be your go-pick for a healer due to her overall high healing output. She also has an ATK buff on her Sub Skill that can help with your team's damage output.
Due to Nodoka (Hot Spring)'s EX Skill applying its healing over time and cannot be repositioned after cast, it can lead to some situations where your team will move on to the next area without receiving enough healing. However, this is only an issue in General Content and is only noticeable if your team can clear out enemy waves quickly. In raids like Hieronymus which is centered around healing, Nodoka (Hot Spring) is one of the few students that can brute force the Lantern with a Healing Reduction debuff.
Tier B
Solid students who still find usage but are generally have better or lower rarity alternatives available
Aru
| Role | Position | Attack Type | Armor Type | Usecase | Farmable? |
| Healer, Buffer | Striker-Back | Explosive | Light | Raids, General Content | Yes |
Aru is in a similar position as Haruna, in which she is a strong option for an AoE Explosive damage dealer in the early game. However, unlike Haruna, Explosive students have more alternatives available, such as Mutsuki and Akari both of which are 2* students. At high investments, Aru still finds usage in all 3 Explosive raids, with her Unique Equipment and Bond item giving her a much-needed damage boost.
Koharu
| Role | Position | Attack Type | Armor Type | Usecase | Farmable? |
| Healer | Striker-Back | Explosive | Heavy | Raids, General Content | Yes |
With the release of newer and more specialized Striker healers, Koharu has somewhat fallen out of favor in raids such as Hieronymus when going for top scores. However, she is still one of the best healers in the game for General Content, as her EX Skill can deal damage to enemies while healing the team. This starts to become important later on when you are no longer able to blitz through stages. Note that she has recently been made farmable via Tactical Assault Shop, making it difficult for us to recommend pulling for her.
Serina (Christmas)
| Role | Position | Attack Type | Armor Type | Usecase | Farmable? |
| Buffer | Striker-Middle | Piercing | Special | Raids | No |
As a damage buffer that stacks Piercing Effectiveness overtime, this puts Serina (Christmas) in an odd spot since the current end-game is a DPS race, which does not give her enough time to get buff stacks. However, she can still find usage in longer fights that give her ample time to gain Holy Night's Blessing stacks. Note that Serina (Christmas) is a multi-DPS buffer, which has a different team composition to Hyper-Carry teams.
Noteable 2* and 1*
In Blue Archive the students BASE RARITY MEANS NOTHING when it comes to their usecase or how useful they are. Be sure to not neglect these students as they are ESSENTIAL in team building for both the early and endgame.
Note that we will only be covering tanks, healers, and buffers in this portion as raising a damage dealer mainly comes down to what armor type the stage currently has.
Tsubaki
| Role | Position | Attack Type | Armor Type | Usecase | Farmable? |
| Tank | Striker-Front | Piercing | Special | Raids, General Content, PvP | Yes |
If you're ever in need of a tank, Tsubaki should be the default tank you consider at any stage of the game. Not only does she have a skill set that makes her extremely tanky and self-sufficient, she also has a high Evasion stat and DEF stat, thanks to her T4 bag slot.
Note that the self-heal on the Basic Skill can be triggered once per battle, allowing her to proc its effects multiple times in a stage. If your Tsubaki is well-invested or your team deals enough damage to clear out mobs quickly, you can forgo running a healer in general.
Serina
| Role | Position | Attack Type | Armor Type | Usecase | Farmable? |
| Healer, Reposition | Special | Mystic | Light | Raids, General Content, PvP | Yes |
If you are having difficulties keeping your team alive in stages and need a healer, Serina should be your default pick. Serina has everything a healer would want in their skill set, low cost healing on EX Skilll (2 Cost), frequent auto-healing with Basic Skill, and a reposition to move your tank away form your team if there are any AoE attacks.
Kotama
| Role | Position | Attack Type | Armor Type | Usecase | Farmable? |
| Buffer | Special | Explosive | Light | PvP | Yes |
If you are looking for a pure AoE damage buffer, then Kotama should be your go-to pick. Note that she can fall off quite hard if you are unable to apply her EX Skill on multiple students. if you have a well-invested Karin (UE50), Kotama is roughly equal to her when buffing 2 students.