Table of Contents [Hide]
Floor 11 is the start of a challenge in Spiral Abyss for Genshin Impact players. The difficulty spikes up a little bit from the previous floor, in addition to the ever-changing roster of enemies in each version. In version 4.7, you will encounter only a few normal bosses here but there are lots of mobs and tons of waves. Follow this guide to know more about enemies' lineup, their weaknesses, and how to complete the entire chamber on Floor 11.
Blessing of the Abyssal Moon
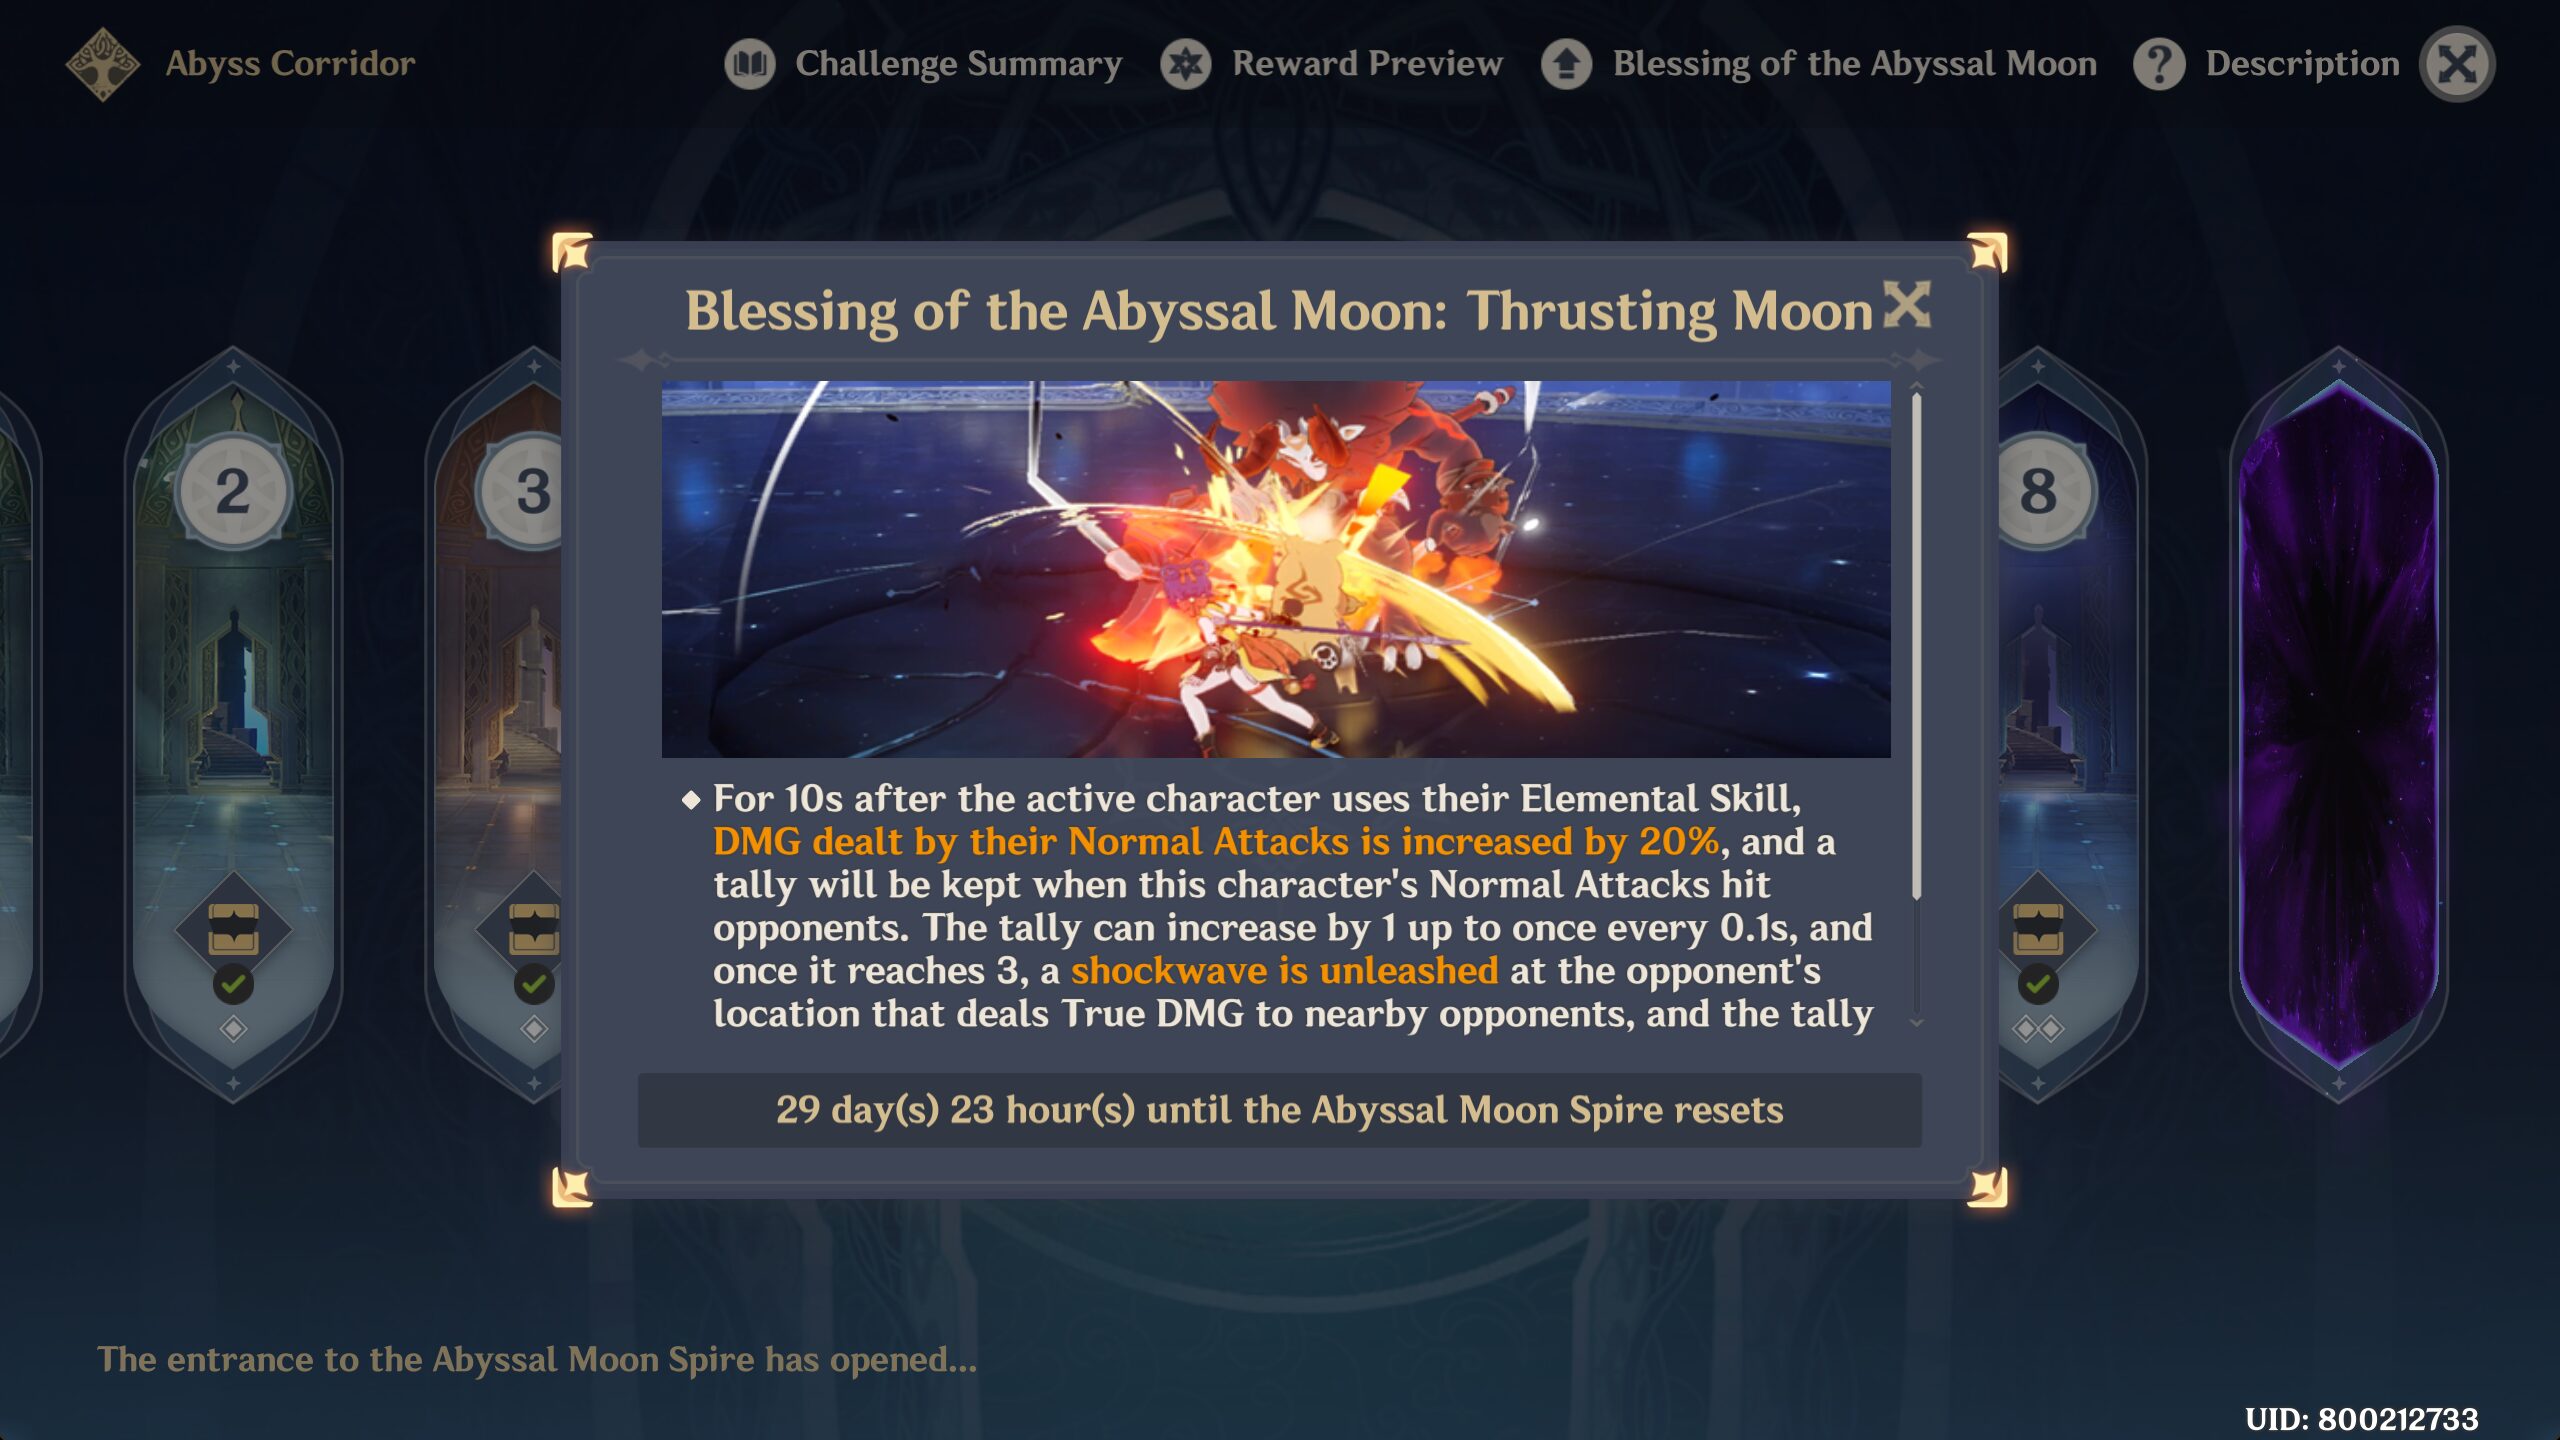
Reminder: Blessing of the Abyssal Moon will change every refresh cycle and may not be updated here. But the enemies list and strategy will remain the same.
For 10s after the active character uses their Elemental Skill, DMG dealt by their Normal Attacks is increased by 20%, and a tally will be kept when this characters's Normal Attacks hit opponents. The tally can increase by 1 up to once every 0.1s, and once it reaches 3, a shockwave is unleashed at the opponent's location that deals True DMG to nearby opponents, and the tally will be reset. Up to 1 shockwave can be unleashed this way every 1.5s, and the effect and tally are cleared when the character leaves the field.
Ley Line Disorder
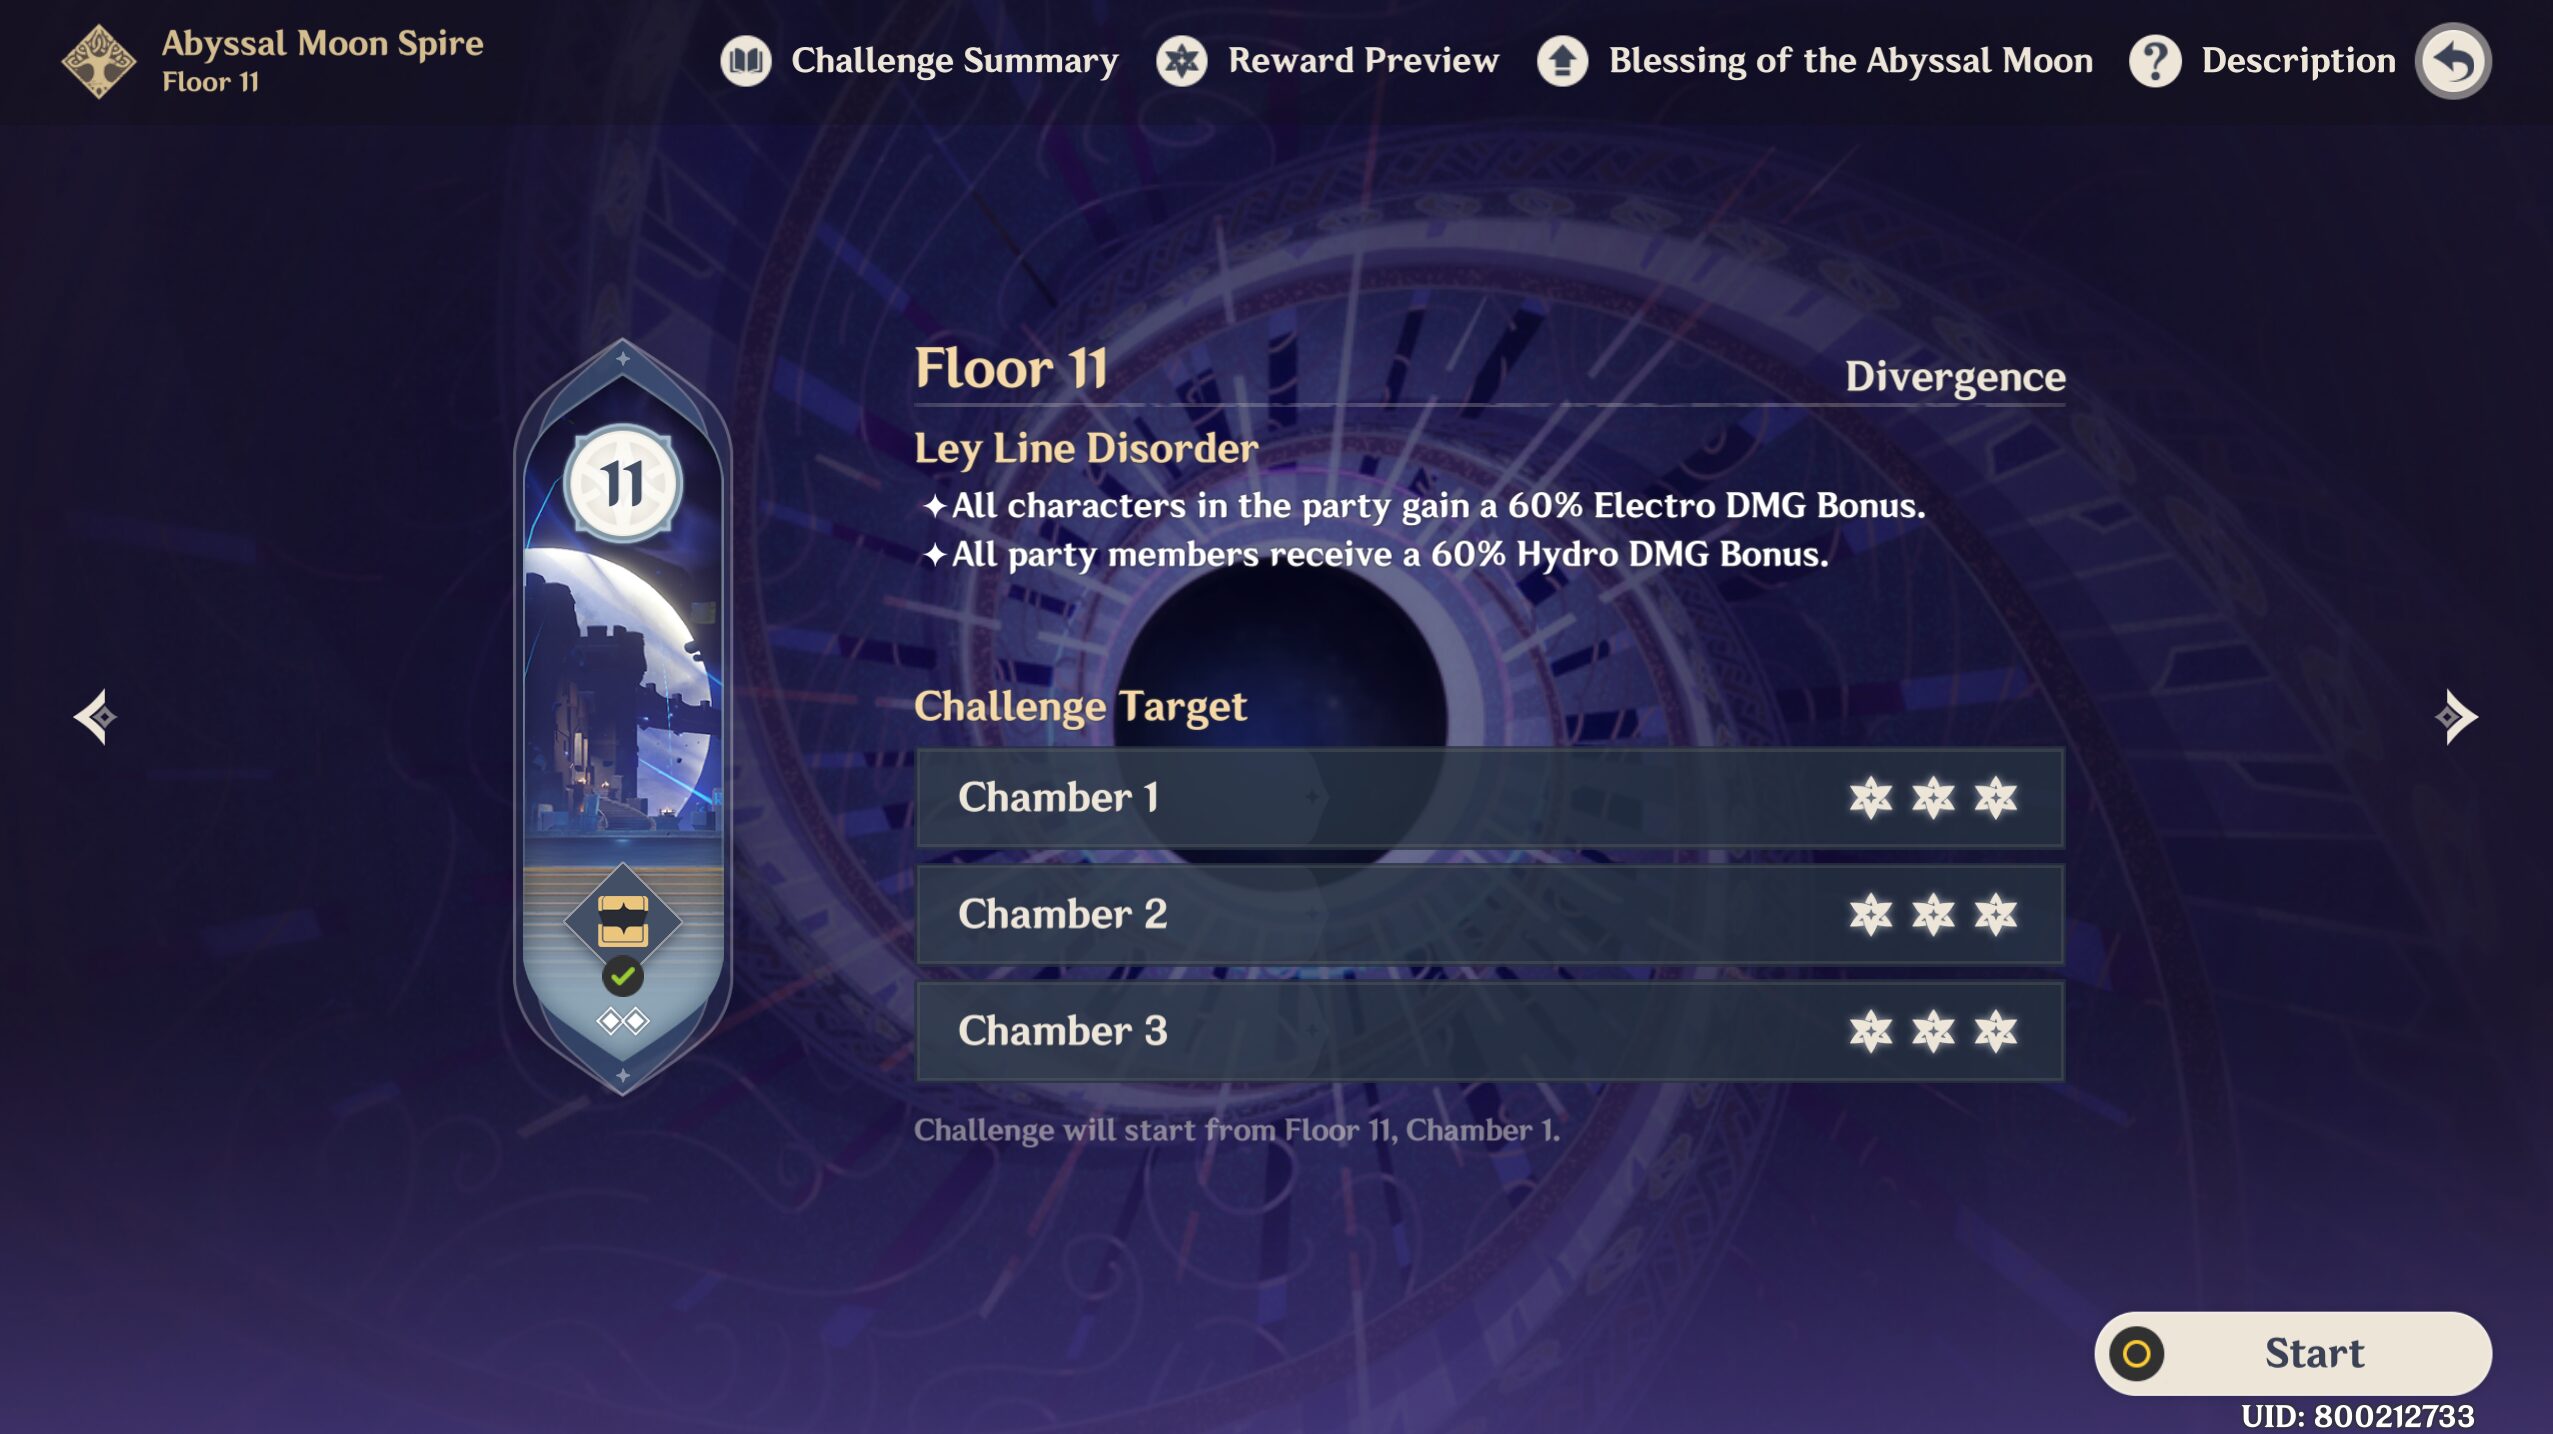
- All characters in the party gain a 60% Electro DMG Bonus.
- All party members receive a 60% Hydro DMG Bonus.
Team Recommendations
There are Leyline Monolith stages for Chamber 1, and some enemies spawn near each other/easy to gather while some are a bit far away. You can bring along an Anemo CC to any of the teams if you want. If you only have 1 and want to bring them, then it's recommended to add them in the 1st Half because there are more enemies that can be gathered with Anemo CC in the 1st Half compared to the 2nd Half. If you plan to bring a Bloom team, remember that the explosion from the Dendro Cores will also deal some damage and reduce the Monolith's HP.
- The recommended elements for the First Half: Any elements except the not-recommended ones.
- Anemo CC is really recommended here (if you only have one, bring them here) because there are many mobs in this half compared to the second half.
- The not recommended elements for the First Half: Pyro, Electro, and Physical
- Pyro and Electro are mentioned simply because there are Geovishaps with said elements. If you feel like you can overpower them with said elements, you can use them. While Physical is because there are Ruin enemies here and they have quite a resistance against Physical. If you still want to bring these elements, feel free.
- Example:
- Hyperbloom Team: Clorinde + Nahida + Furina + Sucrose
- Neuvillette Team: Neuvillette + Furina + Sucrose/Kazuha + Baizhu/Zhongli
- Burgeon Team: Ayato + Nahida + Thoma + Xingqiu
- Crystallize Team: Navia + Zhongli/Chiori + Flex + Flex
- The recommended elements for the Second Half: Pyro
- Aside from Pyro, it's recommended to bring a single-target DPS than AoE because you will be facing 1-2 enemies only in Chamber 2 and 3. If you have Anemo CC, bring them if you want to gather enemies in Chamber 1 and Element RES shredder for other chambers.
- The not recommended elements for the Second Half: Hydro (unless you're bringing Nilou for Bounty Bloom)
- Just a reminder that Hydro isn't bad, not at all. It's just there are Hydro Slimes and Phantasm here and they are immune to Hydro so you might want to use other elements. That's why if you want to bring Bounty of Destruction (Nilou and her trusty Bounty Bloom), they're great options since the explosion deals Dendro DMG, not Hydro.
- Example:
- Vaporize Team: Arlecchino + Xingqiu/Yelan + Zhongli + Flex
- National Team: Raiden + Xingqiu + Bennett + Xiangling
- Mono-Pyro Team: Sucrose + Bennett + Xiangling + Zhongli
Floor 11 Chamber 1
First Half

1st Wave: Large Pyro Slime x1, Pyro Slime x2, Large Electro Slime x1 & Electro Slime x2
2nd Wave: Large Pyro Slime x1, Pyro Slime x2, Large Electro Slime x1 & Electro Slime x2
3rd Wave: Large Pyro Slime x2, Pyro Slime x1, Large Electro Slime x1, Mutant Electro Slime x1 & Electro Slime x1
4th Wave: Large Electro Slime x1, Mutant Electro Slime x1, Pyro Slime x1, Large Pyro Slime x2 & Electro Slime x1
- In all 4 waves, all the Slimes will attack the Monolith unless you attack them to trigger aggro.
- In addition, once you defeat any Slime, the next one will immediately spawn. It does not have a wave. I include 'waves 1-4' just because it will be much more easier to understand and imagine their locations.
- If you have Anemo CC, do bring them here because you can easily gather all of them in one place. And try to bring at least one Hydro character to remove the Pyro Slimes from their Ignite state. If you defeat them while the Slimes are in the Ignite state, they will explode and deal damage to the Monolith if they are near it.
Second Half
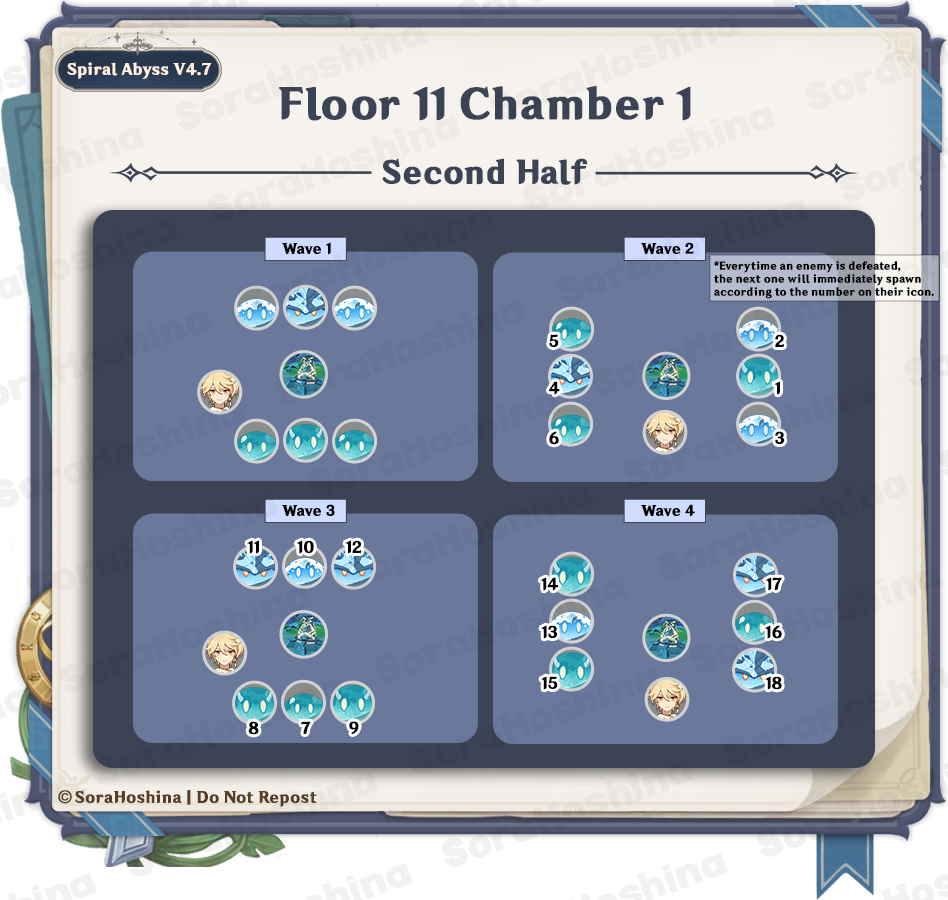
1st Wave: Large Hydro Slime x1, Hydro Slime x2, Large Cryo Slime x1 & Cryo Slime x2
2nd Wave: Large Hydro Slime x1, Cryo Slime x2, Large Cryo Slime x1 & Hydro Slime x2
3rd Wave: Large Hydro Slime x2, Hydro Slime x1, Large Cryo Slime x2 & Cryo Slime x1
4th Wave: Large Hydro Slime x2, Cryo Slime x1, Large Cryo Slime x2 & Hydro Slime x1
- In all 4 waves, all the Slimes will attack the Monolith unless you attack them to trigger aggro.
- In addition, once you defeat any Slime, the next one will immediately spawn. It does not have a wave. I include 'waves 1-4' just because it will be much more easier to understand and imagine their locations.
- Bring at least one Pyro character to remove the Cryo shield from the Large Cryo Slimes. Of course, Blunt attacks like from Claymore attacks also works. But if you bring Pyro, you can also Vaporize/Melt other Slimes. Best element overall for this half.
Floor 11 Chamber 2
First Half
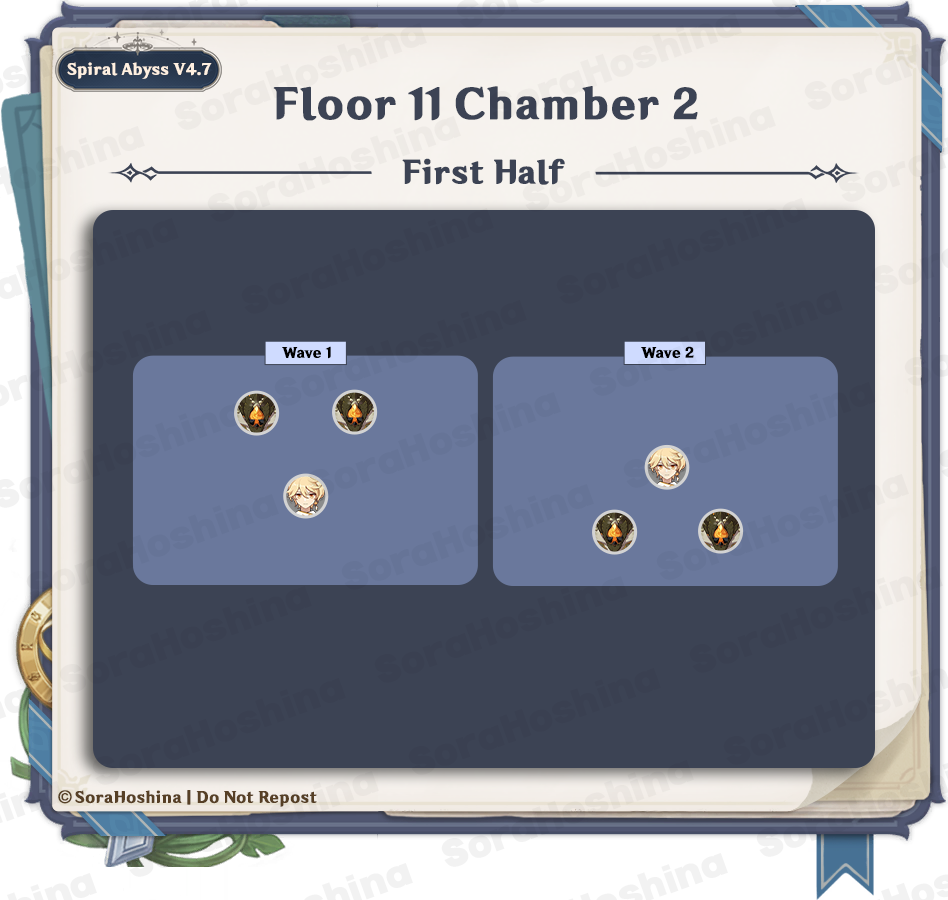
1st Wave: Geovishap x2
2nd Wave: Geovishap x2
- In the first wave, two Electro Geovishap will appear at the front area. It's not the first time you're fighting this enemy right? The answer to the battle is obvious, brute force. There's nothing special with this enemy that is worth mentioning except the Geovishap will be staggered if they slam attack your character who has a shield. At first, they are normal Geovishap, but after you reduce their HP to a certain threshold (around 40%), they will infuse themselves with Electro. They will be in a constant Electro state and you can trigger elemental reaction much easily.
- In the second wave, another two Geovishap (this time they will infuse with Pyro after reaching low health) will appear at the back area. If you're too far away from them, you can either sprint back to them or wait a second and the 2 Geovishap should do the slam attack directly to your current position (as can be seen from the red circle on the ground when they leap to the air).
Second Half
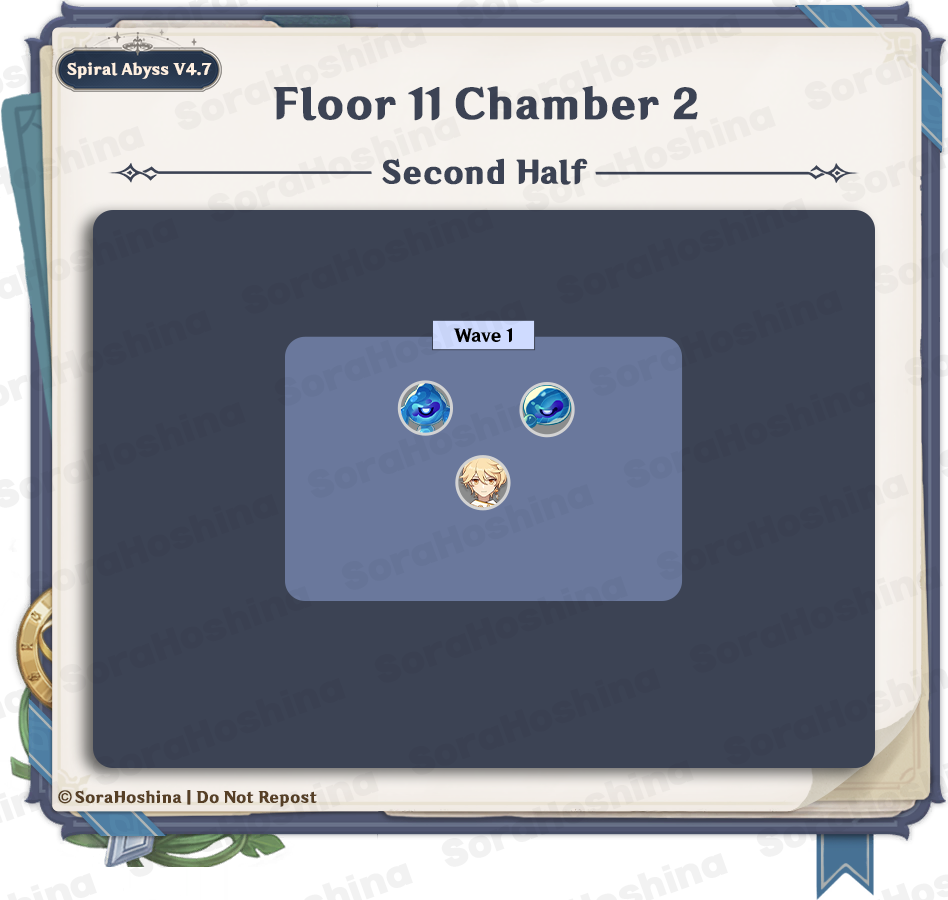
1st Wave: Veteran Tainted Water-Splitting Phantasm x1 & Veteran Tainted Water-Spouting Phantasm x1
- There is only one wave here, and the 2 veteran phantasm will spawn at the front area side by side.
- Since both Phantasms on this floor are like the Local Legend you find in Fontaine, they will enter Enraged State from the start and will stay that way permanently. In this state, their attacks will be enhanced and become immune to being Frozen.

- Between the two Phantasms, the Water-Spouting one (the one on your right) is a bit slower than the Water-Splitting one. So from the start of the challenge, go to the Water-Spouting at the right side and let the Water-Splitting chase after you. When the two are really close to each other, it's a matter of spamming damage to them and trying to avoid incoming attacks (unless you have a shield) to reduce the damage taken.
- If one of them is defeated, it won't get revived if you didn't defeat the remaining one within a limited time so don't worry about that.
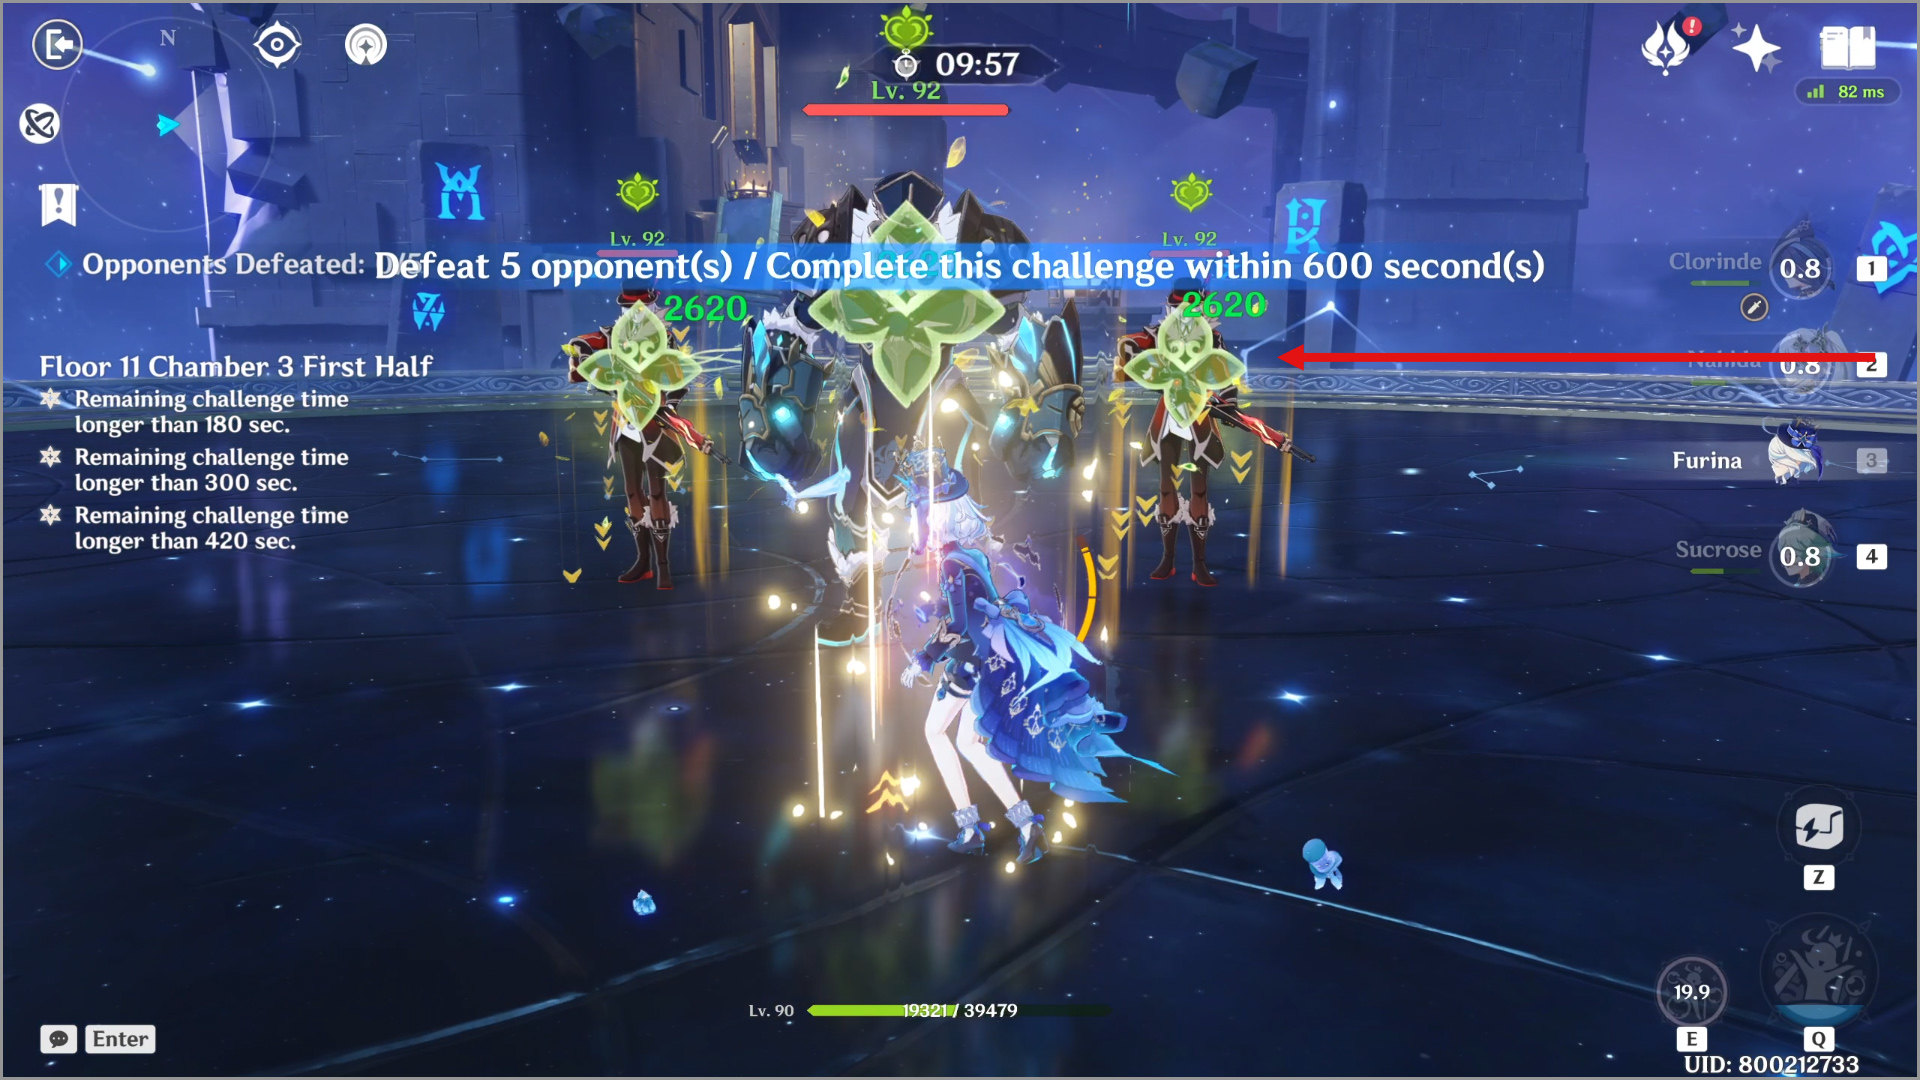
Floor 11 Chamber 3
First Half
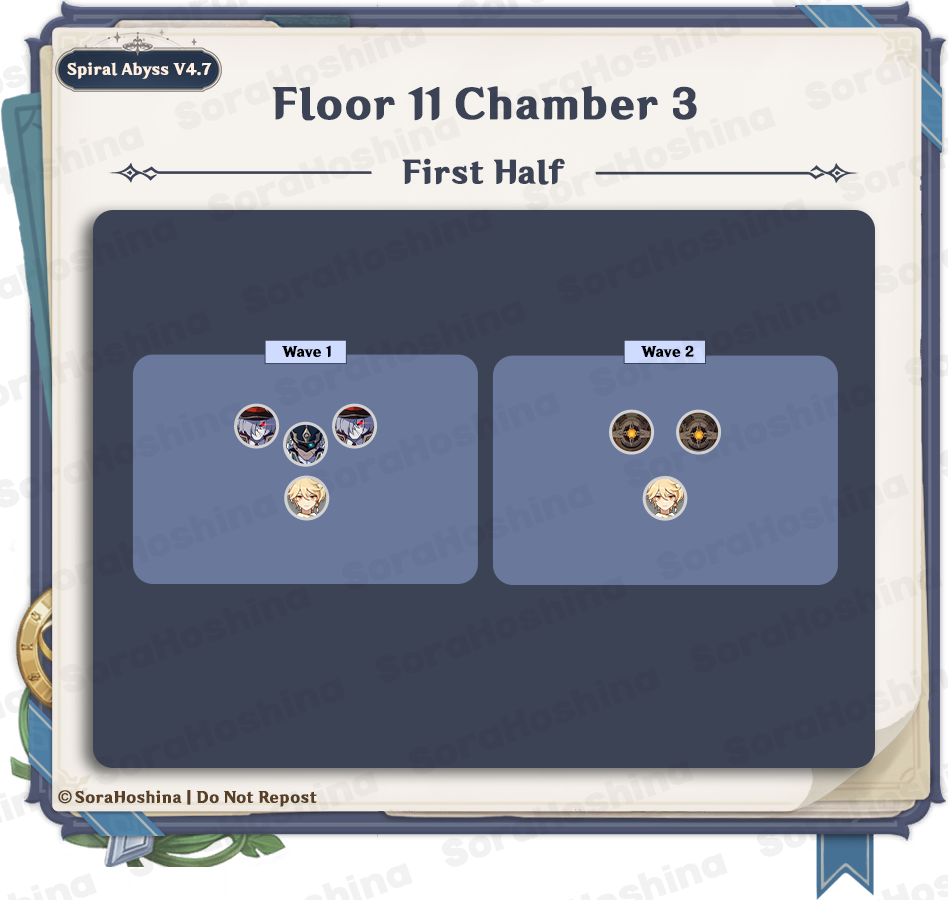
1st Wave: Fatui Skirmisher - Anemoboxer Vanguard x1 & Fatui Skirmisher - Pyroslinger Bracer x2
2nd Wave: Ruin Drake Earthguard
- In the first wave, there are 3 Fatui in the middle. What you need to do is go to either Pyroslinger Bracer and face him so that his back is towards the Anemoboxer and another Pyroslinger. This way, when you get too close to his personal space, he will jump back towards the other two.
- If you didn't manage to group them and didn't bring any Anemo CC, focus on one of the Pyroslinger first before the other one, and only after those 2 are defeated should you focus on the Anemoboxer (this one will keep chasing after you anyway).
- In the second wave, 2 Ruin Drake will be at the initial position of those Fatui before. I trust you're not far away from this spot. If you are, well, run for your life to reach them because these Ruin Drakes are so slow.
- Once they appear, go to any one of them and the other Ruin Drake will come for you. At one point, this Ruin Drake will charge (can be seen by two devices swirling on top of Ruin Drake's body) before scattering bombs into the air. It's highly recommended to attack its weak point at the head - glowing orange orbs - to paralyze the Ruin Drake.
- If you fail to do so, after the bombs hit the ground, the Ruin Drake will gain 40% Resistance to the element it has received the most amount of damage from the beginning of the battle (you can see what elements it is from the color of the bombs).
Second Half

1st Wave: Jadeplume Terrorshroom
- The first and only wave is with Jadeplume Terrorshroom. First of all, when the challenge starts, make sure you are in range within Jadeplume's attack range (if you bring melee DPS). This is because most of their attacks are short range and you can dodge to avoid taking any damage. Of course, if you bring a shielder/healer, you can end the fight faster by brute force attacking Jadeplume.
- There are 3 states of Jadeplume: Normal, Activated, and Scorched:
- The Normal state is the one you're dealing with in its default form.
- The Activated state is when the Fury bar under its HP is filled by Electro attacks from your character. When Jadeplume is in Activated form, it has different attack modes but will eventually be paralyzed from exhaustion for 15 seconds.
- The last state is the Scorched state when the Jadeplume is affected by Burning (Dendro+Pyro). It's not really a big deal except for its skill that can summon a maximum of 4 Fungi, which will make you lose precious time in the challenge.
- Both states are decent so you can choose which one you think is the best for your team. For the Activated state, make sure to precisely avoid any incoming attacks from Jadeplume because those hit like a truck. Instead, wait until it's paralyzed before you can spam your attacks.
- For the Scorched state and the Fungi spores, you can destroy the spores with Electro/Hydro/Pyro within 3 seconds before they can spawn, which will stop the Fungi from spawning. Any of the mentioned elemental AoE attacks are great here.