Table of Contents
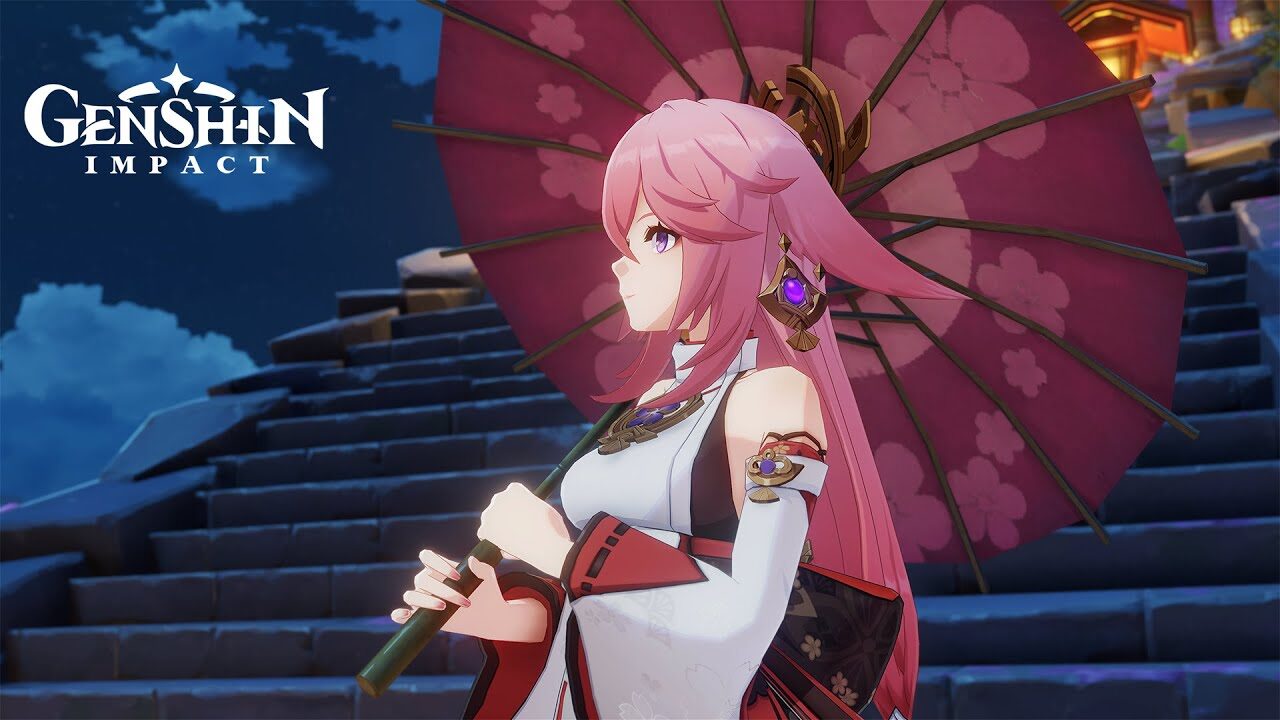
Yae Miko is an Electro damage dealer who deals both constant damage off-field and burst damage. Miko's Elemental Skill allows her to leave behind Sesshou Sakura that deal continuous Electro DMG. When she unleashes her Elemental Burst, Sesshou Sakura on the field will be destroyed, causing Burst DMG.
This guide is based on the Community Character Builds by the Genshin Helper Team.
Skills Overview
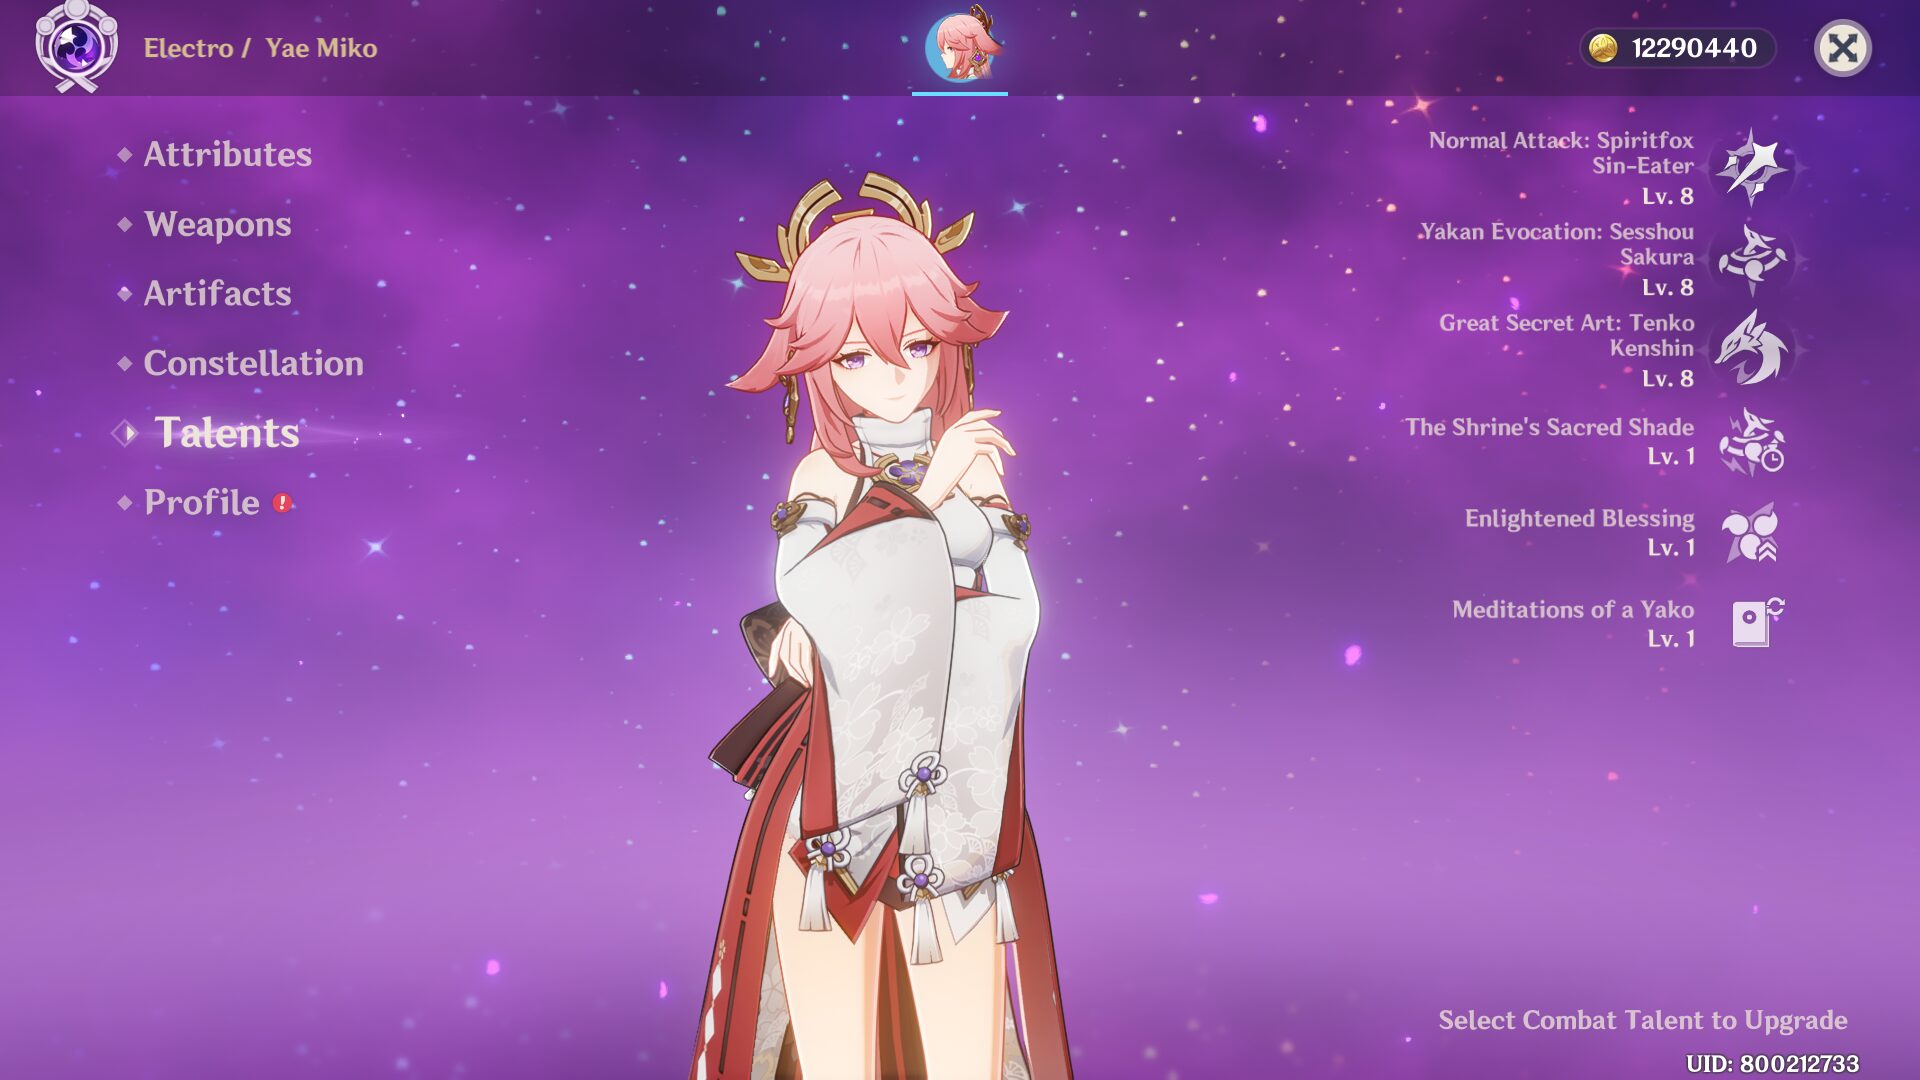
Normal Attack: Spiritfox Sin-Eater

Normal Attack
Summons forth kitsune spirits, initiating a maximum of 3 attacks that deal Electro DMG.
Charged Attack
Consumes a certain amount of Stamina to deal Electro DMG after a short casting time.
Plunging Attack
Plunges towards the ground from mid-air, damaging all opponents in her path with thunderous might. Deals AoE Electro DMG upon impact with the ground.
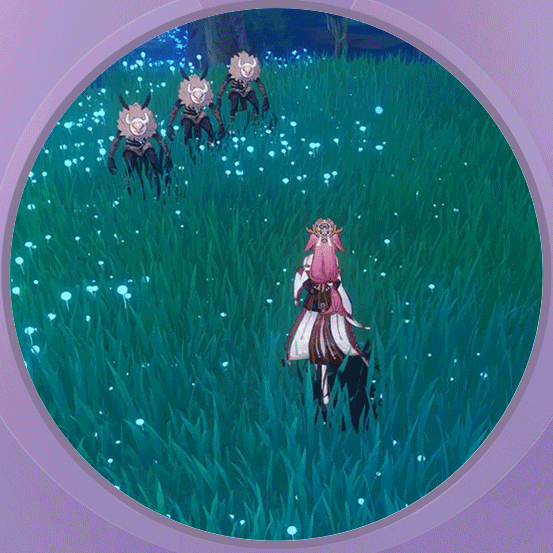
Elemental Skill: Yakan Evocation: Sesshou Sakura
To Yae, such dull tasks as can be accomplished by driving spirits out need not be done personally.
Moves swiftly, leaving a Sesshou Sakura behind.
Sesshou Sakura
Has the following properties:
- Periodically strikes one nearby opponent with lightning, dealing Electro DMG
- When there are other Sesshou Sakura nearby, their level will increase, boosting the DMG dealt by these lightning strikes.
This skill has three charges.
A maximum of 3 Sesshou Sakura can exist simultaneously. The initial level of each Sesshou Sakura is 1, and the initial highest level each sakura can reach is 3. If a new Sesshou Sakura is created too close to an existing one, the existing one will be destroyed.
Elemental Burst: Great Secret Art: Tenko Kenshin
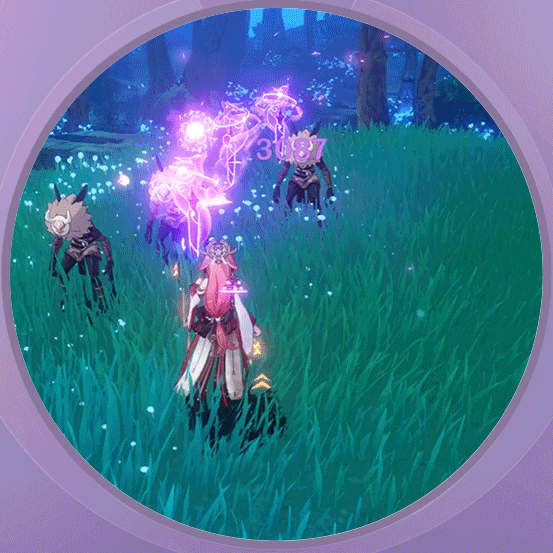
Legends of "kitsunetsuki," or the manifestations of a kitsune's might, are common in Inazuma's folktales. One that particularly captures the imagination is that of the Sky Kitsune, said to cause lightning to fall down upon the foes of the Grand Narukami Shrine. Summons a lightning strike, dealing AoE Electro DMG.
When she uses this skill, Yae Miko will unseal nearby Sesshou Sakura, destroying their outer forms and transforming them into Tenko Thunderbolts that descend from the skies, dealing AoE Electro DMG. Each Sesshou Sakura destroyed in this way will create one Tenko Thunderbolt.
Ascension 1: The Shrine's Sacred Shade
When casting Great Secret Art: Tenko Kenshin, each Sesshou Sakura destroyed resets the cooldown for 1 charge of Yakan Evocation: Sesshou Sakura.
Ascension 4: Enlightened Blessing
Every point of Elemental Mastery Yae Miko possesses will increase Sesshou Sakura DMG by 0.15%.
Passive Talent: Meditations of a Yako
Has a 25% chance to get 1 regional Character Talent Material (base material excluded) when crafting. The rarity is that of the base material.
Talent Priorities
Skill > Burst > Normal ATK
Regarding Talent Priority: Do note that Yae's Elemental Burst does more damage than her Elemental Skill when it hits multiple enemies, and in some setups requiring high ER its more efficient to simply ult every second rotation rather than try to stack enough ER substats.
Start your rotations with Yae's Elemental Skill to amplify her Elemental Burst damage.
Burst combo: Skill > Skill > Skill > Burst > Skill > Skill > Skill
(After the first set of EEE you usually swap out and go through your buff rotation before swapping back to burst)
Take note that none of Yae Miko's abilities snapshot.
Constellations
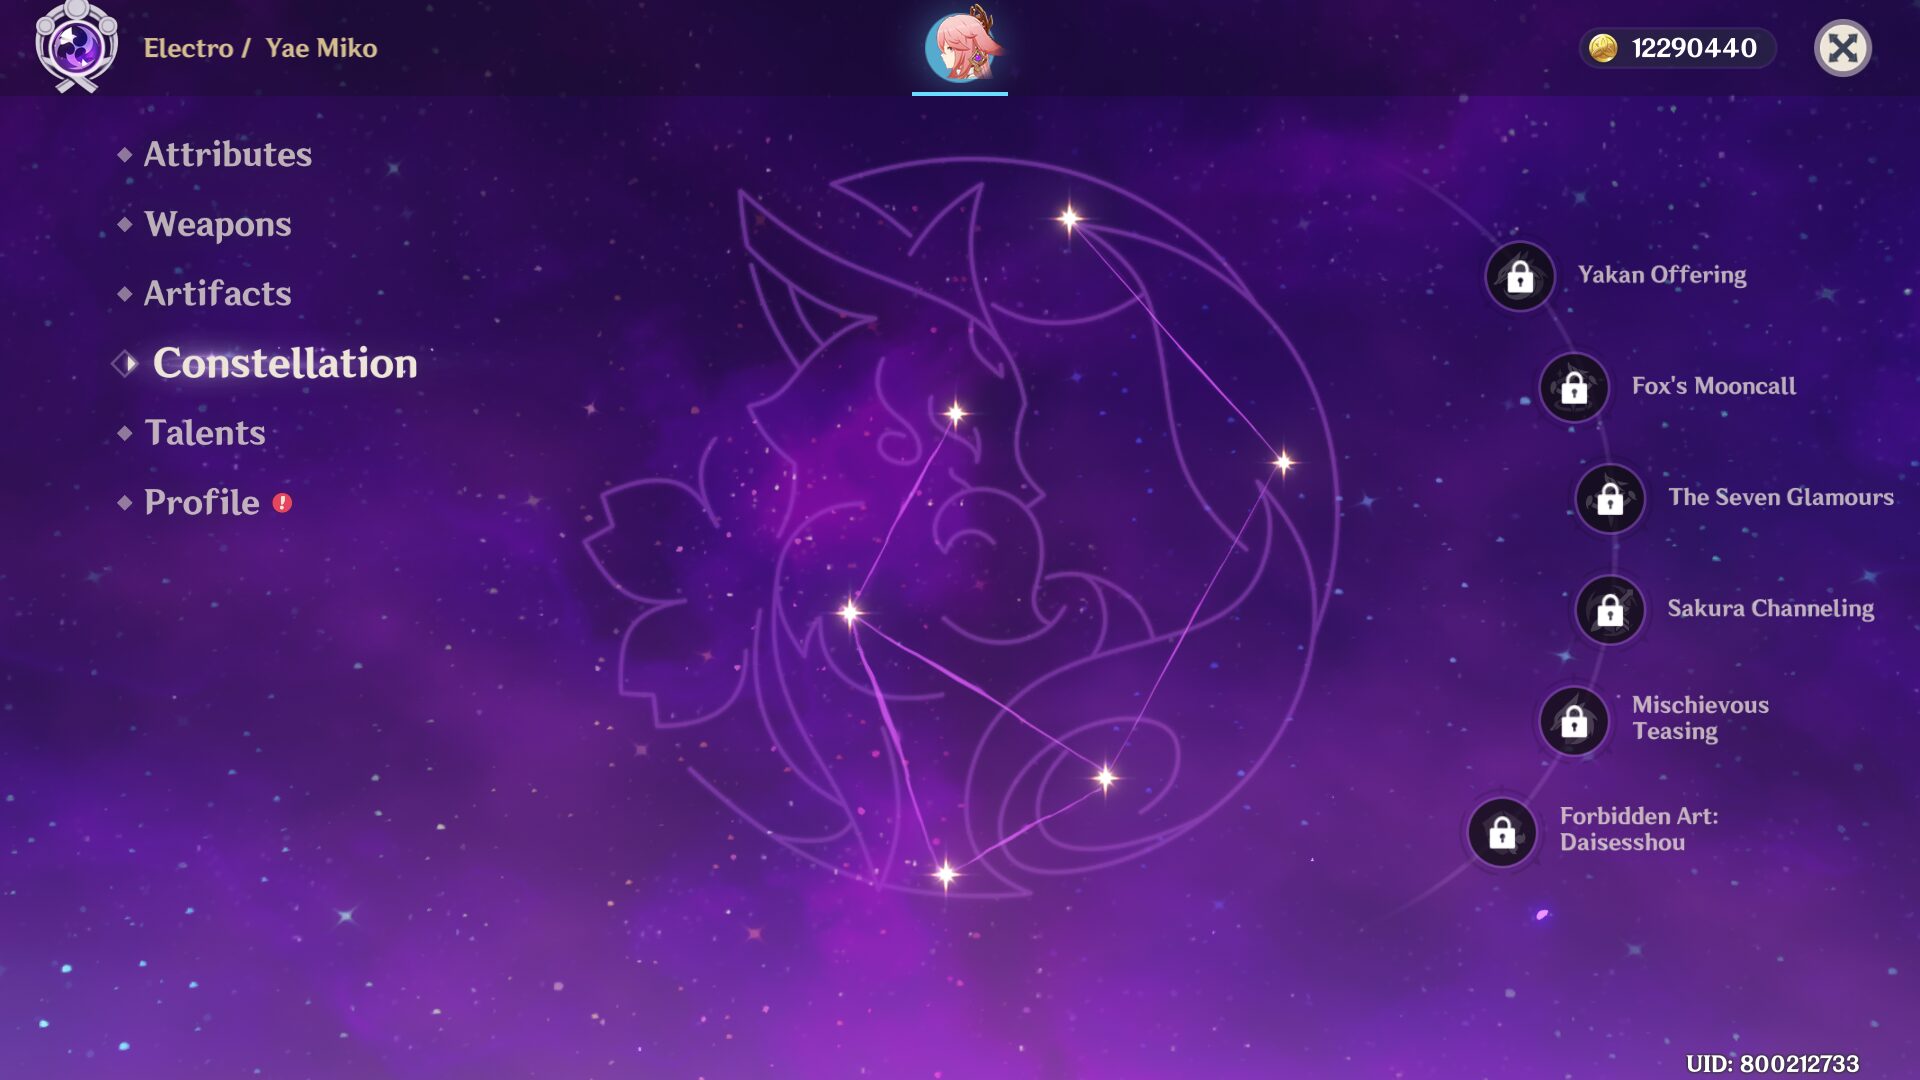
Best Constellations: C1, C2, C3, C4 & C6
C1: Yakan Offering
Each time Great Secret Art: Tenko Kenshin activates a Tenko Thunderbolt, Yae Miko will restore 8 Elemental Energy for herself.
C2: Fox's Mooncall
Sesshou Sakura start at Level 2 when created, their max level is increased to 4, and their attack range is increased by 60%.
C3: The Seven Glamours
Increases the Level of Yakan Evocation: Sesshou Sakura by 3.
Maximum upgrade level is 15.
C4: Sakura Channeling
When Sesshou Sakura lightning hits opponents, the Electro DMG Bonus of all nearby party members is increased by 20% for 5s.
C5: Mischievous Teasing
Increases the Level of Great Secret Art: Tenko Kenshin by 3.
Maximum upgrade level is 15.
C6: Forbidden Art: Daisesshou
The Sesshou Sakura's attacks will ignore 60% of the opponent's DEF.
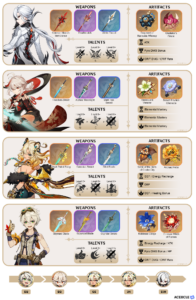
Role 1: Off-Field DPS
Recommended Weapons
- Kagura's Verity (5✩)
- Skyward Atlas (5✩)
- Lost Prayer to the Sacred Winds (5✩)
- Memory of Dust (5✩)
- Solar Pearl (4✩)
~= A Thousand Floating Dreams (5✩) - Oathsworn Eye (4✩) [R5]
~= The Widsith (4✩)* - Hakushin Ring (4✩)*
- Mappa Mare (4✩)

1) Kagura's Verity (ATK: 608 • Crit DMG: 66.2%)
Gains the Kagura Dance effect when using an Elemental Skill, causing the Elemental Skill DMG of the character wielding this weapon to increase by 12/15/18/21/24% for 16s. Max 3 stacks. This character will gain 12/15/18/21/24% All Elemental DMG Bonus when they possess 3 stacks.

2) Skyward Atlas (ATK: 674 • ATK: 33.1%)
Increases Elemental DMG Bonus by 12/15/18/21/24%. Normal Attack hits have a 50% chance to earn the favor of the clouds. which actively seek out nearby opponents to attack for 15s, dealing 160/200/240/280/320% ATK DMG. Can only occur once every 30s.

3) Lost Prayer to the Sacred Winds (ATK: 608 • Crit Rate: 33.1%)
Increases Movement SPD by 10%. When in battle, gain an 8/10/12/14/16% Elemental DMG Bonus every 4s. Max 4 stacks. Lasts until the character falls or leaves combat.

4) Memory of Dust (ATK: 608 • ATK: 49.6%)
Increases Shield Strength by 20/25/30/35/40%. Scoring hits on opponents increases ATK by 4/5/6/7/8% for 8s. Max 5 stacks. Can only occur once every 0.3s. While protected by a shield, this ATK increase effect is increased by 100%.

5) Solar Pearl (ATK: 510 • Crit Rate: 27.6%)
Normal Attack hits increase Elemental Skill and Elemental Burst DMG by 20/25/30/35/40% for 6s. Likewise, Elemental Skill or Elemental Burst hits increase Normal Attack DMG by 20/25/30/35/40% for 6s.
Note: This weapon benefits a lot from refines and attack buffs like Bennett. [R5] Solar Pearl without buffs, or a low refine Solar Pearl with Bennett buff can perform similar to Skyward Atlas. Note that you should do a Normal Attack when you swap in and before you swap out of Yae Miko to keep good uptime on the passive.

6) Oathsworn Eye (ATK: 565 • ATK: 27.6%)
Increases Energy Recharge by 24/30/36/42/48% for 10s after using an Elemental Skill

7) Hakushin Ring (ATK: 565 • Energy Recharge: 30.6%)
After the character equipped with this weapon triggers an electro elemental reaction, nearby party members of an Elemental Type involved in the elemental reaction receive a 10/12.5/15/17.5/20% Elemental DMG Bonus for their element, lasting 6s. Elemental Bonuses gained in this way cannot be stacked.
Note: This weapon's passive can buff your other team members, which may be more beneficial than Yae Miko's personal damage depending on the team and rotation used. Note that the passive cannot be triggered when off-field.

8) Mappa Mare (ATK: 565 • Elemental Mastery: 110)
Triggering an Elemental reaction grants a 8/10/12/14/16% Elemental DMG Bonus for 10s. Max 2 stacks.
Recommended Artifacts
- Golden Troupe (4)*
~= Emblem of Severed Fate (4)* - +18% ATK set (2) / Thundering Fury (2) / Emblem of Severed Fate (2)* [Choose Two]
- Thundersoother (4)*
- Tenacity of the Millelith (4)*

1) Golden Troupe
2-Piece Bonus: Increases Elemental Skill DMG by 20%.
4-Piece Bonus: Increases Elemental Skill DMG by 25%. Additionally, when not on the field, Elemental Skill DMG will be further increased by 25%. This effect will be cleared 2s after taking the field.
Note: Yae's best artifact set in single target. It is also the preferred choice if Yae does not Burst.

2) +18% ATK set (2) / Thundering Fury (2) / Emblem of Severed Fate (2)* [Choose Two]

3) Thundersoother
2-Piece Bonus: Electro RES increased by 40%.
4-Piece Bonus: Increases DMG against opponents affected by Electro by 35%.
Note: Assuming you are able to maintain 100% uptime on its passive, this is competitive to be Yae's BiS set. This set works best for Yae in Electro-charged teams.

4) Tenacity of the Millelith
2-Piece Bonus: HP +20%
4-Piece Bonus: When an Elemental Skill hits an opponent, the ATK of all nearby party members is increased by 20% and their Shield Strength is increased by 30% for 3s. This effect can be triggered once every 0.5s. This effect can still be triggered even when the character who is using this artifact set is not on the field.
Note: This set trades off a portion of Yae's damage in return for a party wide 20 ATK% buff. If you have good pieces as a result of farming Pale Flame (4) (for Eula or otherwise) this can be a good option for her. Not recommended to specifically farm this set for Yae.
| Artifact Main Stats | Artifact Sub Stats |
|---|---|
| Sands - Energy Recharge / ATK% Goblet - Electro DMG Circlet - Crit Rate / DMG | Crit Rate / DMG ATK% Energy Recharge Elemental Mastery Flat ATK |
Role 2: Off-Field Aggravate DPS
Recommended Weapons
- Kagura's Verity (5✩)
- A Thousand Floating Dreams (5✩)*
- Tome of the Eternal Flow (5✩)
- Lost Prayer to the Sacred Winds (5✩)
~= Skyward Atlas (5✩)
~= The Widsith (4✩)*
~= Tulaytullah's Remembrance (5✩) - Solar Pearl (4✩)*
- Oathsworn Eye R5 (4✩)
- Hakushin Ring (4✩)*
- Mappa Mare (4✩)
1) Kagura's Verity (ATK: 608 • Crit DMG: 66.2%)
Gains the Kagura Dance effect when using an Elemental Skill, causing the Elemental Skill DMG of the character wielding this weapon to increase by 12/15/18/21/24% for 16s. Max 3 stacks. This character will gain 12/15/18/21/24% All Elemental DMG Bonus when they possess 3 stacks.

2) A Thousand Floating Dreams (ATK: 542 • Elemental Mastery: 265)
Party members other than the equipping character will provide the equipping character with buffs based on whether their Elemental Type is the same as the latter or not. If their Elemental Types are the same, increase Elemental Mastery by 32/40/48/56/64. If not, increase the equipping character's DMG Bonus from their Elemental Type by 10/14/18/22/26%. Each of the aforementioned effects can have up to 3 stacks. Additionally, all nearby party members other than the equipping character will have their Elemental Mastery increased by 40/42/44/46/48. Multiple such effects from multiple such weapons can stack.
Note: The team EM buff this weapon provides may make it desirable over other options.

3) Tome of the Eternal Flow (ATK: 542 • Crit DMG: 88.2%)
HP is increased by 16/20/24/28/32%. When current HP increases or decreases, Charged Attack DMG will be increased by 14/18/22/26/30% for 4s. Max 3 stacks, can be triggered once every 0.3s. When you have 3 stacks or refresh a third stack's duration, 8/9/10/11/12 Energy will be restored. This Energy restoration effect can be triggered once every 12s.
4) Lost Prayer to the Sacred Winds (ATK: 608 • Crit Rate: 33.1%)
Increases Movement SPD by 10%. When in battle, gain an 8/10/12/14/16% Elemental DMG Bonus every 4s. Max 4 stacks. Lasts until the character falls or leaves combat.
5) Solar Pearl (ATK: 510 • Crit Rate: 27.6%)
Normal Attack hits increase Elemental Skill and Elemental Burst DMG by 20/25/30/35/40% for 6s. Likewise, Elemental Skill or Elemental Burst hits increase Normal Attack DMG by 20/25/30/35/40% for 6s.
Note: At [R5] this weapon is better than Tome of the Eternal Flow.
6) Oathsworn Eye (ATK: 565 • ATK: 27.6%)
Increases Energy Recharge by 24/30/36/42/48% for 10s after using an Elemental Skill
7) Hakushin Ring (ATK: 565 • Energy Recharge: 30.6%)
After the character equipped with this weapon triggers an electro elemental reaction, nearby party members of an Elemental Type involved in the elemental reaction receive a 10/12.5/15/17.5/20% Elemental DMG Bonus for their element, lasting 6s. Elemental Bonuses gained in this way cannot be stacked.
Note: This weapon's passive can buff your other team members, which may be more beneficial than Yae Miko's personal damage depending on the team and rotation used. Note that the passive cannot be triggered when off-field.
8) Mappa Mare (ATK: 565 • Elemental Mastery: 110)
Triggering an Elemental reaction grants a 8/10/12/14/16% Elemental DMG Bonus for 10s. Max 2 stacks.
Recommended Artifacts
- Gilded Dreams (4)
~= Emblem of Severed Fate (4)*
~= Golden Troupe (4)* - Thundering Fury (2) and +80 EM set (2) / +18% ATK set (2) / Golden Troupe (2) / Noblesse Oblige (2) [Choose One]
- Thundersoother (4)
- Tenacity of the Millelith (4)*

1) Gilded Dreams
2-Piece Bonus: Increases Elemental Mastery by 80.
4-Piece Bonus: Within 8s of triggering an Elemental Reaction, the character equipping this will obtain buffs based on the Elemental Type of the other party members. ATK is increased by 14% for each party member whose Elemental Type is the same as the equipping character, and Elemental Mastery is increased by 50 for every party member with a different Elemental Type. Each of the aforementioned buffs will count up to 3 characters. This effect can be triggered once every 8s. The character who equips this can still trigger its effects when not on the field.

2) Thundering Fury (2) and +80 EM set (2) / +18% ATK set (2) / Golden Troupe (2) / Noblesse Oblige (2) [Choose One]
3) Thundersoother
2-Piece Bonus: Electro RES increased by 40%.
4-Piece Bonus: Increases DMG against opponents affected by Electro by 35%.
4) Tenacity of the Millelith
2-Piece Bonus: HP +20%
4-Piece Bonus: When an Elemental Skill hits an opponent, the ATK of all nearby party members is increased by 20% and their Shield Strength is increased by 30% for 3s. This effect can be triggered once every 0.5s. This effect can still be triggered even when the character who is using this artifact set is not on the field.
| Artifact Main Stats | Artifact Sub Stats |
|---|---|
| Sands - Energy Recharge / Elemental Mastery / ATK% Goblet - Electro DMG Circlet - Crit Rate / DMG | Crit Rate / DMG Elemental Mastery ATK% Energy Recharge Flat ATK |
Team Compositions
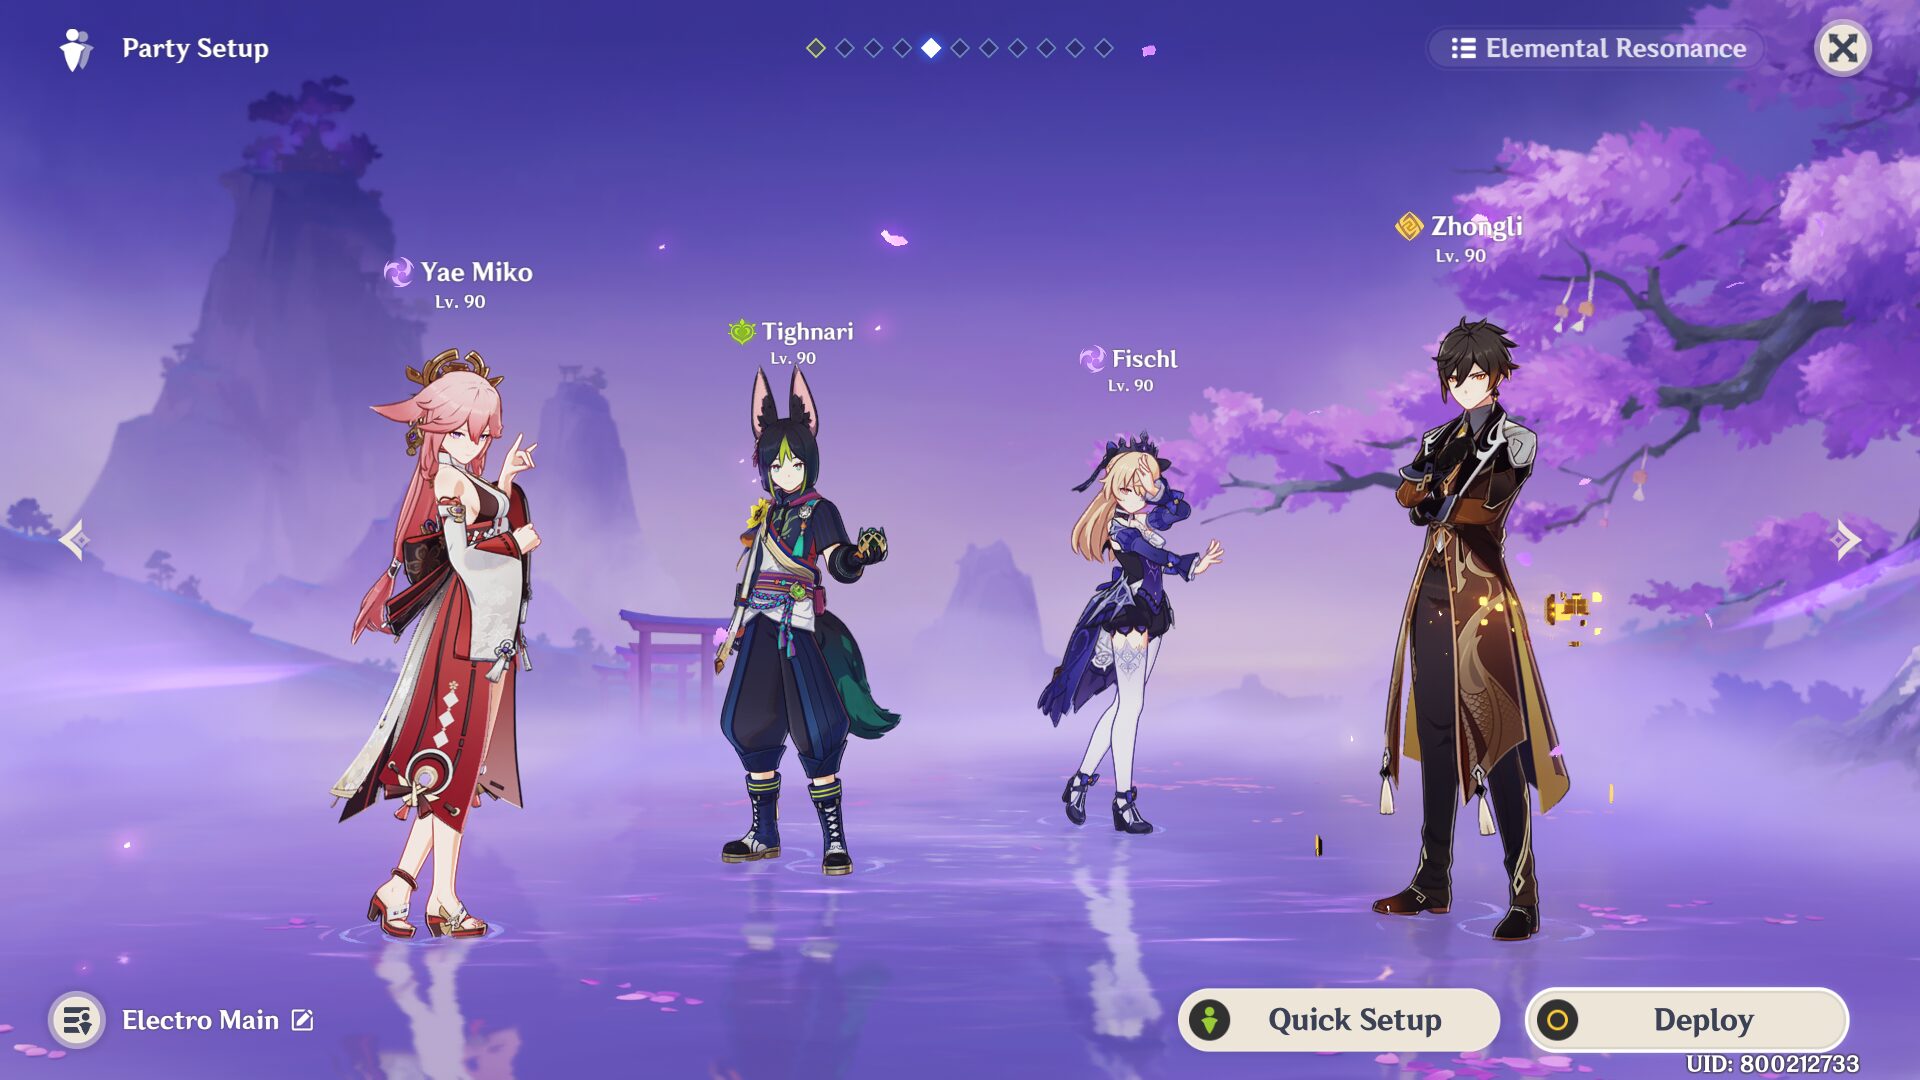
Taser Team
Yae Miko: Off-Field DPS
Raiden Shogun / Fischl: Off-Field DPS + Battery
Kokomi: Enabler + Healer
Kazuha: Anemo CC + Elemental RES Shred w/ VV set || Heizou / Sucrose: Driver
Overload Team
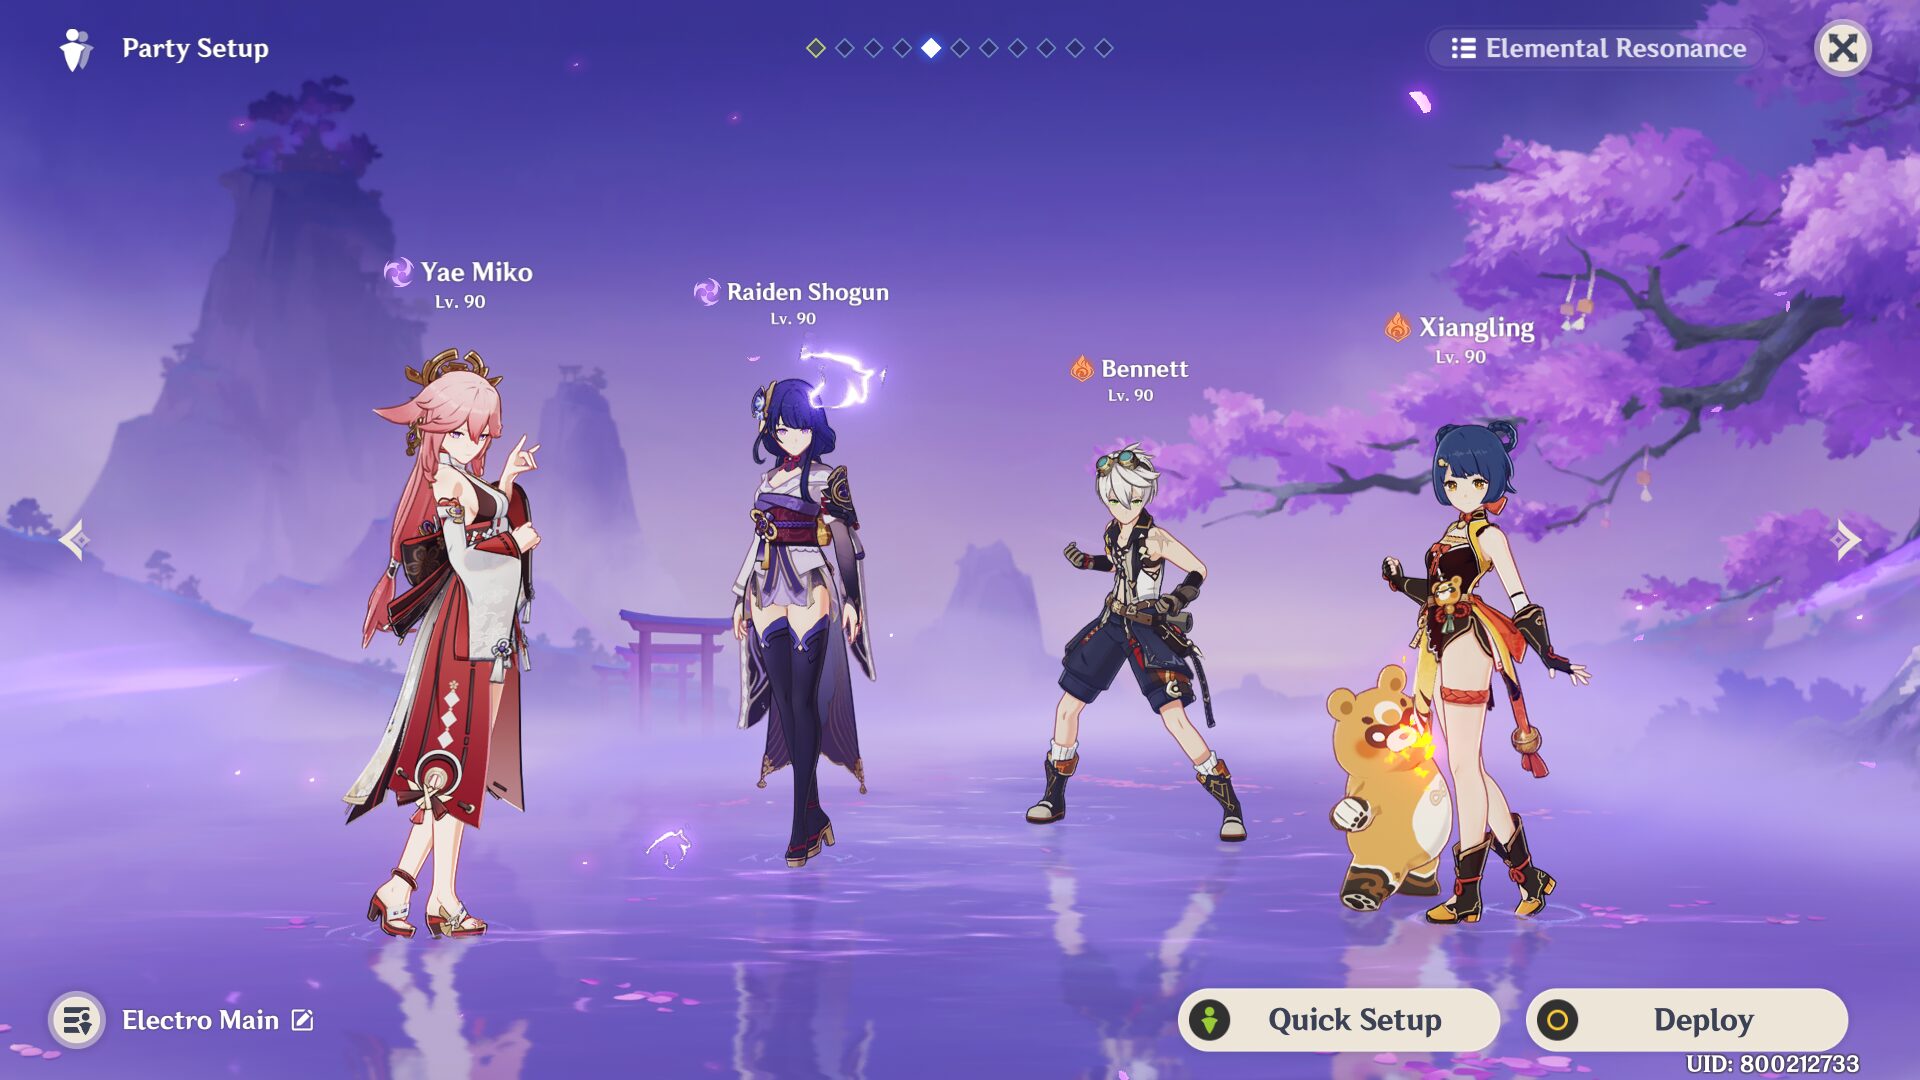
Yae Miko: Off-Field DPS
Raiden Shogun: Off-Field DPS + Battery
Bennett: Buffer + Healer
Xiangling: Sub-DPS
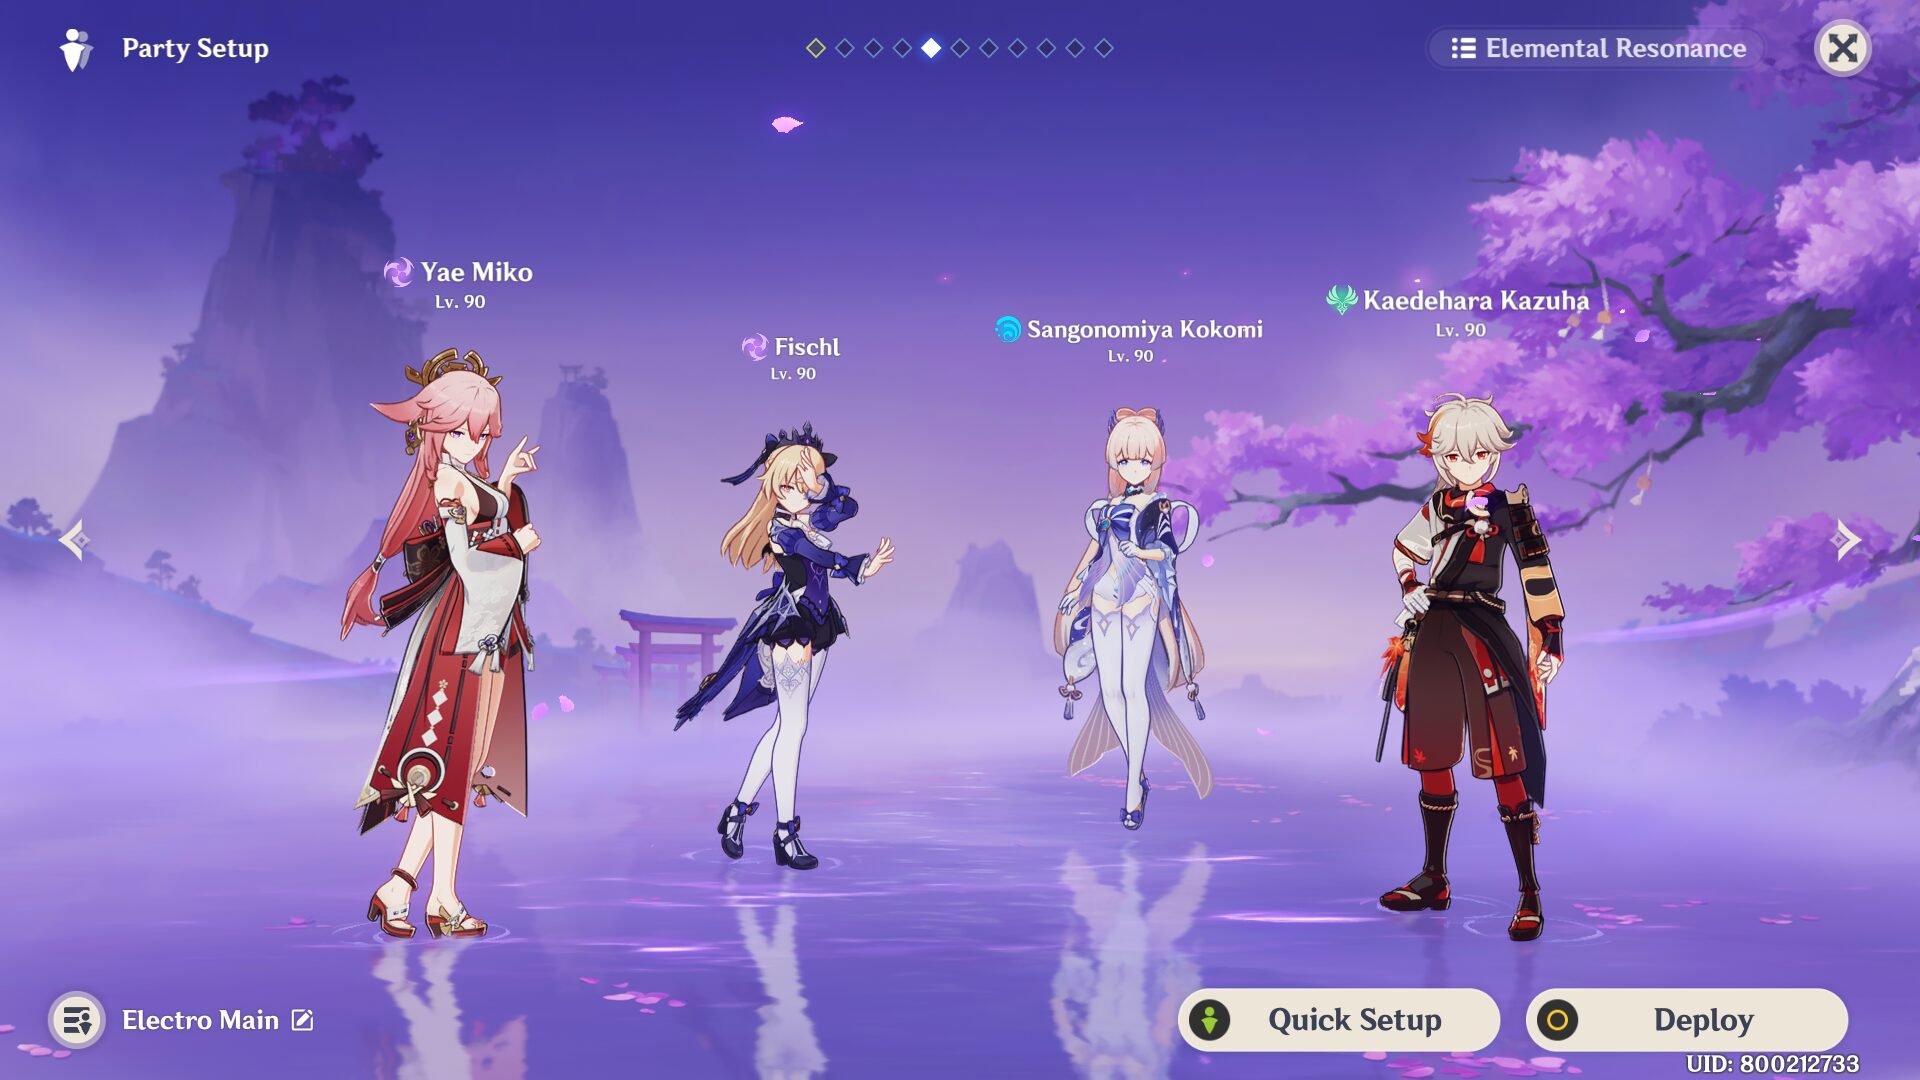
Aggravate Team
Yae Miko: Off-Field DPS
Tighnari / Nahida: Dendro Enabler
Fischl: Off-Field DPS + Battery
Zhongli: Shielder + Elemental RES Shred
Hyperbloom Team
Yae Miko: Off-Field DPS
Kokomi: Hydro Enabler
Nahida: Dendro Enabler
Kazuha: Anemo CC + Elemental RES Shred w/ VV set

Sora
Articles: 327More Articles

Genshin Impact: Reminiscent Regimen: Thrill Event Guide

Genshin Impact: Spiral Abyss V5.1 Floor 12 Complete Guide

Genshin Impact: Spiral Abyss V5.1 Floor 11 Complete Guide

Genshin Impact: Xilonen Quick Character Guide
Xilonen Team Compositions
Genshin Impact: Talent Level-Up Materials Chart (Updated V5.1)

Genshin Impact: All New Achievements in Version 5.1

Genshin Impact: Envisaged Echoes Keqing Guide

Genshin Impact: Envisaged Echoes Zhongli Guide
Genshin Impact: Xilonen Ascension and Talent Materials

Genshin Impact Codes – October 2024

Genshin Impact: Brilliant Chrysanthemum Route & Farming Guide

Genshin Impact: Saurian Claw Succulent Route & Farming Guide
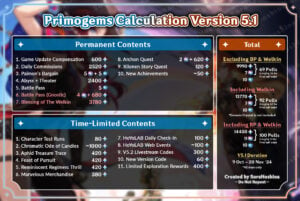
Genshin Impact: Primogems Calculation Version 5.1

Genshin Impact: Imaginarium Theater Version 5.0 October Guide

Genshin Impact 5.1 Special Program Livestream Overview
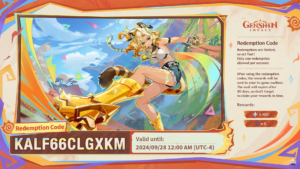
3 New Redemption Codes from 5.1 Special Program
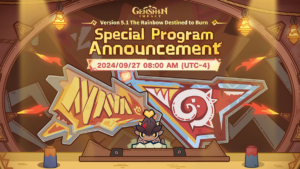
Genshin Impact 5.1 Livestream Countdown

Genshin Impact: Version 5.0 Tier List (September 2024)