Table of Contents
Rosaria is a damage dealer who can be used in multiple ways. She can attack enemies with her versatile Elemental Skill, or she can use Elemental Burst to deal DoT to surrounding enemies and assist other party members in battle.
This guide is based on the Community Character Builds by the Genshin Helper Team.
Talent Priorities

Burst > Skill > Normal Attack
Constellations

Best Constellations: C1, C2, C4 & C6
C1: Unholy Revelation
When Rosaria deals a CRIT Hit, her ATK SPD increases by 10% and her Normal Attack DMG increases by 10% for 4s.
C2: Land Without Promise
The duration of the Ice Lance created by Rites of Termination is increased by 4s.
C3: The Wages of Sin
Increases the Level of Ravaging Confession by 3.
Maximum upgrade level is 15.
C4: Painful Grace
Ravaging Confession's CRIT Hits regenerate 5 Energy for Rosaria.
Can only be triggered once each time Ravaging Confession is cast.
C5: Last Rites
Increases the Level of Rites of Termination by 3.
Maximum upgrade level is 15.
C6: Divine Retribution
Rites of Termination's attack decreases opponents' Physical RES by 20% for 10s.
Role 1: Reverse Melt
This build capitalizes on the fact Rosaria's skill and burst don't have an ICD, allowing her to Melt all Skill and Burst procs. Which in combination with snapshotting buffs onto her burst makes it one of her highest personal damage builds.
Recommended Weapons
- Staff of the Scarlet Sands (5✩)
- Staff of Homa (5✩)
- Primordial Jade Winged-Spear (5✩)
- Calamity Queller (5✩)
- Vortex Vanquisher (5✩)*
- Dragon's Bane (4✩)*
- Wavebreaker's Fin (4✩)*
- Missive Windspear (4✩) [R5]
~= Deathmatch (4✩)* - Blackcliff Pole (4✩) (1 stack)
- ''The Catch'' (4✩) [R5]
- Engulfing Lightning (5✩)
- Skyward Spine (5✩)
- Lithic Spear (4✩) (1 stack)
- Kitain Cross Spear (4✩) [R5]
For more details see the sheet here created by kol #1593.

1) Staff of the Scarlet Sands (ATK: 542 • CRIT Rate: 44.1%)
[Refinement 1] The equipping character gains 52% of their Elemental Mastery as bonus ATK. When an Elemental Skill hits opponents, the Dream of the Scarlet Sands effect will be gained for 10s: The equipping character will gain 28% of their Elemental Mastery as bonus ATK. Max 3 stacks.

2) Staff of Homa (ATK: 608 • Crit Damage: 66.2%)
[Refinement 1] HP increased by 20%. Additionally, provides an ATK Bonus based on 0.8% of the wielder's Max HP. When the wielder's HP is less than 50%, this ATK bonus is increased by an additional 1% of Max HP.

3) Primordial Jade Winged-Spear (ATK: 674 • CRIT Rate: 22.1%)
[Refinement 1] On hit, increases ATK by 3.2% for 6s. Max 7 stacks. This effect can only occur once every 0.3s. While in possession of the maximum possible stacks, DMG dealt is increased by 12%.

4) Calamity Queller (ATK: 741 • ATK: 16.5%)
[Refinement 1] Gain 12% All Elemental DMG Bonus. Obtain Consummation for 20s after using an Elemental Skill, causing ATK to increase by 3.2% per second. This ATK increase has a maximum of 6 stacks. When the character equipped with this weapon is not on the field, Consummation's ATK increase is doubled.

5) Vortex Vanquisher (ATK: 608 • ATK: 49.6%)
[Refinement 1] Increases Shield Strength by 20%. Scoring hits on opponents increases ATK by 4% for 8s. Max 5 stacks. Can only occur once every 0.3s. While protected by a shield, this ATK increase effect is increased by 100%.
Note: The ranking assumes you are unshielded. If you use a shield, it can surpass Calamity Queller.

6) Dragon's Bane (ATK: 454 • Elemental Mastery: 221)
[Refinement 1] Increases DMG against opponents affected by Hydro or Pyro by 20%.
Note: At high refinement [R4-R5] this performs a tad better than Primordial Jade Winged-Spear.

7) Wavebreaker's Fin (ATK: 620 • ATK: 13.8%)
[Refinement 1] For every point of the entire party's combined maximum Energy capacity, the Elemental Burst DMG of the character equipping this weapon is increased by 0.12%. A maximum of 40% increased Elemental Burst DMG can be achieved this way.
Note: At high refinement [R4-R5] with a 260 energy cost team this performs just below Staff of Homa.

8) Missive Windspear (ATK: 510 • ATK: 41.3%)
[Refinement 5] Within 10s after an Elemental Reaction is triggered, ATK is increased by 24% and Elemental Mastery is increased by 96.

9) Blackcliff Pole (ATK: 510 • Crit DMG: 55.1%)
[Refinement 5] After defeating an opponent, ATK is increased by 24% for 30s. This effect has a maximum of 3 stacks, and the duration of each stack is independent of the others.

10) "The Catch" (ATK: 510 • Energy Recharge: 45.9%)
[Refinement 1] Increases Elemental Burst DMG by 32% and Elemental Burst CRIT Rate by 12%.

11) Engulfing Lightning (ATK: 608 • Energy Recharge: 55.1%)
[Refinement 1] ATK increased by 28% of Energy Recharge over the base 100%. You can gain a maximum bonus of 80% ATK. Gain 30% Energy Recharge for 12s after using an Elemental Burst.

12) Skyward Spine (ATK: 674 • Energy Recharge: 36.8%)
[Refinement 1] Increases CRIT Rate by 8% and increases Normal ATK SPD by 12%. Additionally, Normal and Charged Attacks hits on opponents have a 50% chance to trigger a vacuum blade that deals 40% of ATK as DMG in a small AoE. This effect can occur no more than once every 2s.

13) Lithic Spear (ATK: 565 • ATK: 27.6%)
[Refinement 1] For every character in the party who hails from Liyue, the character who equips this weapon gains 7% ATK increase and a 3% CRIT Rate increase. This effect stacks up to 4 times.

14) Kitain Cross Spear (ATK: 565 • Elemental Mastery: 110)
[Refinement 1] Increases Elemental Skill DMG by 6%. After Elemental Skill hits an opponent, the character loses 3 Energy but regenerates 3 Energy every 2s for the next 6s. This effect can occur once every 10s. Can be triggered even when the character is not on the field.
Recommended Artifacts
- Gilded Dreams (4)
~= Lavawalker (4) - Emblem of Severed Fate (4)*
- Blizzard Strayer (2) Noblesse Oblige (2)

1) Gilded Dreams
2-Piece Bonus: Increases Elemental Mastery by 80.
4-Piece Bonus: Within 8s of triggering an Elemental Reaction, the character equipping this will obtain buffs based on the Elemental Type of the other party members. ATK is increased by 14% for each party member whose Elemental Type is the same as the equipping character, and Elemental Mastery is increased by 50 for every party member with a different Elemental Type. Each of the aforementioned buffs will count up to 3 characters. This effect can be triggered once every 8s. The character who equips this can still trigger its effects when not on the field.

2) Emblem of Severed Fate
2-Piece Bonus: Energy Recharge +20%
4-Piece Bonus: Increases Elemental Burst DMG by 25% of Energy Recharge. A maximum of 75% bonus DMG can be obtained in this way.

3) Blizzard Strayer (2) Noblesse Oblige (2)
Blizzard Strayer 2-Piece Bonus: Cryo DMG Bonus +15%
Noblesse Oblige 2-Piece Bonus: Elemental Burst DMG +20%
| Artifact Main Stats | Artifact Sub Stats |
|---|---|
| Sands - Elemental Mastery / ATK% Goblet - Cryo DMG Circlet - Crit Rate / DMG | Crit Rate Crit DMG Elemental Mastery / ATK% Energy Recharge Flat ATK |
Role 2: Freeze
This build can be used on both a quick-swap/sub-dps and perma-freeze DPS Rosaria. If played as a perma-freeze DPS, Rosaria has the same team comp as Freeze Kaeya.
Recommended Weapons
- Staff of Homa (5✩)
- Wavebreaker's Fin (4✩)*
- Vortex Vanquisher (5✩) (3 stacks)
- Primordial Jade Winged-Spear (5✩)
- Blackcliff Pole (4✩) (1 stack)
- Skyward Spine (5✩)
- Engulfing Lightning (5✩)
- Lithic Spear (4✩) (1 stack)
- Staff of the Scarlet Sands (5✩)
- "The Catch" (4✩) [R5]
- Deathmatch (4✩)*
1) Staff of Homa (ATK: 608 • Crit Damage: 66.2%)
[Refinement 1] HP increased by 20%. Additionally, provides an ATK Bonus based on 0.8% of the wielder's Max HP. When the wielder's HP is less than 50%, this ATK bonus is increased by an additional 1% of Max HP.
2) Wavebreaker's Fin (ATK: 620 • ATK: 13.8%)
[Refinement 1] For every point of the entire party's combined maximum Energy capacity, the Elemental Burst DMG of the character equipping this weapon is increased by 0.12%. A maximum of 40% increased Elemental Burst DMG can be achieved this way.
Note: At high refinement [R5], this weapon can perform similarly to Staff of Homa, and even outperform it with a high energy cost team (260 cost).
3) Vortex Vanquisher (ATK: 608 • ATK: 49.6%)
[Refinement 1] Increases Shield Strength by 20%. Scoring hits on opponents increases ATK by 4% for 8s. Max 5 stacks. Can only occur once every 0.3s. While protected by a shield, this ATK increase effect is increased by 100%.
4) Primordial Jade Winged-Spear (ATK: 674 • CRIT Rate: 22.1%)
[Refinement 1] On hit, increases ATK by 3.2% for 6s. Max 7 stacks. This effect can only occur once every 0.3s. While in possession of the maximum possible stacks, DMG dealt is increased by 12%.
5) Blackcliff Pole (ATK: 510 • Crit DMG: 55.1%)
[Refinement 5] After defeating an opponent, ATK is increased by 24% for 30s. This effect has a maximum of 3 stacks, and the duration of each stack is independent of the others.
6) Skyward Spine (ATK: 674 • Energy Recharge: 36.8%)
[Refinement 1] Increases CRIT Rate by 8% and increases Normal ATK SPD by 12%. Additionally, Normal and Charged Attacks hits on opponents have a 50% chance to trigger a vacuum blade that deals 40% of ATK as DMG in a small AoE. This effect can occur no more than once every 2s.
7) Engulfing Lightning (ATK: 608 • Energy Recharge: 55.1%)
[Refinement 1] ATK increased by 28% of Energy Recharge over the base 100%. You can gain a maximum bonus of 80% ATK. Gain 30% Energy Recharge for 12s after using an Elemental Burst.
8) Lithic Spear (ATK: 565 • ATK: 27.6%)
[Refinement 1] For every character in the party who hails from Liyue, the character who equips this weapon gains 7% ATK increase and a 3% CRIT Rate increase. This effect stacks up to 4 times.
9) Staff of the Scarlet Sands (ATK: 542 • CRIT Rate: 44.1%)
[Refinement 1] The equipping character gains 52% of their Elemental Mastery as bonus ATK. When an Elemental Skill hits opponents, the Dream of the Scarlet Sands effect will be gained for 10s: The equipping character will gain 28% of their Elemental Mastery as bonus ATK. Max 3 stacks.
10) "The Catch" (ATK: 510 • Energy Recharge: 45.9%)
[Refinement 1] Increases Elemental Burst DMG by 32% and Elemental Burst CRIT Rate by 12%.

11) Deathmatch (ATK: 454 • Crit Rate: 36.8%)
[Refinement 1] If there are at least 2 opponents nearby, ATK is increased by 16% and DEF is increased by 16%. If there are fewer than 2 opponents nearby, ATK is increased by 24%.
Note: Rosaria gets a lot of Crit Rate from Blizzard Strayer (4) and Cryo Resonance. As a result, this weapon falls off in value as you will tend to overcap above 100% Crit Rate. If Rosaria is being used without the Blizzard Strayer (4) set, then this weapon can perform better compared to other options.
Recommended Artifacts
- Blizzard Strayer (4)
- Noblesse Oblige (4)*
- Blizzard Strayer (2) Noblesse Oblige (2)

1) Blizzard Strayer
2-Piece Bonus: Cryo DMG Bonus +15%
4-Piece Bonus: When a character attacks an opponent affected by Cryo, their CRIT Rate is increased by 20%. If the opponent is Frozen, CRIT Rate is increased by an additional 20%.

2) Noblesse Oblige
2-Piece Bonus: Elemental Burst DMG +20%
4-Piece Bonus: Using an Elemental Burst increases all party members' ATK by 20% for 12s. This effect cannot stack.
Note: This set is only used in her sub-dps/quickswap roles not her perma-freeze dps role. Also, it should only be considered when you have no decent Blizzard Strayer (4) pieces and no one else on the team is holding Noblesse Oblige (4).
3) Blizzard Strayer (2) Noblesse Oblige (2)
Blizzard Strayer 2-Piece Bonus: Cryo DMG Bonus +15%
Noblesse Oblige 2-Piece Bonus: Elemental Burst DMG +20%
| Artifact Main Stats | Artifact Sub Stats |
|---|---|
| Sands - ATK% Goblet - Cryo DMG Circlet - Crit DMG | Crit DMG ATK% Energy Recharge* Crit Rate* Flat ATK |
Rosaria does not need much Energy Recharge if paired with Kaeya. If paired with another Cryo unit such as Chongyun or Ayaka, she will need more Energy Recharge.
Compared to Kaeya, Rosaria has even less desire for Crit Rate, as her Ascension 1 Talent includes an extra 12% Crit Rate once her Skill hits the back of an enemy.
Role 3: Support
This Build focuses on her Buffing/Energy generation/Cryo application capabilities. However, it does not mean that you don't invest in her personal damage, only that it's a lower priority overall.
Be sure to cast Skill before Burst as Crit Rate granted by the Ascension 1 Talent will be included with Ascension 4 Talent Bonus as well.
Rosaria's Elemental Skill and Elemental Burst can be Reverse Melted (1.5x) with another Pyro applier for some quick and powerful damage.
Recommended Weapons
- Favonius Lance (4✩)*
- Staff of the Scarlet Sands (5✩)
- Deathmatch (4✩)
- Primordial Jade Winged-Spear (5✩)
- Engulfing Lightning (5✩)
- Skyward Spine (5✩)
- ''The Catch'' (4✩)
- Prototype Starglitter (4✩)

1) Favonius Lance (ATK: 565 • Energy Recharge: 30.6%)
[Refinement 5] CRIT Hits have a 100% chance to generate a small amount of Elemental Particles, which will regenerate 6 Energy for the character. Can only occur once every 6s.
Note: The best option in situations where you havent met your teams energy requirements. Outside of that scenario you would be better of using a Crit Rate weapon that benefits her A4 buff.
2) Staff of the Scarlet Sands (ATK: 542 • CRIT Rate: 44.1%)
[Refinement 1] The equipping character gains 52% of their Elemental Mastery as bonus ATK. When an Elemental Skill hits opponents, the Dream of the Scarlet Sands effect will be gained for 10s: The equipping character will gain 28% of their Elemental Mastery as bonus ATK. Max 3 stacks.
3) Deathmatch (ATK: 454 • Crit Rate: 36.8%)
[Refinement 1] If there are at least 2 opponents nearby, ATK is increased by 16% and DEF is increased by 16%. If there are fewer than 2 opponents nearby, ATK is increased by 24%.
4) Primordial Jade Winged-Spear (ATK: 674 • CRIT Rate: 22.1%)
[Refinement 1] On hit, increases ATK by 3.2% for 6s. Max 7 stacks. This effect can only occur once every 0.3s. While in possession of the maximum possible stacks, DMG dealt is increased by 12%.
5) Engulfing Lightning (ATK: 608 • Energy Recharge: 55.1%)
[Refinement 1] ATK increased by 28% of Energy Recharge over the base 100%. You can gain a maximum bonus of 80% ATK. Gain 30% Energy Recharge for 12s after using an Elemental Burst.
6) Skyward Spine (ATK: 674 • Energy Recharge: 36.8%)
[Refinement 1] Increases CRIT Rate by 8% and increases Normal ATK SPD by 12%. Additionally, Normal and Charged Attacks hits on opponents have a 50% chance to trigger a vacuum blade that deals 40% of ATK as DMG in a small AoE. This effect can occur no more than once every 2s.
7) "The Catch" (ATK: 510 • Energy Recharge: 45.9%)
[Refinement 1] Increases Elemental Burst DMG by 32% and Elemental Burst CRIT Rate by 12%.

8) Prototype Starglitter (ATK: 510 • Energy Recharge: 45.9%)
[Refinement 5] After using an Elemental Skill, increases Normal and Charged Attack DMG by 16% for 12s. Max 2 stacks.
Recommended Artifacts
- Noblesse Oblige (4)
- Instructor (4)*
1) Noblesse Oblige
2-Piece Bonus: Elemental Burst DMG +20%
4-Piece Bonus: Using an Elemental Burst increases all party members' ATK by 20% for 12s. This effect cannot stack.

2) Instructor
2-Piece Bonus: Increases Elemental Mastery by 80.
4-Piece Bonus: Upon triggering an Elemental Reaction, increases all party members' Elemental Mastery by 120 for 8s.
Note: Can be the better option in teams that prefer the Elemental Mastery buff over ATK, such as Hu Tao VapeMelt.
| Artifact Main Stats | Artifact Sub Stats |
|---|---|
| Sands - ATK% / Energy Recharge Goblet - Cryo DMG Circlet - Crit Rate | Crit Rate Energy Recharge Crit DMG ATK% Flat ATK |
Team Compositions
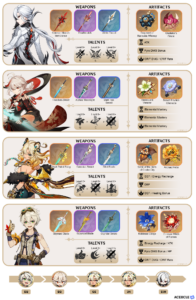
Reverse Melt Team

Rosaria: Main DPS
Kaeya / Chongyun: Sub-DPS + Cryo Resonance + Energy
Bennett: Healer + Buffer (Irreplaceable)
Xiangling: Sub-DPS + Pyro Resonance
Freeze Team

Rosaria: Sub-DPS + Cryo Resonance + Energy
Ganyu / Ayaka / Kaeya: Main DPS
Mona / Kokomi: Healer + Buffer w/ TTDS
Venti / Kazuha: Elemental RES Shredder + Grouping
Support Team

Rosaria: Support
Eula: Main DPS
Raiden Shogun: Buffer (Burst DMG)
Zhongli: Shielder

Sora
Articles: 327More Articles

Genshin Impact: Reminiscent Regimen: Thrill Event Guide

Genshin Impact: Spiral Abyss V5.1 Floor 12 Complete Guide

Genshin Impact: Spiral Abyss V5.1 Floor 11 Complete Guide

Genshin Impact: Xilonen Quick Character Guide
Xilonen Team Compositions
Genshin Impact: Talent Level-Up Materials Chart (Updated V5.1)

Genshin Impact: All New Achievements in Version 5.1

Genshin Impact: Envisaged Echoes Keqing Guide
Genshin Impact: Envisaged Echoes Zhongli Guide
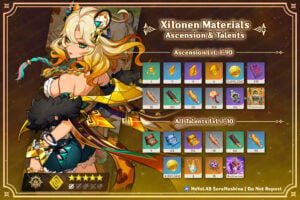
Genshin Impact: Xilonen Ascension and Talent Materials

Genshin Impact Codes – October 2024
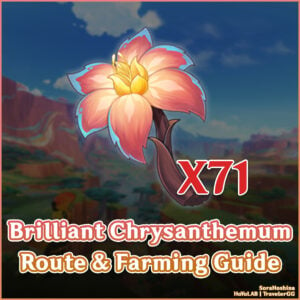
Genshin Impact: Brilliant Chrysanthemum Route & Farming Guide
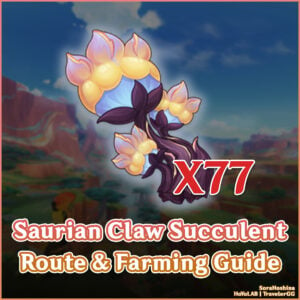
Genshin Impact: Saurian Claw Succulent Route & Farming Guide
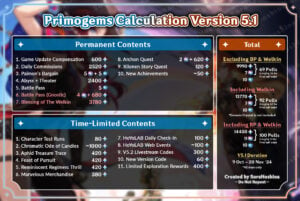
Genshin Impact: Primogems Calculation Version 5.1

Genshin Impact: Imaginarium Theater Version 5.0 October Guide

Genshin Impact 5.1 Special Program Livestream Overview
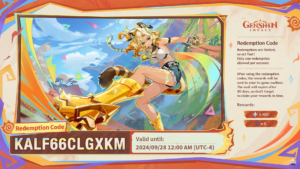
3 New Redemption Codes from 5.1 Special Program
Genshin Impact 5.1 Livestream Countdown

Genshin Impact: Version 5.0 Tier List (September 2024)