Table of Contents
This guide only covers Bennett's role as the Burst Support. A Burst Support Bennett completely ignores the need for excess healing potential and is aimed for people who prefer to squeeze out more damage instead.
On this build, Bennett is built with offensive stats like ATK%, Pyro Damage, and Crit stats while having a good amount of Energy Recharge to burst off cooldown.
Prioritize Energy Recharge before offensive stats if you cannot cast your Elemental Burst off cooldown.
This guide is based on the Community Character Builds by the Genshin Helper Team.
Skills Overview
Normal Attack: Strike of Fortune

Normal Attack
Performs up to 5 rapid strikes.
Charged Attack
Consumes a certain amount of Stamina to unleash 2 rapid sword strikes.
Plunging Attack
Plunges from mid-air to strike the ground below, damaging opponents along the path and dealing AoE DMG upon impact.
Elemental Skill: Passion Overload

Bennett puts all his fire and passion for adventuring into his sword. Results may vary based on how fired up he is…
(Press/Tap)
A single, swift flame strike that deals Pyro DMG.
Hold (Short)
Charges up, resulting in different effects when unleashed based on the Charge Level.
• Level 1: Strikes twice, dealing Pyro DMG and launching opponents.
• Level 2: Unleashes 3 consecutive attacks that deal impressive Pyro DMG, but the last attack triggers an explosion that launches both Bennett and the enemy. Bennett takes no damage from being launched.
Cooldown: 5/7.5/10 seconds
Elemental Burst: Fantastic Voyage

Bennett performs a jumping attack that deals Pyro DMG, creating an Inspiration Field.
Inspiration Field
• If the health of a character within the AoE is equal to or falls below 70%, their health will continuously regenerate. The amount of HP restored scales off Bennett's Max HP.
• If the health of a character within the AoE is higher than 70%, they gain an ATK Bonus that is based on Bennett's Base ATK.
• Imbues characters within the AoE with Pyro.
Duration: 12 seconds
Cooldown: 15 seconds
Energy Cost: 60
Ascension 1: Rekindle
Decreases Passion Overload's CD by 20%.
Ascension 4: Fearnaught
When inside Fantastic Voyage's circle, Passion Overload's CD is decreased by 50% and Bennett cannot be launched by this skill's explosion.
Passive Talent: It Should Be Safe…
When dispatched on an expedition in Mondstadt, time consumed is reduced by 25%.
TLDR / Rotation
As mentioned before, this guide only covers Bennett's role as the Burst Support. Keyword: Burst. His whole benefit in the team is by supplying 100% Burst uptime. In other words, Bennett will contribute with healing and ATK bonus through his Elemental Burst.
As long as you have enough Energy Recharge, Bennett can get enough Energy with few Skills to charge his Burst back up before the next rotation.
Prioritize Energy Recharge before offensive stats if you cannot cast your Elemental Burst off cooldown.
Rotation: Bennett's Elemental Burst and Skill > Support like Xiangling and Xingqiu > Main DPS
Talent Priorities

Burst > Skill
Constellations

Best Constellations: C1, C2 & C5
C1: Grand Expectation ⭐
Fantastic Voyage's ATK increase no longer has an HP restriction, and gains an additional 20% of Bennett's Base ATK.
C2: Impasse Conqueror ⭐
When Bennett's HP falls below 70%, his Energy Recharge is increased by 30%.
C3: Unstoppable Fervor
Increases the Level of Passion Overload by 3.
Maximum upgrade level is 15.
C4: Unexpected Odyssey
Using a Normal Attack as the second attack of Passion Overload's Charge Level 1 will perform a follow-up attack.
This additional attack does 135% of the second attack's DMG.
C5: True Explorer ⭐
Increases the Level of Fantastic Voyage by 3.
Maximum upgrade level is 15.
C6: Fire Ventures With Me
Sword, Claymore, or Polearm-wielding characters inside Fantastic Voyage's radius gain a 15% Pyro DMG Bonus and their weapons are infused with Pyro.
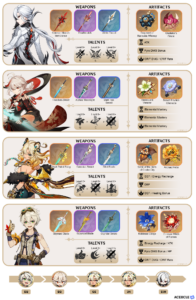
Recommended Weapons
- Mistsplitter Reforged (5⭐)
- Aquila Favonia (5⭐)
- Skyward Blade (5⭐)
- Freedom-Sworn (5⭐)
- The Alley Flash (4⭐)
- Finale of the Deep (4⭐)
- Sapwood Blade (4⭐)
- Blackcliff Longsword (4⭐)
- Prototype Rancour (4⭐)
- Festering Desire (4⭐)

1) Mistsplitter Reforged (ATK: 674 • Crit DMG: 44.1%)
| Gain a 12~24% Elemental DMG Bonus for all elements and receive the might of the Mistsplitter's Emblem. At stack levels 1/2/3, Mistsplitter's Emblem provides a 8/16/28~16/32/56% Elemental DMG Bonus for the character's Elemental Type. The character will obtain 1 stack of Mistsplitter's Emblem in each of the following scenarios: Normal Attack deals Elemental DMG (stack lasts 5s), casting Elemental Burst (stack lasts 10s); Energy is less than 100% (stack disappears when Energy is full). Each stack's duration is calculated independently. |

2) Aquila Favonia (ATK: 674 • Physical DMG Bonus: 41.3%)
| ATK is increased by 20~40%. Triggers on taking DMG: the soul of the Falcon of the West awakens, holding the banner of the resistance aloft, regenerating HP equal to 100~160% of ATK and dealing 200~320% of ATK as DMG to surrounding opponents. This effect can only occur once every 15s. |

3) Skyward Blade (ATK: 608 • Energy Recharge: 55.1%)
| CRIT Rate increased by 4~8%. Gains Skypiercing Might upon using an Elemental Burst: Increases Movement SPD by 10%, increases ATK SPD by 10%, and Normal and Charged hits deal additional DMG equal to 20~40% of ATK. Skypiercing Might lasts for 12s. |

4) Freedom-Sworn (ATK: 608 • Elemental Mastery: 198)
| A part of the "Millennial Movement" that wanders amidst the winds. Increases DMG by 10~20%. When the character wielding this weapon triggers Elemental Reactions, they gain a Sigil of Rebellion. This effect can be triggered once every 0.5s and can be triggered even if said character is not on the field. When you possess 2 Sigils of Rebellion, all of them will be consumed and all nearby party members will obtain "Millennial Movement: Song of Resistance" for 12s. "Millennial Movement: Song of Resistance" increases Normal, Charged, and Plunging Attack DMG by 16~32% and increases ATK by 20~40%. Once this effect is triggered, you will not gain Sigils of Rebellion for 20s. Of the many effects of the "Millennial Movement," buffs of the same type will not stack. |

5) The Alley Flash (ATK: 620 • Elemental Mastery: 55)
| Increases DMG dealt by the character equipping this weapon by 12~24%. Taking DMG disables this effect for 5s. |

6) Finale of the Deep (ATK: 565 • ATK: 27.6%)
| When using an Elemental Skill, ATK will be increased by 12~24% for 15s, and a Bond of Life worth 25% of Max HP will be granted. This effect can be triggered once every 10s. When the Bond of Life is cleared, a maximum of 150~300 ATK will be gained based on 2.4~4.8% of the total amount of the Life Bond cleared, lasting for 15s. |

7) Sapwood Blade (ATK 565 • ER 30.6%)
| After triggering Burning, Quicken, Aggravate, Spread, Bloom, Hyperbloom, or Burgeon, a Leaf of Consciousness will be created around the character for a maximum of 10s. When picked up, the Leaf will grant the character 60~120 Elemental Mastery for 12s. Only 1 Leaf can be generated this way every 20s. This effect can still be triggered if the character is not on the field. The Leaf of Consciousness' effect cannot stack. |

8) Blackcliff Longsword (ATK: 565 • Crit DMG: 36.8%)
| After defeating an opponent, ATK is increased by 12~24% for 30s. This effect has a maximum of 3 stacks, and the duration of each stack is independent of the others. |

9) Prototype Rancour (ATK: 565 • Physical DMG Bonus: 34.5%)
| On hit, Normal or Charged Attacks increase ATK and DEF by 4~8% for 6s. Max 4 stacks. This effect can only occur once every 0.3s. |

10) Festering Desire (ATK: 510 • Energy Recharge: 45.9%)
| Increases Elemental Skill DMG by 16~32% and Elemental Skill CRIT Rate by 6~12%. |
Recommended Artifacts
- Noblesse Oblige (4)
- Emblem of Severed Fate (4)
- Crimson Witch of Flames (4)
- Noblesse Oblige (2) / Crimson Witch of Flames (2) / +18% ATK set (2) / +80 EM set (2) / Emblem of Severed Fate (2) [Choose Two]

1) 4-Pc Noblesse Oblige
2-Piece Bonus: Elemental Burst DMG +20%
4-Piece Bonus: Using an Elemental Burst increases all party members' ATK by 20% for 12s. This effect cannot stack.

2) 4-Pc Emblem of Severed Fate
2-Piece Bonus: Energy Recharge +20%
4-Piece Bonus: Increases Elemental Burst DMG by 25% of Energy Recharge. A maximum of 75% bonus DMG can be obtained in this way.

3) 4-Pc Crimson Witch of Flames
2-Piece Bonus: Pyro DMG Bonus +15%
4-Piece Bonus: Increases Overloaded and Burning, and Burgeon DMG by 40%. Increases Vaporize and Melt DMG by 15%. Using Elemental Skill increases the 2-Piece Set Bonus by 50% of its starting value for 10s. Max 3 stacks.

4) Noblesse Oblige (2) / Crimson Witch of Flames (2) / +18% ATK set (2) / +80 EM set (2) / Emblem of Severed Fate (2) [Choose Two]
Main & Sub Stats Priority
| Artifact Main Stats | Artifact Sub Stats |
|---|---|
| Sands - ATK% / Energy Recharge Goblet - Pyro DMG Circlet - Crit Rate / DMG | Crit Rate / DMG ATK% Energy Recharge** Elemental Mastery **Prioritize Energy Recharge first if you can't burst off cooldown |
Team Compositions
Mono Pyro Team
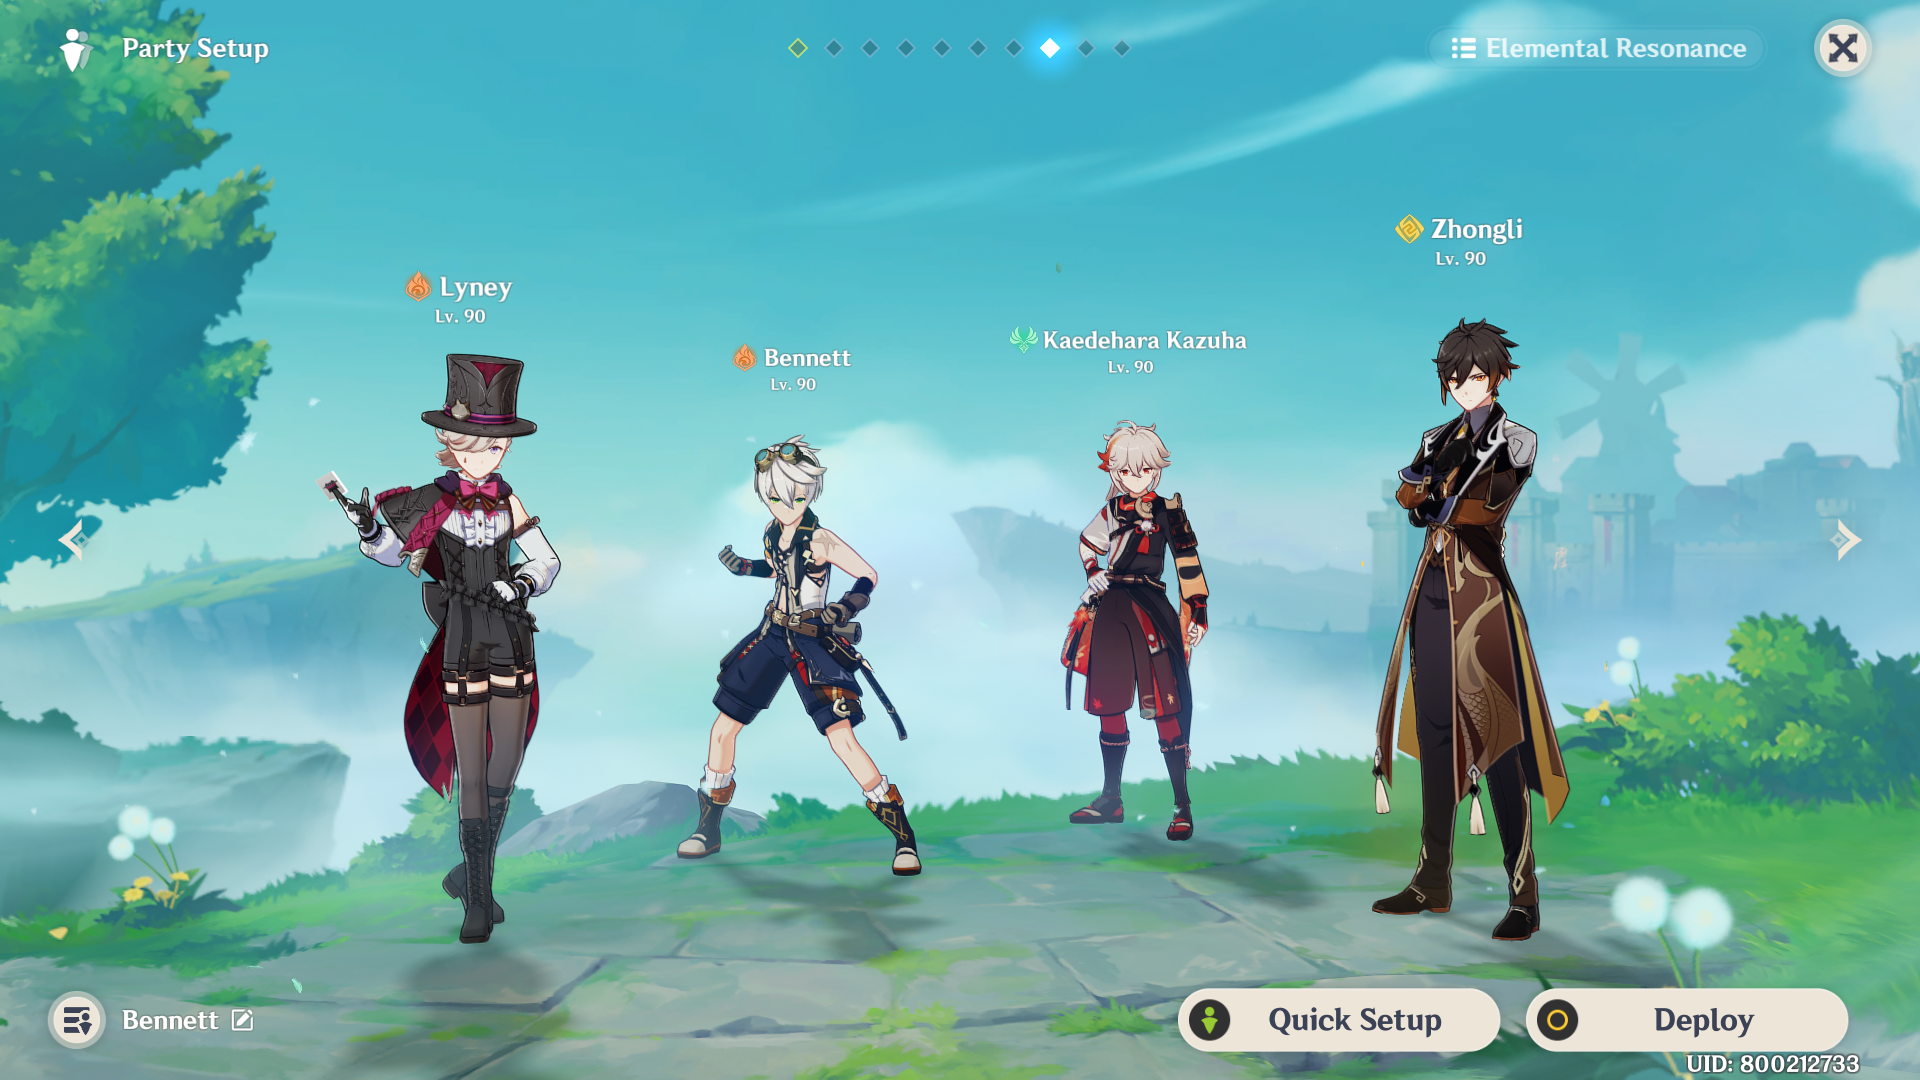
Bennett: Burst Support (Healer + Buffer)
Xiangling / Lyney / Klee / Yoimiya / Diluc / Yanfei: Main DPS
Kazuha / Venti / Sucrose / Jean: Anemo character with Viridescent Venerer set to provide Elemental RES shreds
Zhongli / Albedo: Shielder / Sub-DPS || Xiangling: Pyro Sub-DPS
Vaporize Team

Bennett: Burst Support (Healer + Buffer)
Yelan / Tartaglia / Kamisato Ayato: Hydro DPS
Xiangling: Pyro Flex
Kazuha / Sucrose / Venti / Lynette: Swirl Pyro or Hydro and using VV set
Reverse Melt Team

Bennett: Burst Support (Healer + Buffer)
Rosaria / Chongyun: DPS
Kaeya / Shenhe: Sub-DPS / Support
Xiangling: Sub-DPS || Kazuha / Jean: Anemo to Swirl Pyro
National Team
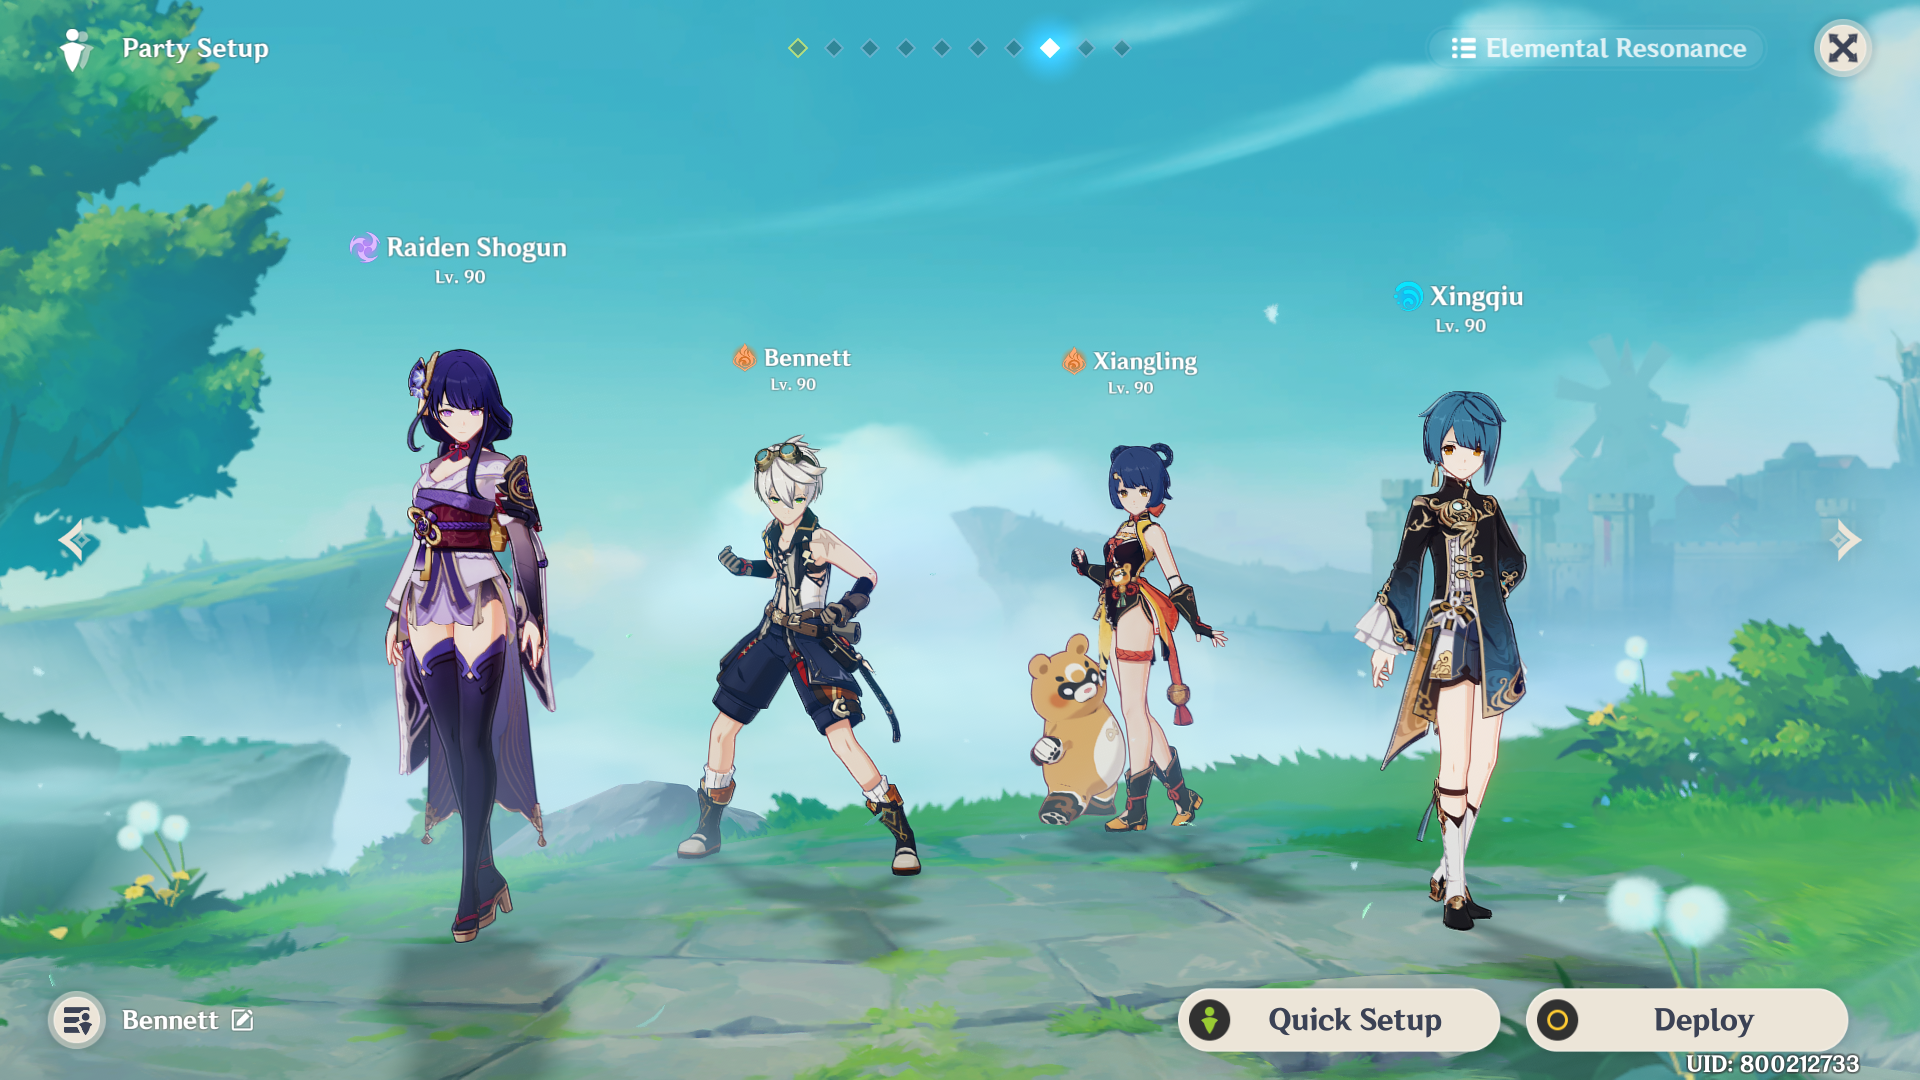
Bennett: Burst Support (Healer + Buffer)
Raiden Shogun: DPS
Xingqiu: Sub-DPS
Xiangling: Sub-DPS

Sora
Articles: 327More Articles

Genshin Impact: Reminiscent Regimen: Thrill Event Guide
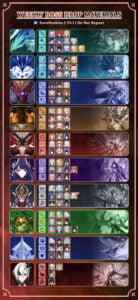
Genshin Impact: Spiral Abyss V5.1 Floor 12 Complete Guide

Genshin Impact: Spiral Abyss V5.1 Floor 11 Complete Guide

Genshin Impact: Xilonen Quick Character Guide
Xilonen Team Compositions
Genshin Impact: Talent Level-Up Materials Chart (Updated V5.1)

Genshin Impact: All New Achievements in Version 5.1

Genshin Impact: Envisaged Echoes Keqing Guide

Genshin Impact: Envisaged Echoes Zhongli Guide
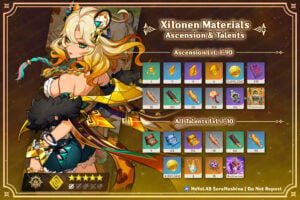
Genshin Impact: Xilonen Ascension and Talent Materials

Genshin Impact Codes – October 2024

Genshin Impact: Brilliant Chrysanthemum Route & Farming Guide

Genshin Impact: Saurian Claw Succulent Route & Farming Guide
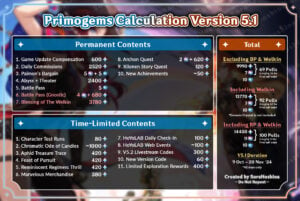
Genshin Impact: Primogems Calculation Version 5.1

Genshin Impact: Imaginarium Theater Version 5.0 October Guide

Genshin Impact 5.1 Special Program Livestream Overview
3 New Redemption Codes from 5.1 Special Program

Genshin Impact 5.1 Livestream Countdown

Genshin Impact: Version 5.0 Tier List (September 2024)