Table of Contents [Hide]
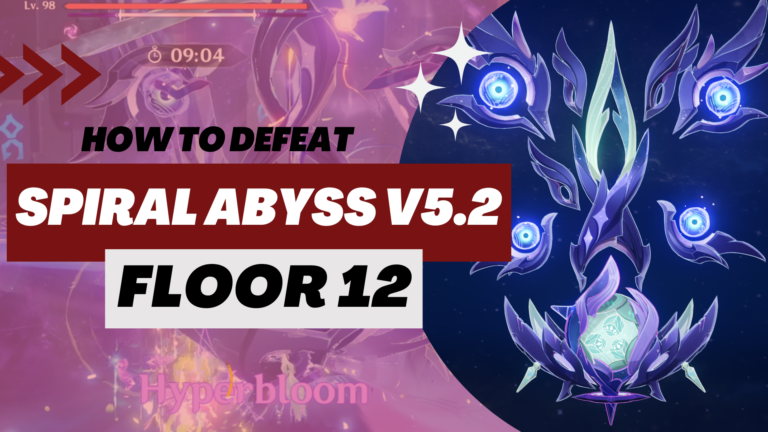
The last floor of 4.7 Abyss is here with yet another Maguu Kenki (but he's single this time) and ASIMON (the desert triangle boss), while also facing mobs of enemies. Continue reading this guide for the full analysis of Floor 12 in the Spiral Abyss.
Blessing of the Abyssal Moon
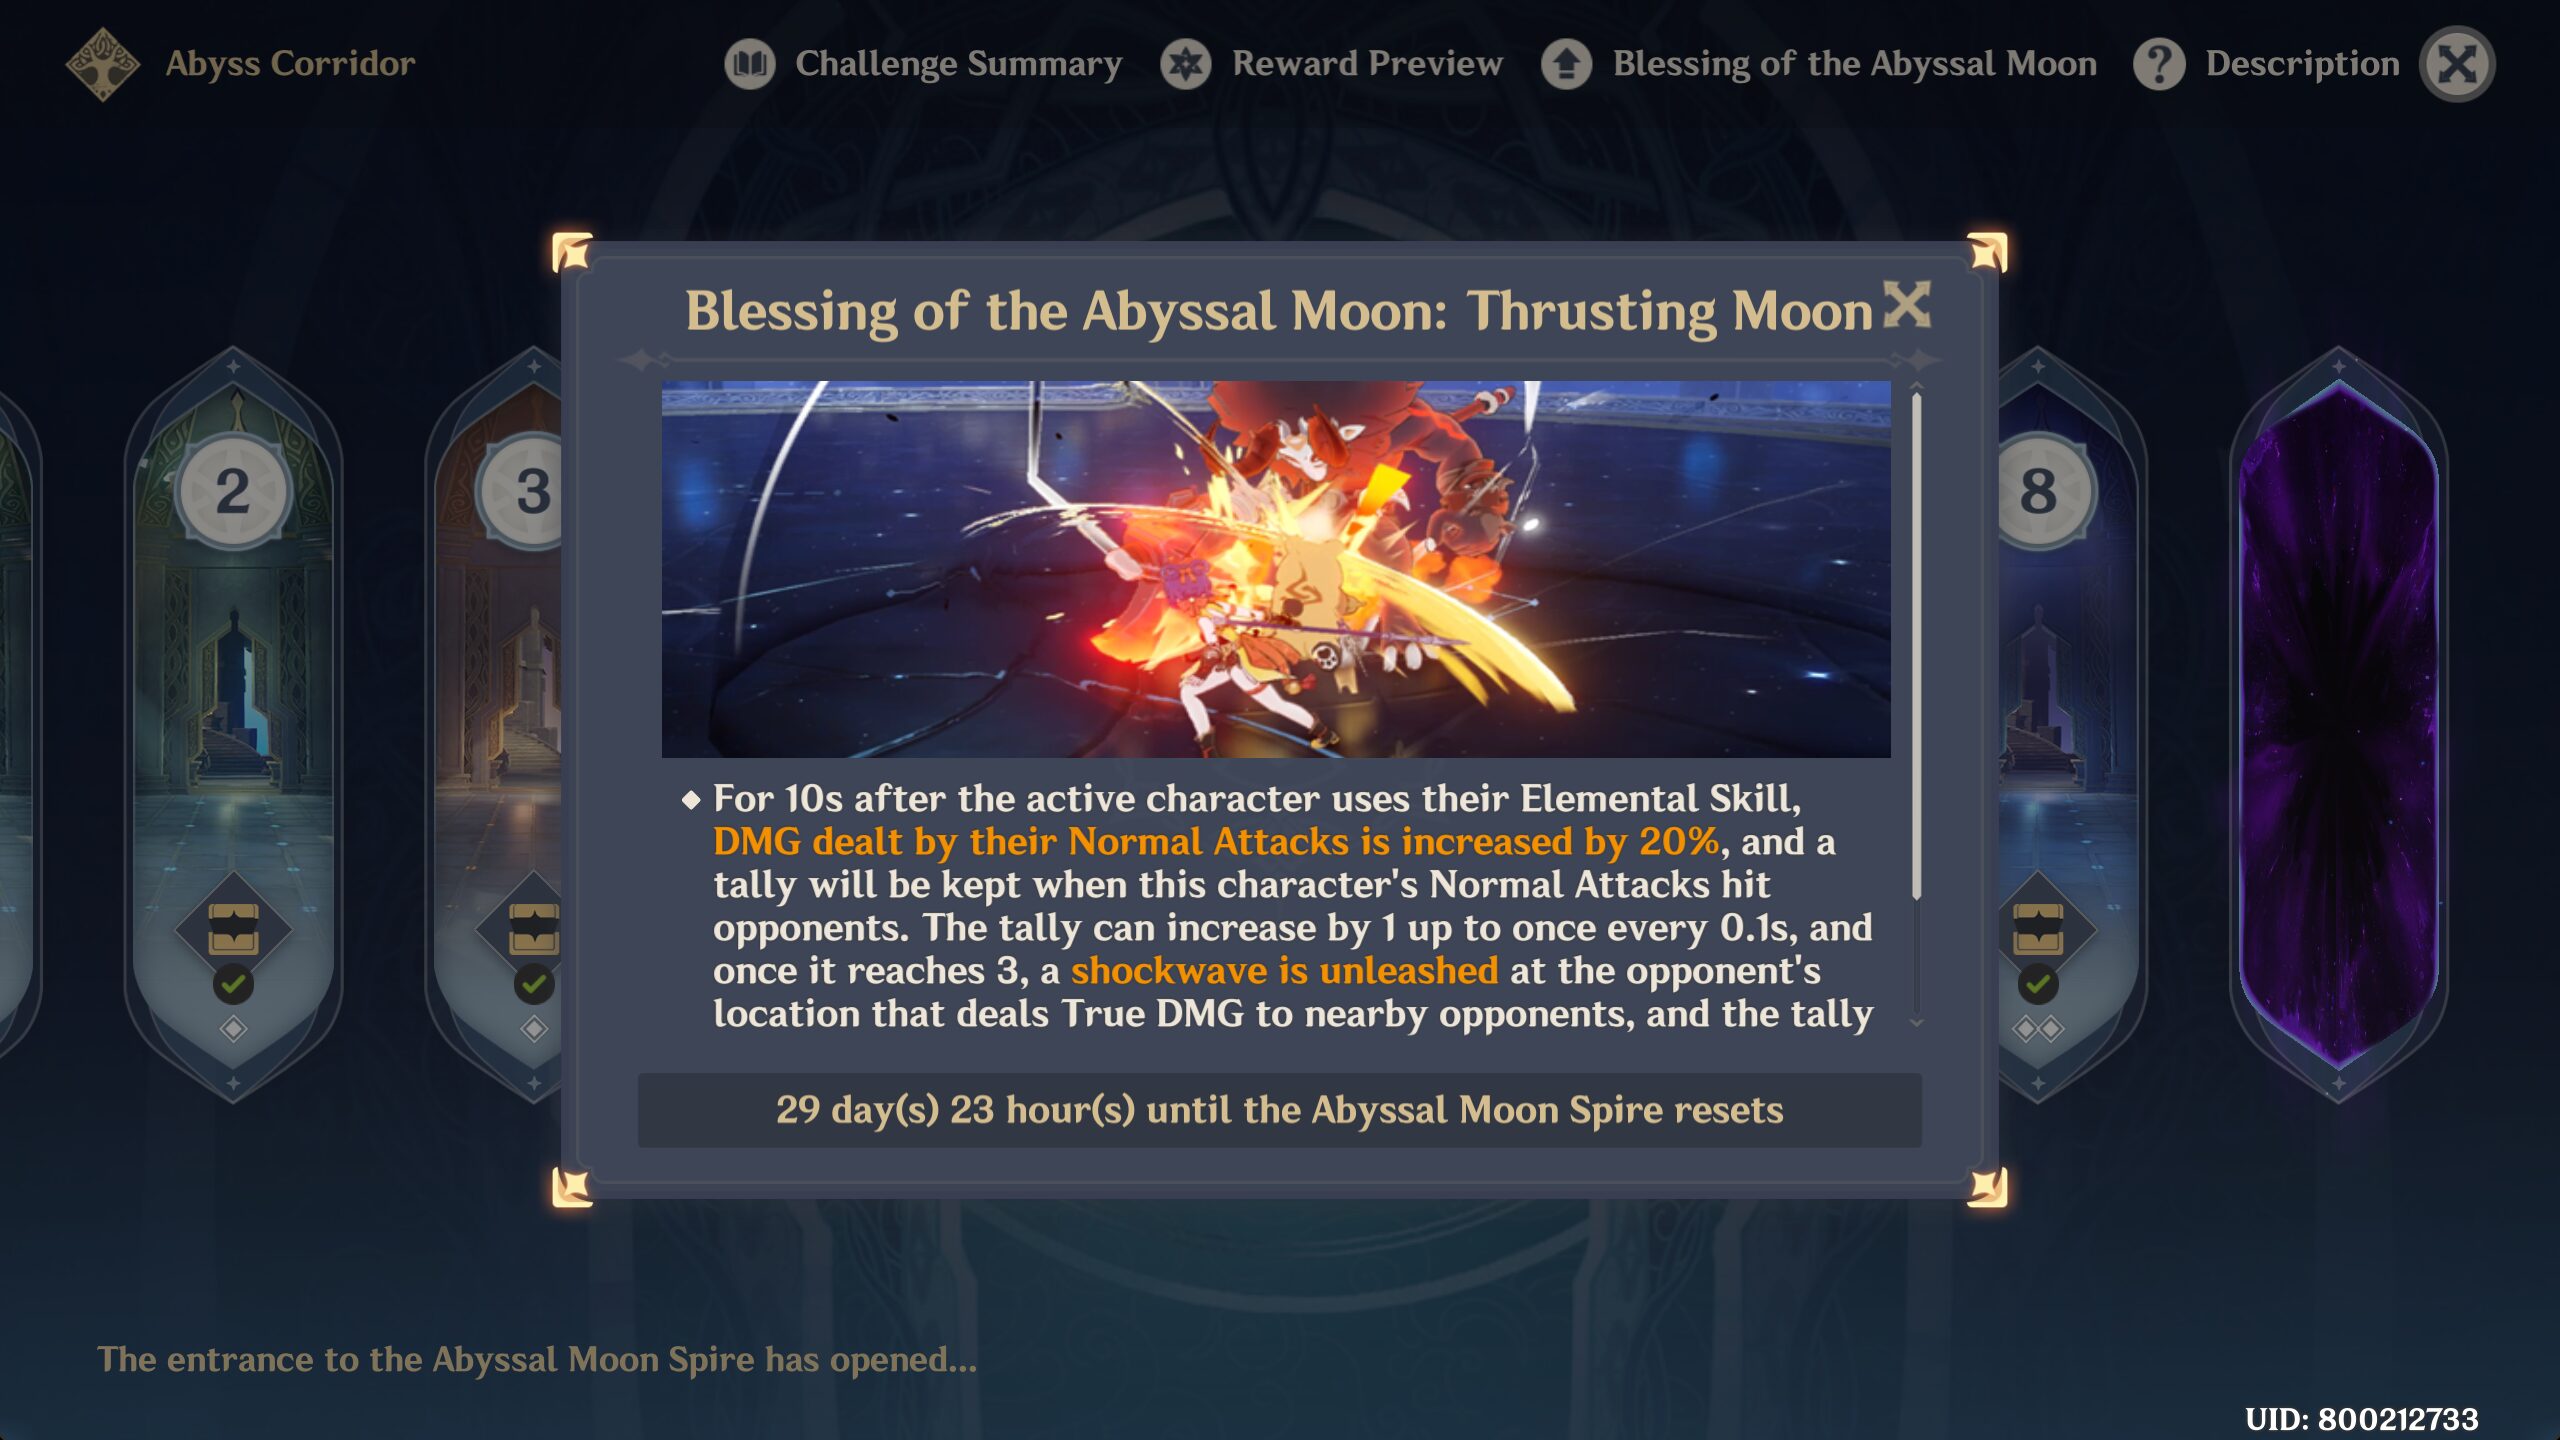
Reminder: Blessing of the Abyssal Moon will change every refresh cycle and may not be updated here. But the enemies list and strategy will remain the same.
For 10s after the active character uses their Elemental Skill, DMG dealt by their Normal Attacks is increased by 20%, and a tally will be kept when this characters's Normal Attacks hit opponents. The tally can increase by 1 up to once every 0.1s, and once it reaches 3, a shockwave is unleashed at the opponent's location that deals True DMG to nearby opponents, and the tally will be reset. Up to 1 shockwave can be unleashed this way every 1.5s, and the effect and tally are cleared when the character leaves the field.
Team Recommendations
Ley Line Disorder:
For this floor only, the Let Line flow will be normal.
General Tips:
If the floor is too hard for you, don’t forget that changing teams is an option. Although you need to start from Chamber 1, at least you don’t have to worry about stars for the Chamber you already completed.
- The recommended elements for the First Half: Electro & Dendro
- Aggravate/Hyperblooom is a good reactions here because there are many Primal Construct and its boss form here and said reactions can easily break their invisibility.
- Other than that, it's best if your main DPS is a single-target because you will face 2 bosses here and AoE DPS won't shine that bright here.
- The not recommended elements for the First Half: Physical
- Just because it's not recommended, doesn't mean it's bad. It's just, there are some Ruin enemies here and they have some resistance towards Physical attacks. If you feel like you're up to some challenge, you can bring your Physical team.
- Example:
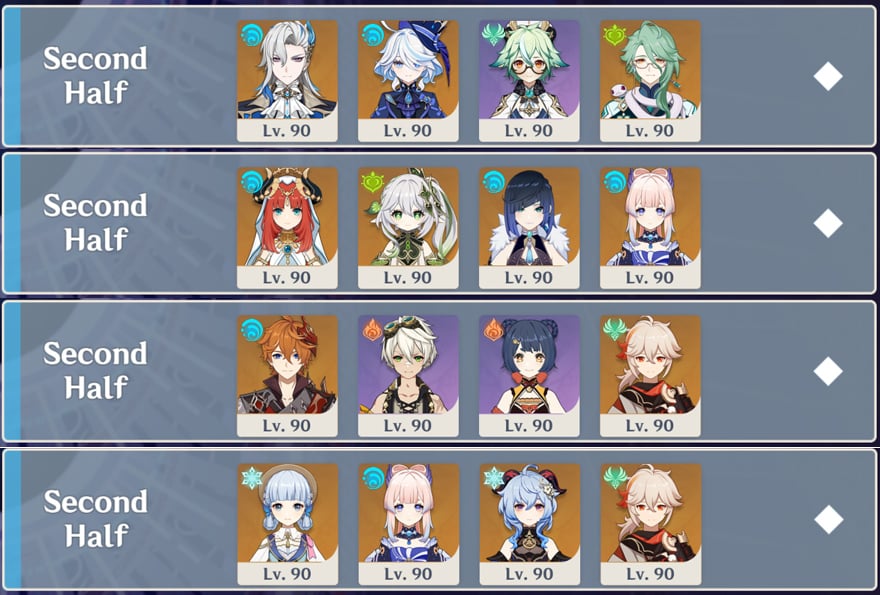
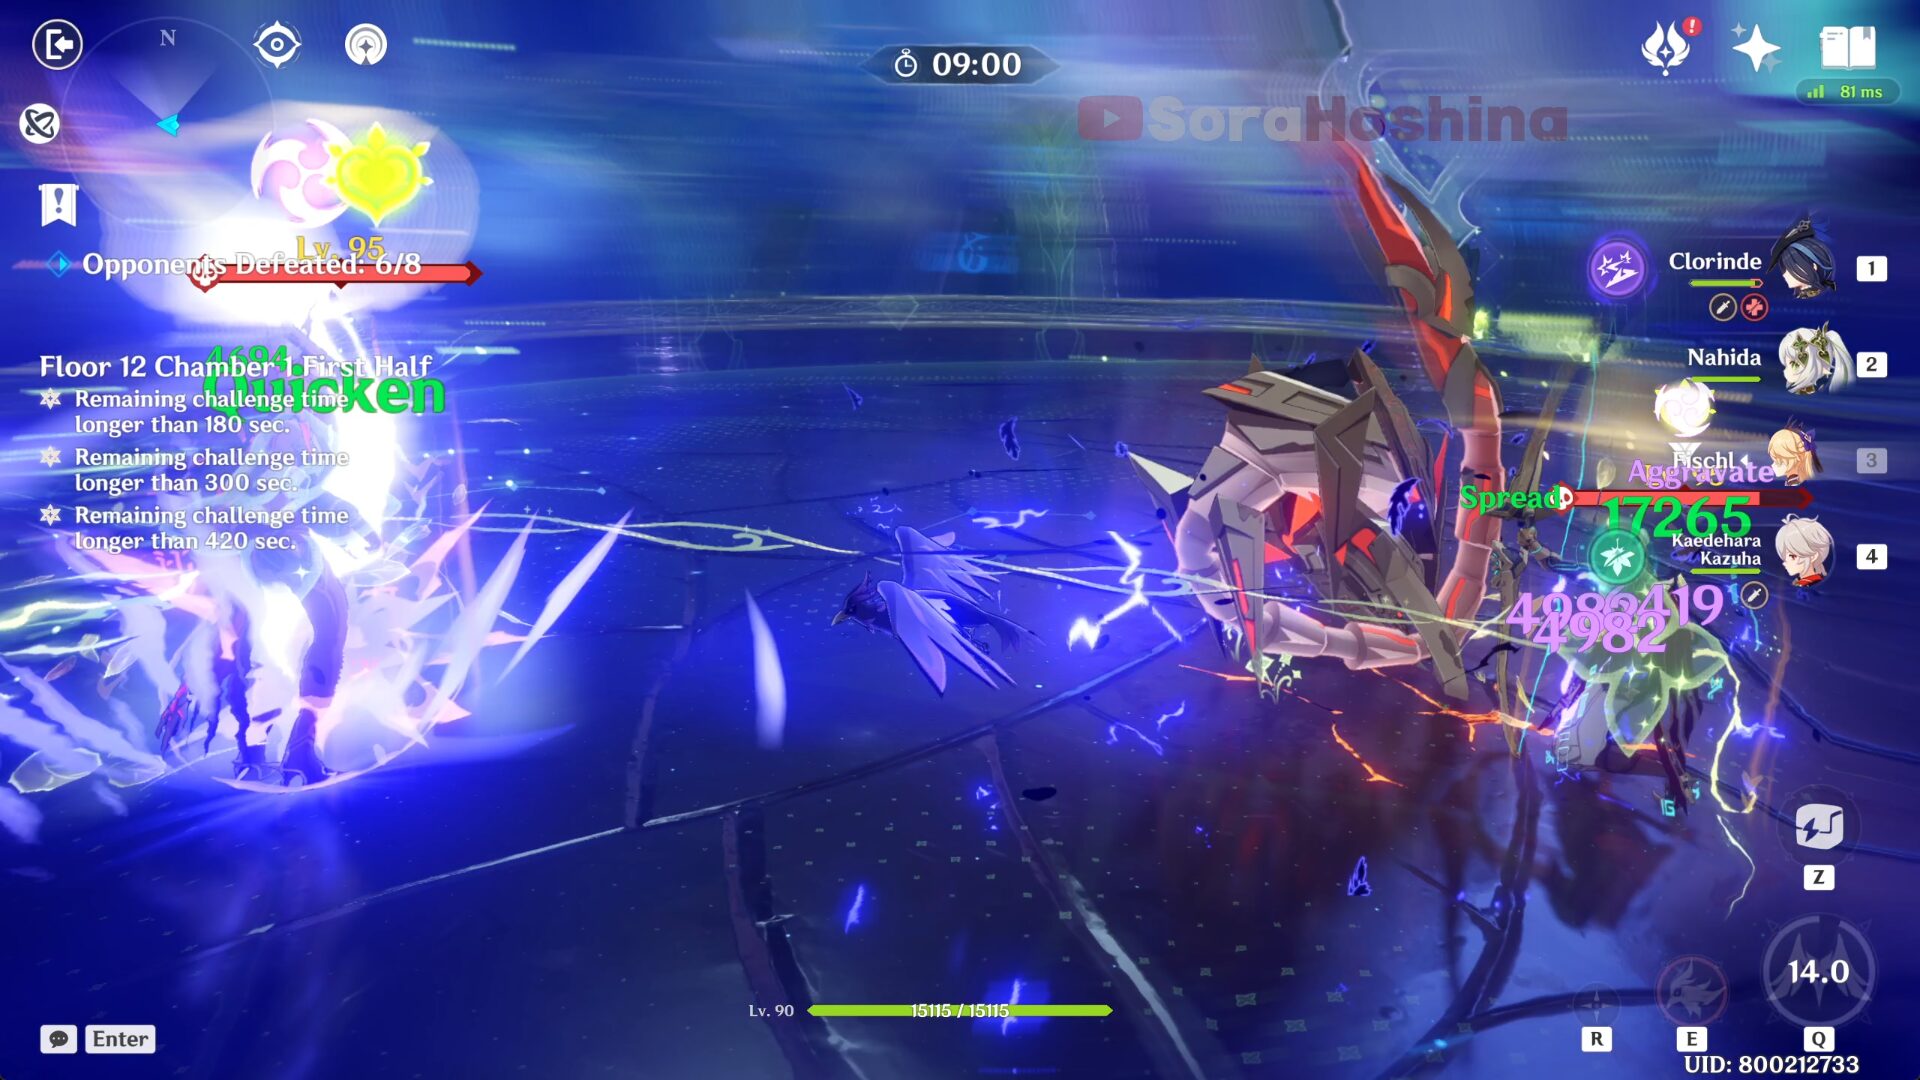
- Aggravate Team: Clorinde + Nahida/DMC + Fischl + Kazuha/Sucrose
- National Team: Raiden + Xingqiu + Bannett + Xiangling
- Vaporize Team: Arlecchino + Xingqiu/Yelan + Zhongli + Flex
- Hyperbloom Team: Clorinde + Collei + Xingqiu + Beidou
- The recommended elements for the Second Half: Anemo & Hydro
- Yeah sure there are Black Serpent Knight Windcutter here who have high RES against Anemo, but there are too many enemies here so it's best if you bring at least one Anemo CC to gather most enemies in once place.
- Hydro is also great here because there are some enemies here with Pyro shield. So it's obvious Hydro is the best element to break those shields.
- The not recommended elements for the Second Half: Pyro
- There are some enemies here with Pyro shield and although most of them don't have Pyro RES, it's not a bad idea to avoid bringing Pyro DPS here (especially Mono Pyro team), especially if the enemies still have their Pyro shield. But if you're planning to use Vaporize or Melt team, feel free to bring Pyro DPS here.
- Example:
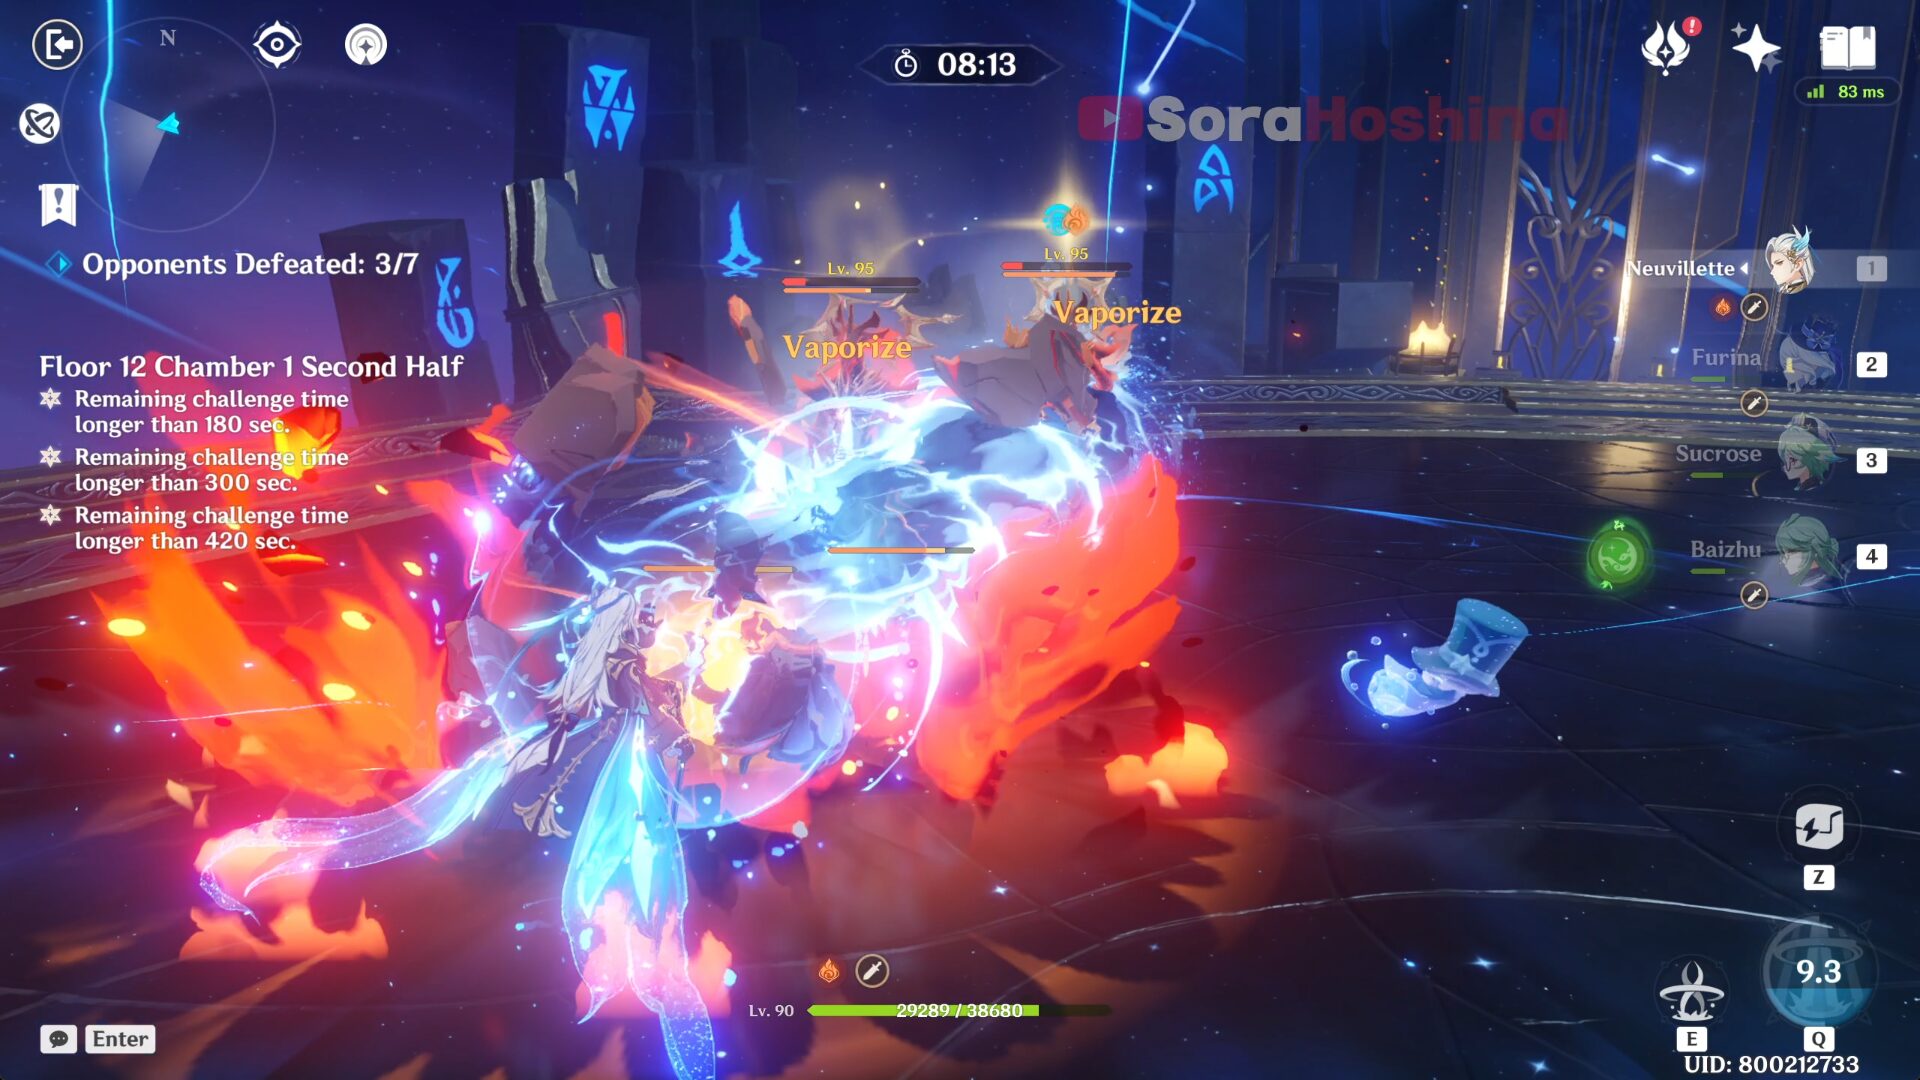
- Bounty Bloom Team: Nilou + Nahida + Xingqiu/Yelan + Kokomi/Barbara
- Neuvillette Team: Neuvillette + Furina + Sucrose/Kazuha + Baizhu/Zhongli
- National Team: Tartaglia + Kazuha + Bennett + Xiangling
- Freeze Team: Ayaka + Kokomi + Ganyu + Kazuha
Floor 12 Chamber 1
First Half
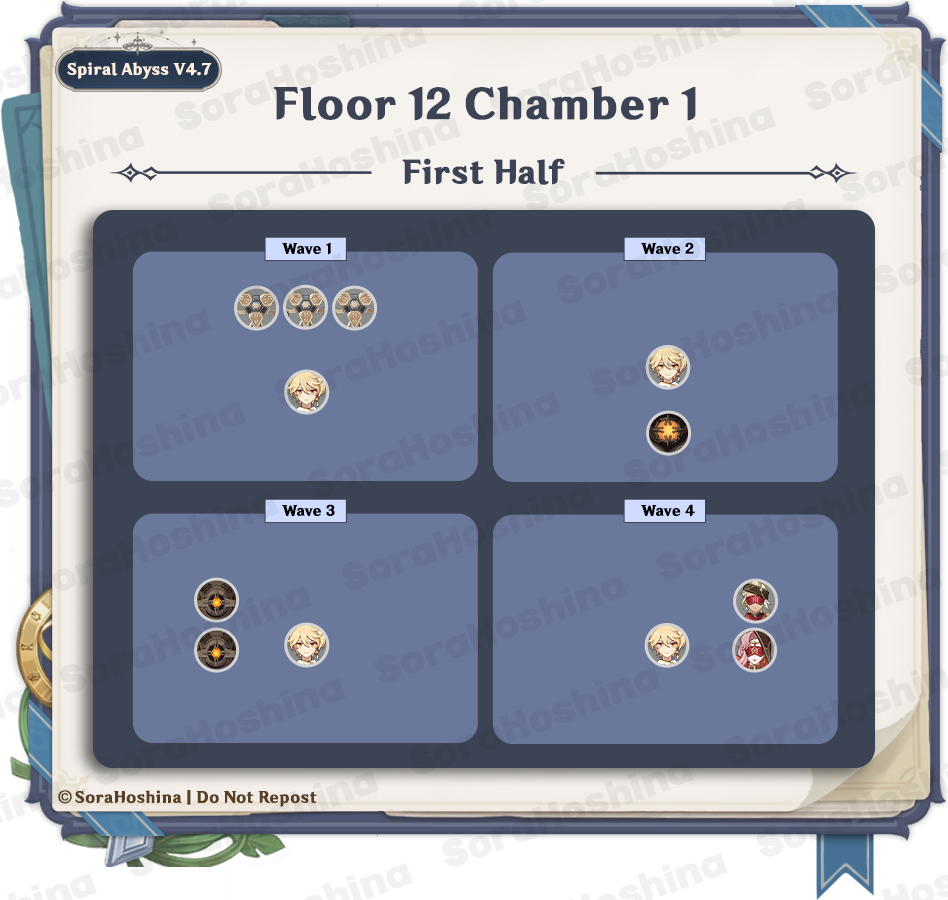
1st Wave: Primal Construct x3
2nd Wave: Ruin Guard x1
3rd Wave: Ruin Drake x2
4th Wave: Eremite Scorching Loremaster x1 & Eremite Galehunter x1
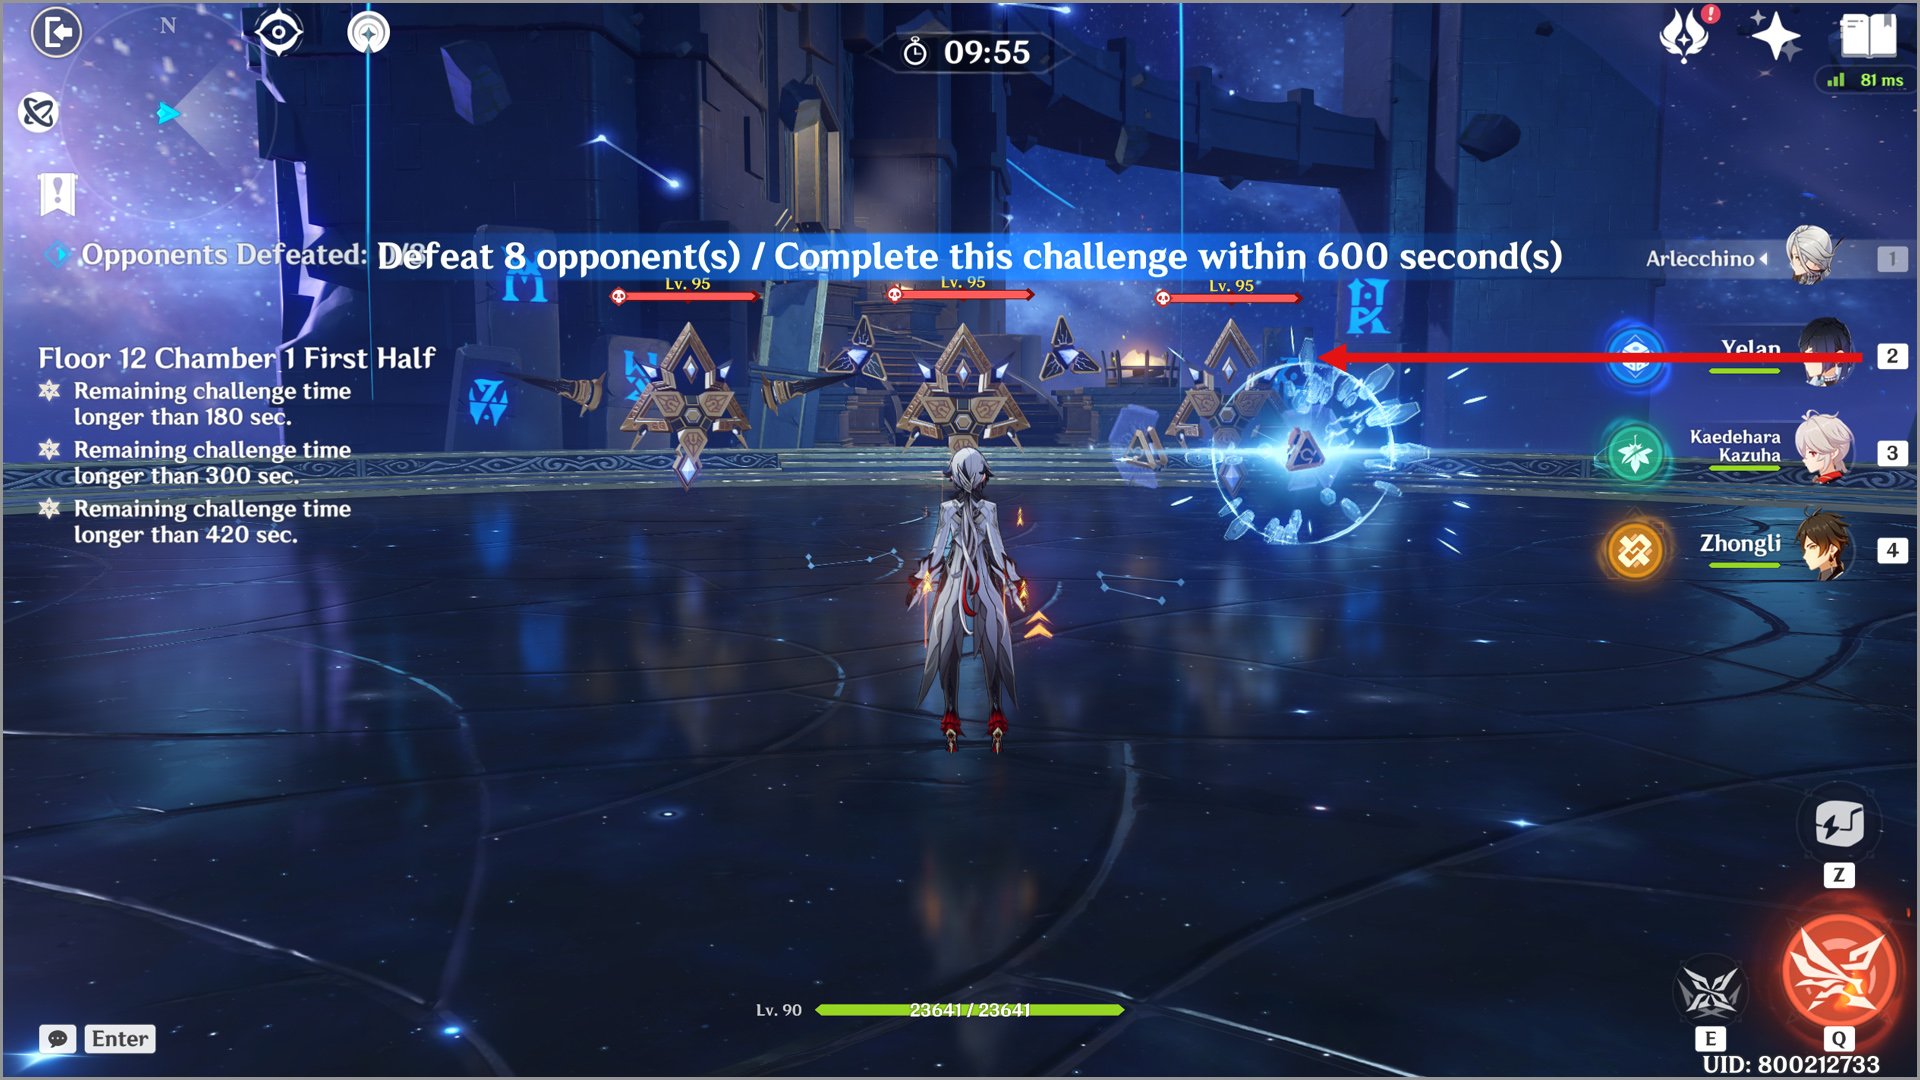
- In the first wave, there are 3 Primal Constructs and they spawn pretty close to each other at the front. Once you start the challenge, immediately go to either most left/right Primal Construct so the opposite one will hover in your direction. This way, you can gather them at one spot without even using Anemo CC. Once they're together, unleash every Skill/Burst you have to defeat all of them at the same time.
- They can enter an invisible state, and once they do, you will have 3 options below. Personally, I prefer the inflict Quicken method because it's faster than the first method:
- Destroy the parts they leave on the field then use Electro
- Inflict Quicken (Dendro x Electro) on the invisible part (you can still see their form faintly)
- Wait for a long time before they end the invisible state and appear again
- They can enter an invisible state, and once they do, you will have 3 options below. Personally, I prefer the inflict Quicken method because it's faster than the first method:
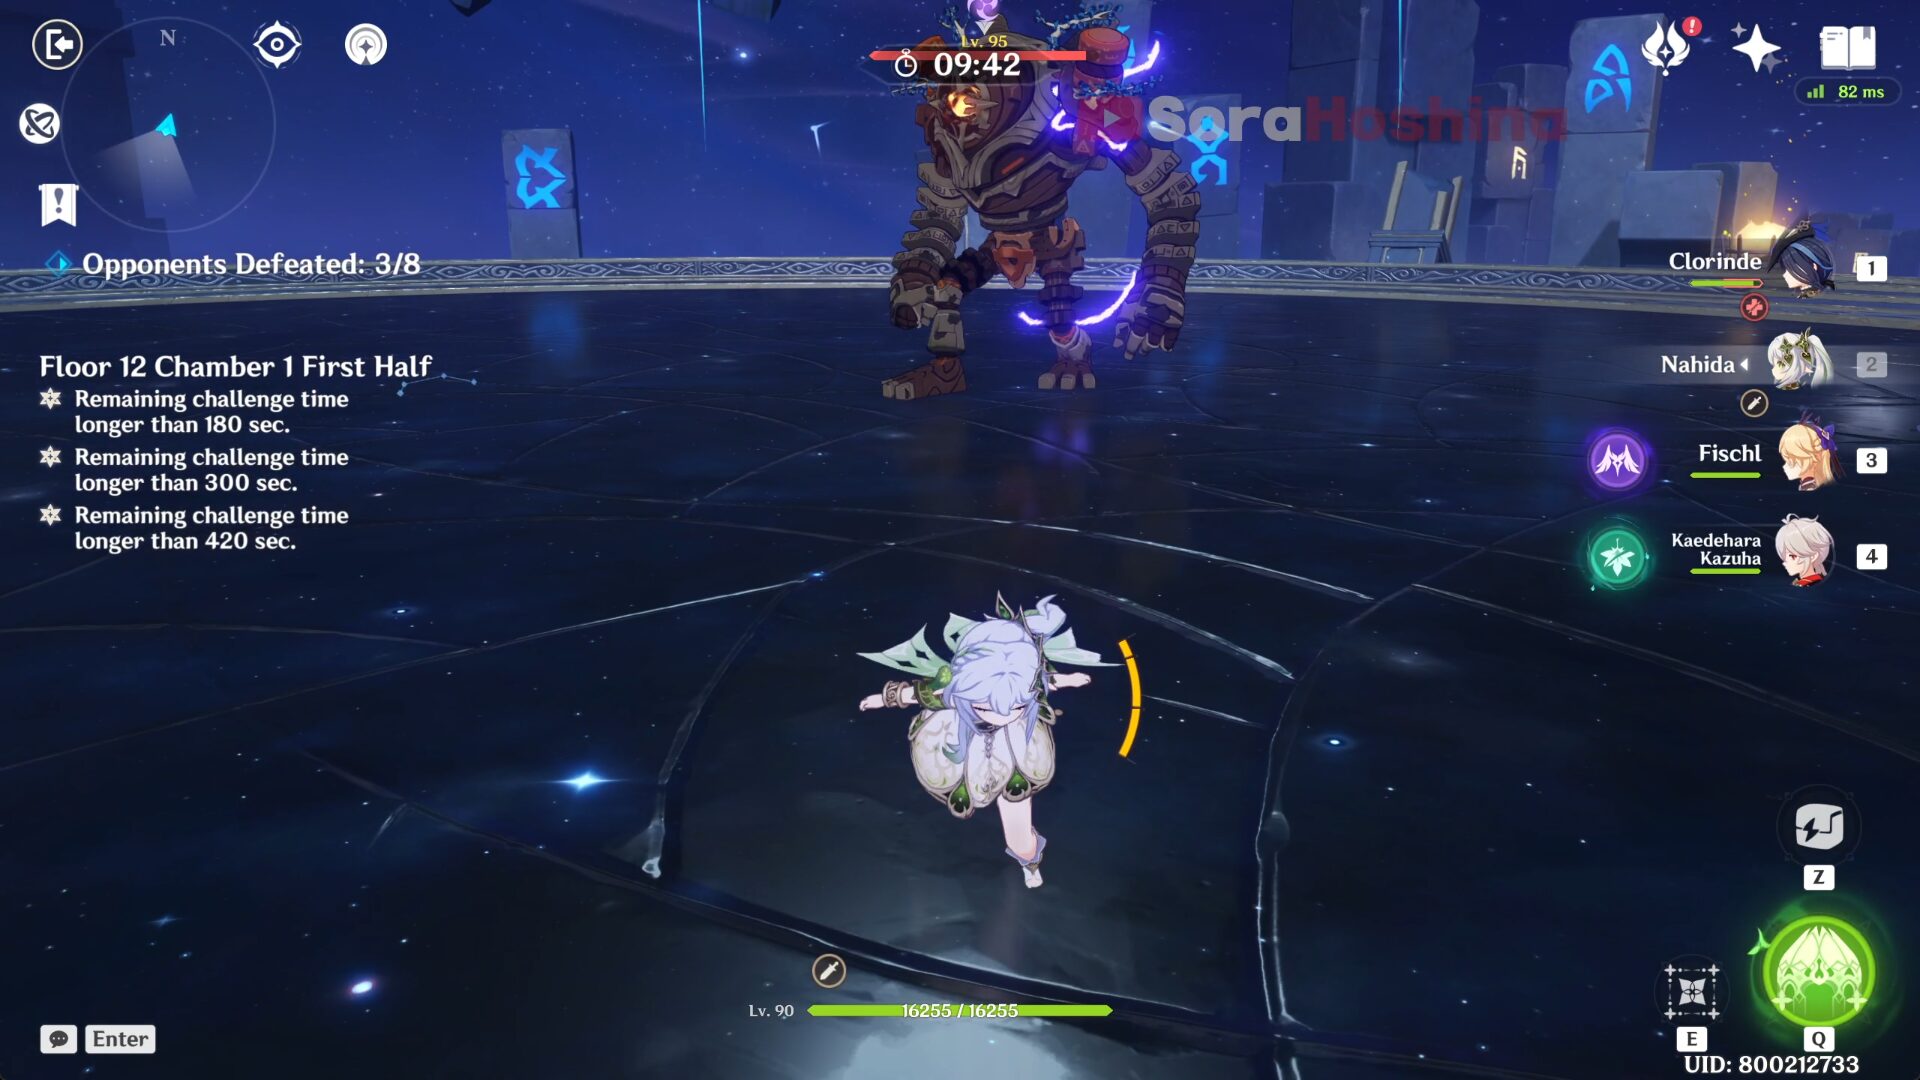
- In the second wave, there is one Ruin Guard at the back area. This one is such an ancient enemy so you should know to either brute force or attack the glowing orb on its head to paralyze it (which is honestly a waste of time since there's another 2 waves after this). BUT ONE THING, I recommend luring it to the left side of the arena because the next wave will spawn there.
- In the third wave, another Ruin enemy are here and it's the Ruin Drakes. It's the type that stays on the ground (Earthguard) so you don't have to worry about it flying around (Skywatch).
- Now this is the enemy that you should aim for the weak point once it's exposed (unless you're super strong). At one point, this Ruin Drake will charge before scattering bombs into the air. This is the moment you want to attack its weak point with the Bow character's aimed shot.
- If you fail to do so, after the bombs hit the ground, the Ruin Drake will gain 40% Resistance to the element it has received the most amount of damage from the beginning of the battle (you can see what elements it is from the color of the bombs). You don't want this to happen because of the limited amount of times so make sure to hit the weakness point. THAT IS, unless, your DPS is broken. In this case, no need to aim for the weak point and just brute force.
- Lastly in the fourth wave, we have 2 Eremite ladies on the right. they are near each other. However, they will enter enhanced mode + summon their beasts from the start so you can't Anemo CC them.
- For prioritization, I suggest going after the Galehunter first because she has a skill that can create an Anemo vortex and suck your characters in + she doesn't really chase after you that much, often letting her spirit animal birb chase after you. In addition, the Loremaster has the skill to teleport closer to you, while the Galehunter doesn't. Remember that as long as their spirit animals are still alive, you can't pull them using Anemo CC, not that you really need it because you can gather them quite easily.
Second Half
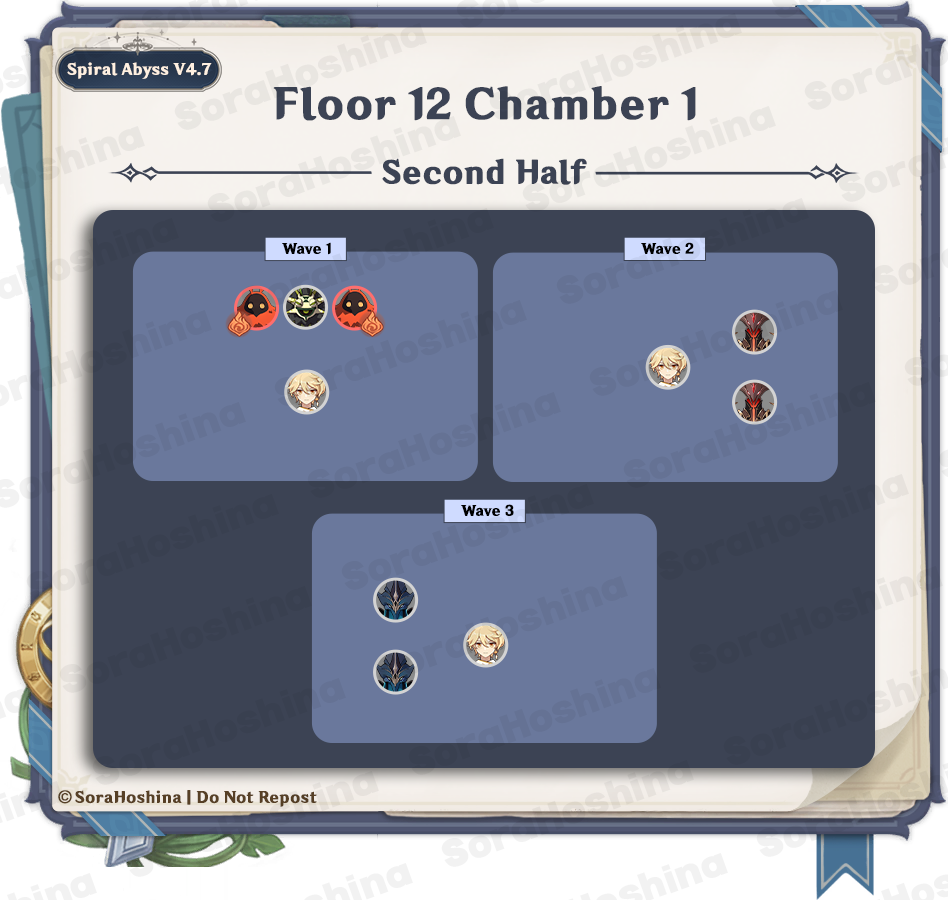
1st Wave: Dendro Samachurl x1 & Pyro Abyss Mage x2 (Smoldering Flames Aura)
2nd Wave: Abyss Lector Fathomless Flames x2
3rd Wave: Black Serpent Knight Windcutter x2
Smoldering Flames Aura: Deals continuous Pyro DMG to the active character while the debuff is active.
- In the first wave, the three enemies spawn really close to each other so if you have Anemo CC, just gather them. But if you don't, focus on the Samachurl first because it's ability to create vine and block your path is really annoying. Once the Samachurl is down, just focus on any of the Abyss Mage.
- In the second wave, there are 2 Abyss Lector on the side. To gather them, you can either (1) CC them using Anemo or (2) get far away from them, preferably the wall right in front of the first Abyss Lector so the second one will get near the first one.
- For the Abyss Lectors in their second phase, there is one skill where it summons a meteor and leaves behind Darkfire Furnace on the field. Once this thing appears on the field, definitely go for this furnace and destroy it using elemental attacks (Hydro is the best). This is because the Lector will summon many flames to flare from the ground for the entire duration of Darkfire Furnace is on the field. In addition, once this furnace is gone, it will also deplete the Lector's shield.
- In the third wave, there are 2 Knight Windcutter on the left side. Just get near any one of them and the other will get near you too.
- If the Black Serpent Knight: Windcutter's attacks is fully absorbed by a player's Shield (does not count if the shield breaks as a result of the attack), it will gain a temporary buff at the cost of 15% of its Current HP, which increases its ATK by 30% and allows it to blink away from the next attack and take no DMG no matter the scale.
Floor 12 Chamber 2
First Half

1st Wave: Maguu Kenki x1
- There is only one wave here and it's a single Maguu Kenki. When you start the challenge, it takes around 10 seconds for Maguu Kenki to stand up and within those seconds, it won't be taking any damage. So, be wary of when you can start attacking, and don’t waste your Skill and Burst. If you use your Skill during its standing-up animation, you can generate particles but Maguu Kenki won’t take any damage. So it’s up to you if you want to use it or not.
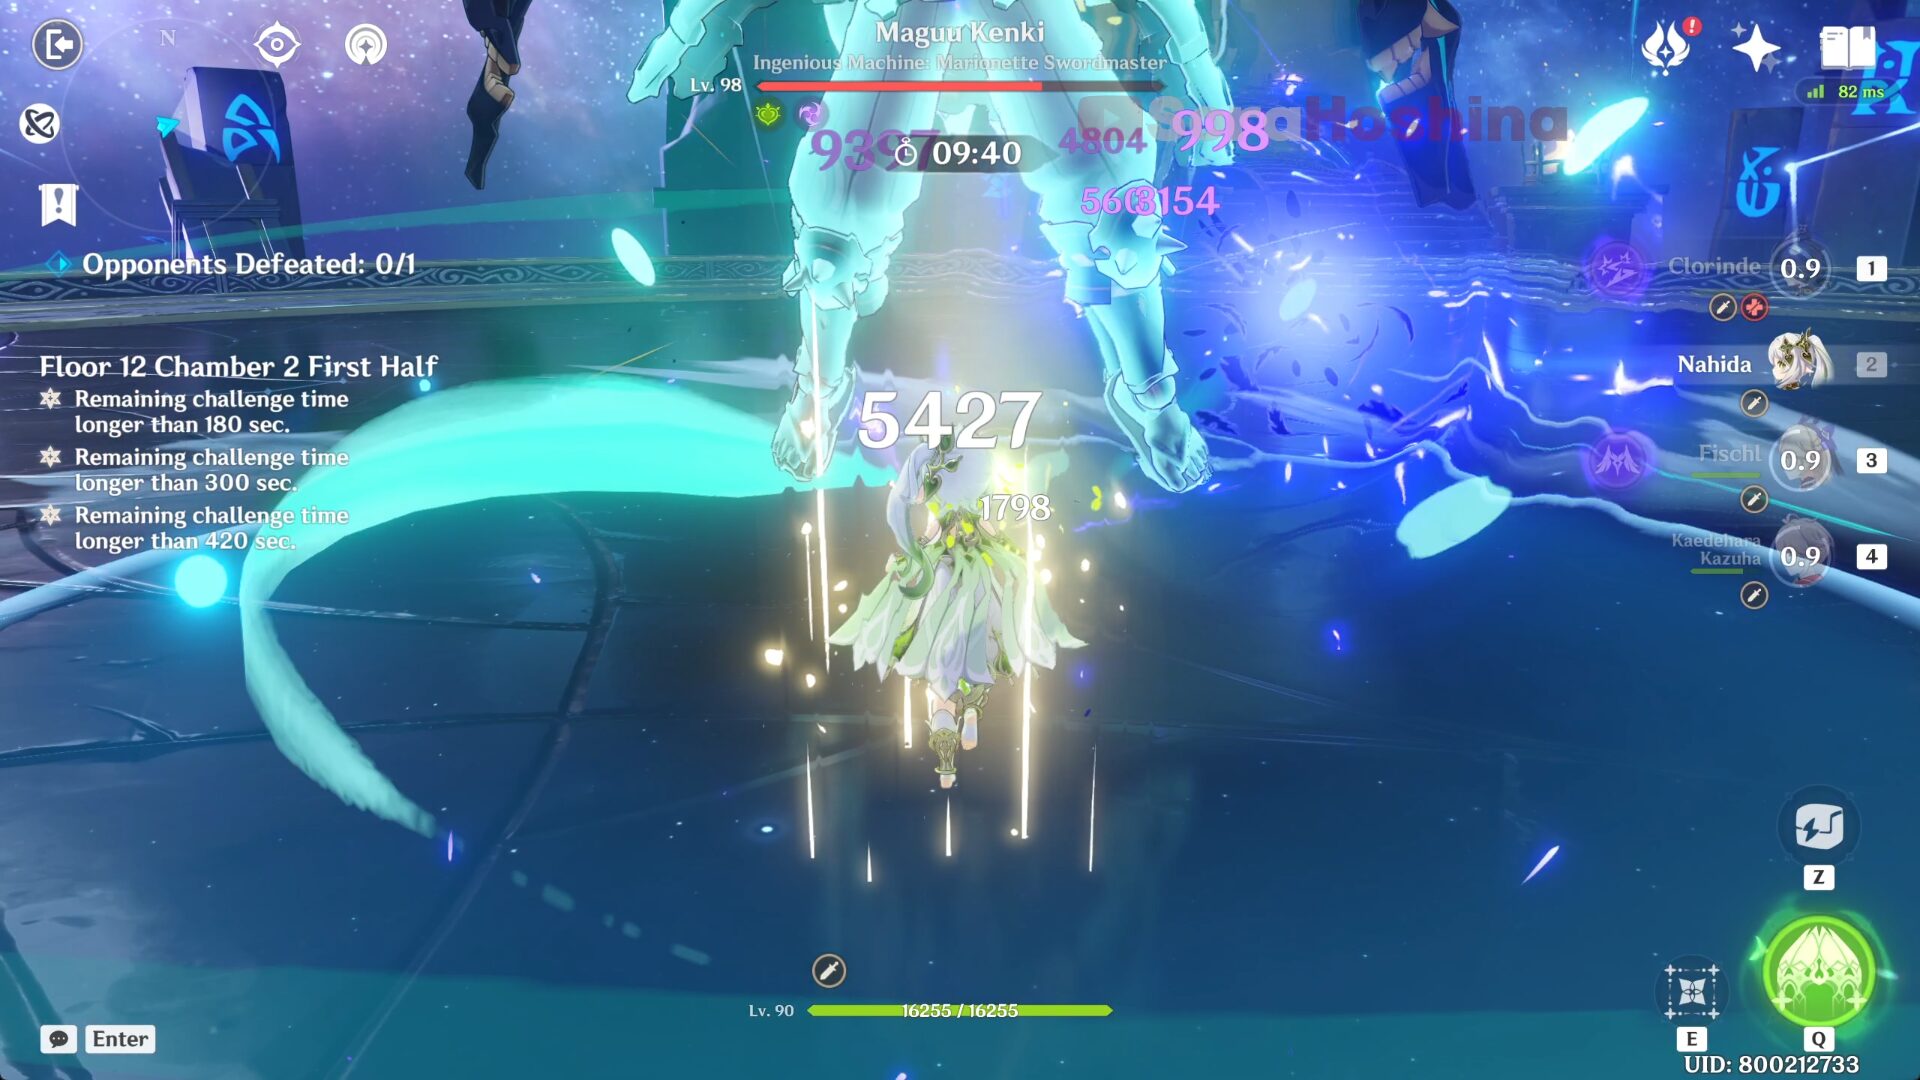
- Once it reaches 70-75% of its Max HP, it will use Dual Sword Burst (not an official name) to deal both Cryo and Anemo DMG. Maguu will be immune during this skill so don't waste your time attacking it, especially your Burst.
- Instead, make sure to (1) dash i-frame as soon as Maguu Kenki enters downward motion, (2) or use skills that elevate you off the ground to avoid DMG, or (3) use Elemental Burst as another form to i-frame/avoid this attack, as this attack hits you like a truck. In addition, try not to attack from far away outside of its melee range because it will trigger Maguu's parry mask and block your attacks.
- Another attack that this Maguu Kenki really loves to use is Shadowsword: Blustering Blade (again, not an official name) where it will teleport and leave a phantom in its original location. The phantom performs a single slash (either Anemo or Cryo) before Maguu Kenki performs 3 or 4 slashes in quick succession behind the phantom.
- Because of this attack, you might miss your target whenever you use Elemental Burst as Maguu Kenki might teleport away from your Burst AoE. That's why, pay attention to Maguu Kenki and wait until it does any other attacks that will make him not use the teleport skill before using your Elemental Burst.
Second Half
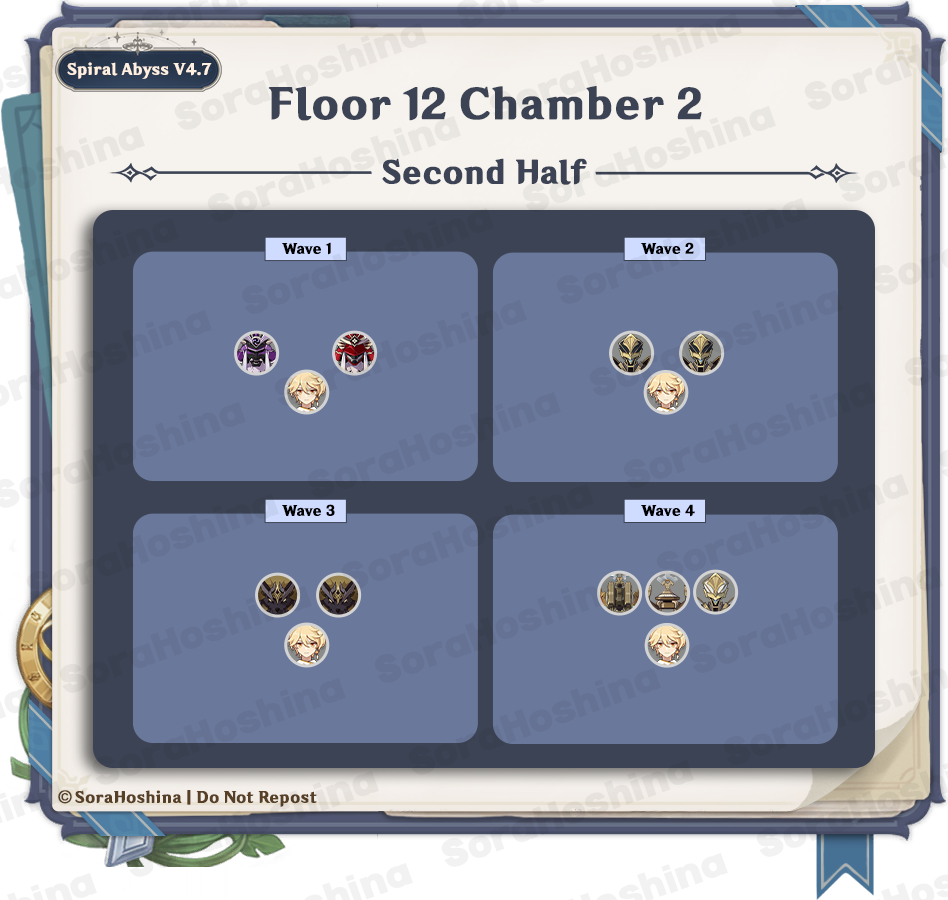
1st Wave: Kairagi Dancing Thunder x1 & Kairagi Fiery Might x1
2nd Wave: Suppression Specialist Mek (Pneuma) x2
3rd Wave: Rockfond Rifthound x2
4th Wave: Construction Specialist Mek x1, Assault Specialist Mek x1 & Arithmetic Enhancer Mek x1 (Pneuma)
- In the first wave, two Kairagi will spawn at the front area. An early reminder that you have to watch out for their ability to regenerate half of their HP and be immune to CC if one of them dies. As you already remember, Kairagi's thrust attacks often cause them to separate. I recommend you turn around right after you start the challenge and go to the back area. This will make them chase after you and do a thrust attack.
- The best option to avoid one of them recovering half their HP is to (1) make sure you attack both of them until their HP is the same before finishing them off or (2) using DPS with high burst damage to kill both of them at the same time or (3) using Freeze team to immobilize the Kairagi, giving you a longer window to kill it before it can even heal.
- In the second wave, there are 2 Meka also in the middle of the arena. Since both of them are the same, you don't have to worry about them making elemental reactions. If you bring any Ousia character, you can use their Arkhe attacks twice to paralyze these Mekas. If not, well, brute force it is. These 2 will chase after you anyway, albeit a bit slow.
- In the third wave, there are 2 Rifthounds that will spawn at the initial locations. Yes, all enemies in this challenge will spawn at the same location so it's better to stay at one place and don't go running around. Don't forget that these puppies' attacks will apply Corrosion on hit:
- Characters being Corroded will lose a fraction of their HP every second. Active characters can be brought down by Corrosion. When a non-active character's HP is less than 15%, they will no longer lose HP due to Corrosion. As Corrosion is capable of stacking, it is advisable to avoid as many Corrosion-inflicting hits as possible.
- You can lose the Corrosion by healing your characters.
- In the fourth wave, there are 3 Meka and all of them are Pneuma. Once again, if you bring any Ousia characters, you can attack them twice to paralyze them. If not, focus on the Enhancer Meka in the middle of the three because it's the buffer among them all and the other 2 Mekas will chase after you.
Floor 12 Chamber 3
First Half
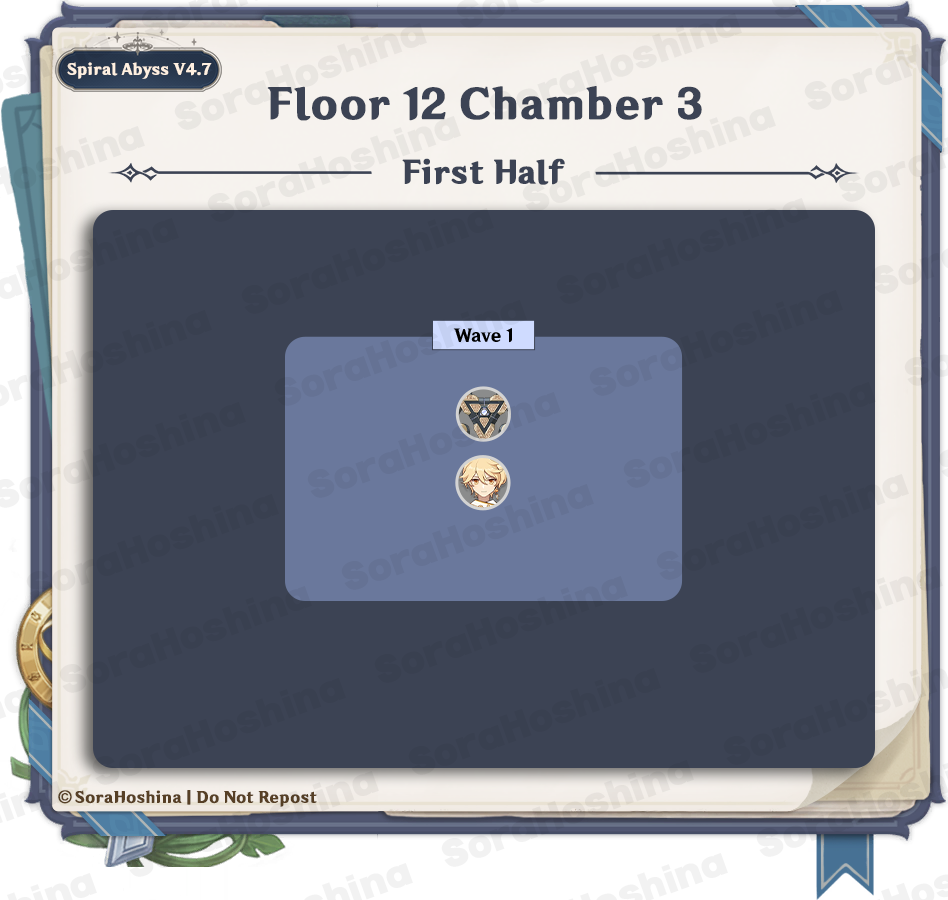
1st Wave: Algorithm of Semi-Intransient Matrix of Overseer Network
- There is only one wave here and it's ASIMON. Although this boss will often enter invisibility mode by firing out components toward you just like the smaller Primal Construct, the boss is impossible to spot because even the outline can't be seen. The methods to paralyze it and cancel its invisibility are still the same:
- Use Catalyze reaction on the cores (hidden main body).
- Destroy and use Electro attack on the components.
- I prefer the first one because that method is much faster in paralyzing it, and the second method took too much time as the components are quite tanky. One of the best methods to search for the core is by having auto attacks like Yae Miko or Fischl. Their Skill (Sesshou Sakura and Oz) can detect the invisible core and attack it, making its location known to you. Then you can use a Dendro character for Dendro attacks. Another option is Zhongli: His shield can show the location of the core when you're near it (Or any other characters that can inflict debuff on Matrix as the debuff will remain visible like Nahida's Skill, Mona's Burst, etc).
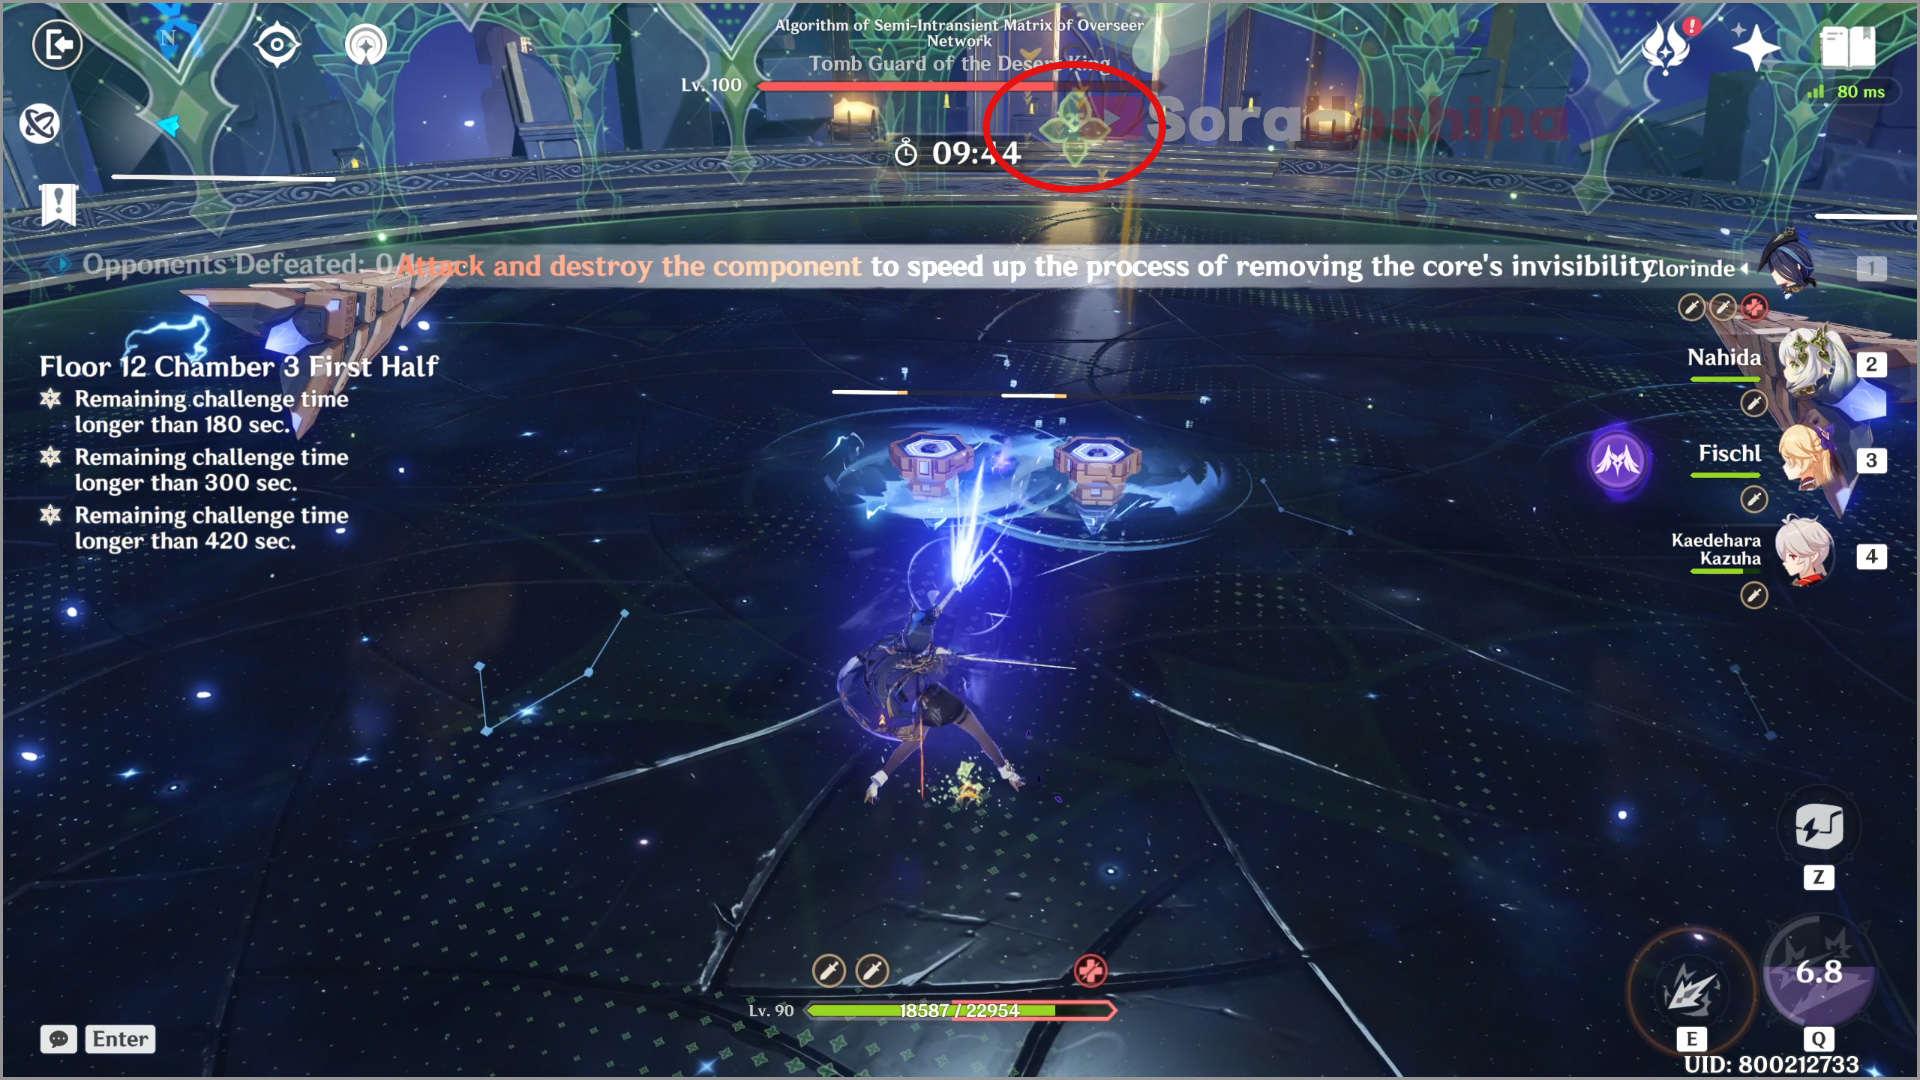
- If you don't bring any characters above, I suggest going for the second method which is destroying and using Electro attacks on the components. While it may take time because there are multiple components, it is better than making your character attack air trying to search for the core.
- If you still want to search for the main core, there is another option. It will always try to teleport in front of where it is facing. So if you're fighting it from the front of it > It turns invisible > It will be most likely behind you. Elemental Sight does not work in searching for the core.
Second Half
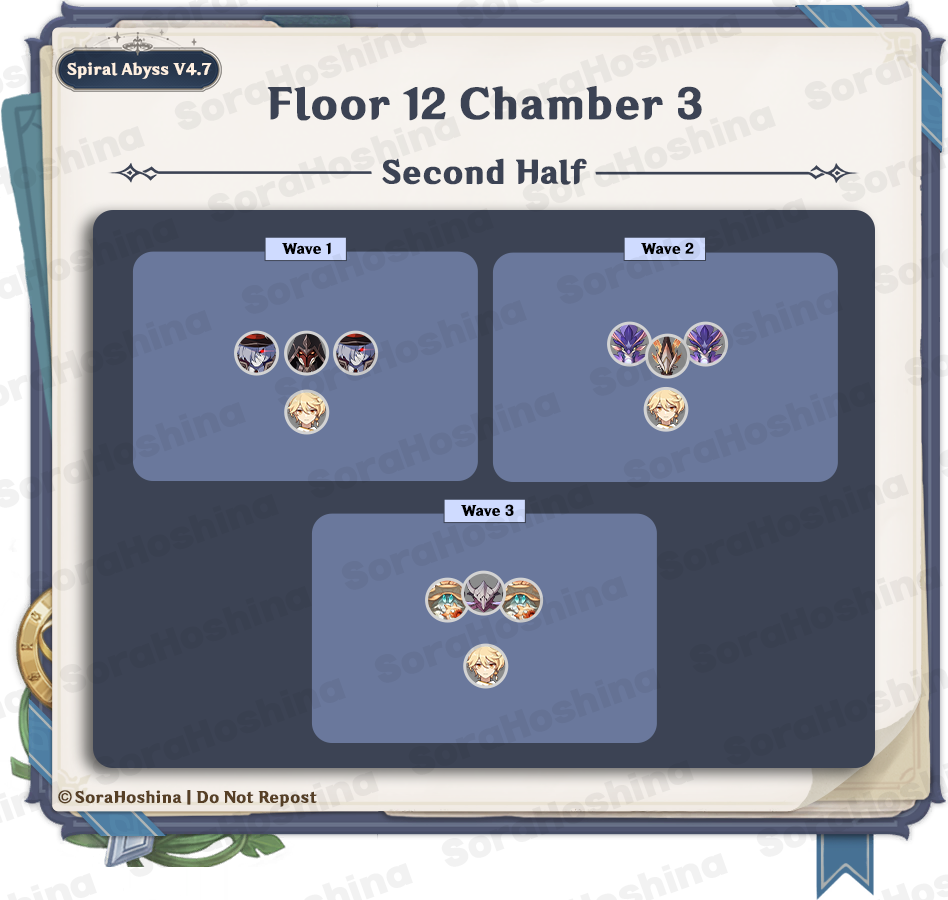
1st Wave: Fatui Pyro Agent x1 & Fatui Skirmisher Pyroslinger Bracer x2
2nd Wave: Consecrated Red Vulture x1 & Bubbler Seahorse x2
3rd Wave: Consecrated Scorpion & Sternshield Crab x2
- In the first wave, there are 3 Fatui in the middle. What you need to do is go to either Pyroslinger Bracer and face him so that his back is towards the Pyro Agent and another Pyroslinger. This way, when you get too close to his personal space, he will jump back towards the other two.
- If you didn't manage to group them and didn't bring any Anemo CC, focus on one of the Pyroslinger first before the other one, and only after those 2 are defeated should you focus on the Pyroslinger (this one will keep chasing after you anyway).
- In the second wave, there are various enemies at the front. Focus on the 2 Bubbler Seahorse because it's not chasing after you unlike the big red bird.
- There will be a time when the Consecrated enemy will summon Phagocytic Energy Block. Make sure to attack these rocks with elemental attacks until the bar is filled so you can gain a status > hit the respective enemies > paralyze them. If you left the Block alone for a period of time, it will boost the attacks of the Consecrated enemy.
- In the third wave, it's almost the same variation with the second wave where there's a Consecrated enemy and two side-kicks (which also deal Overload). The plan is the same as before where you defeat the 2 Sternshield Crabs first before attacking the big boss. Although the Scorpion has some long-range attacks, it will mostly chase after you.