
Table of Contents [Hide]
A new area expansion for Natlan is finally here and we're back to collecting Pyroculus. Fortunately, there is only 54 Pyroculus in the new areas. As usual, some locations are locked behind quests/puzzles so please do them first before you start collecting the Pyroculus.
(1) Lost Traveler in the Ashen Realm Quest Chain Guide
(2) The Mystery of Tecoloapan Beach Quest Guide
(3) Every Picture Tells a Story Achievement
(4) Open Your Heart to Me Quest Guide
(5) The Lone Isle Named Night Quest Guide
(6) Embers Rekindled Achievement Guide
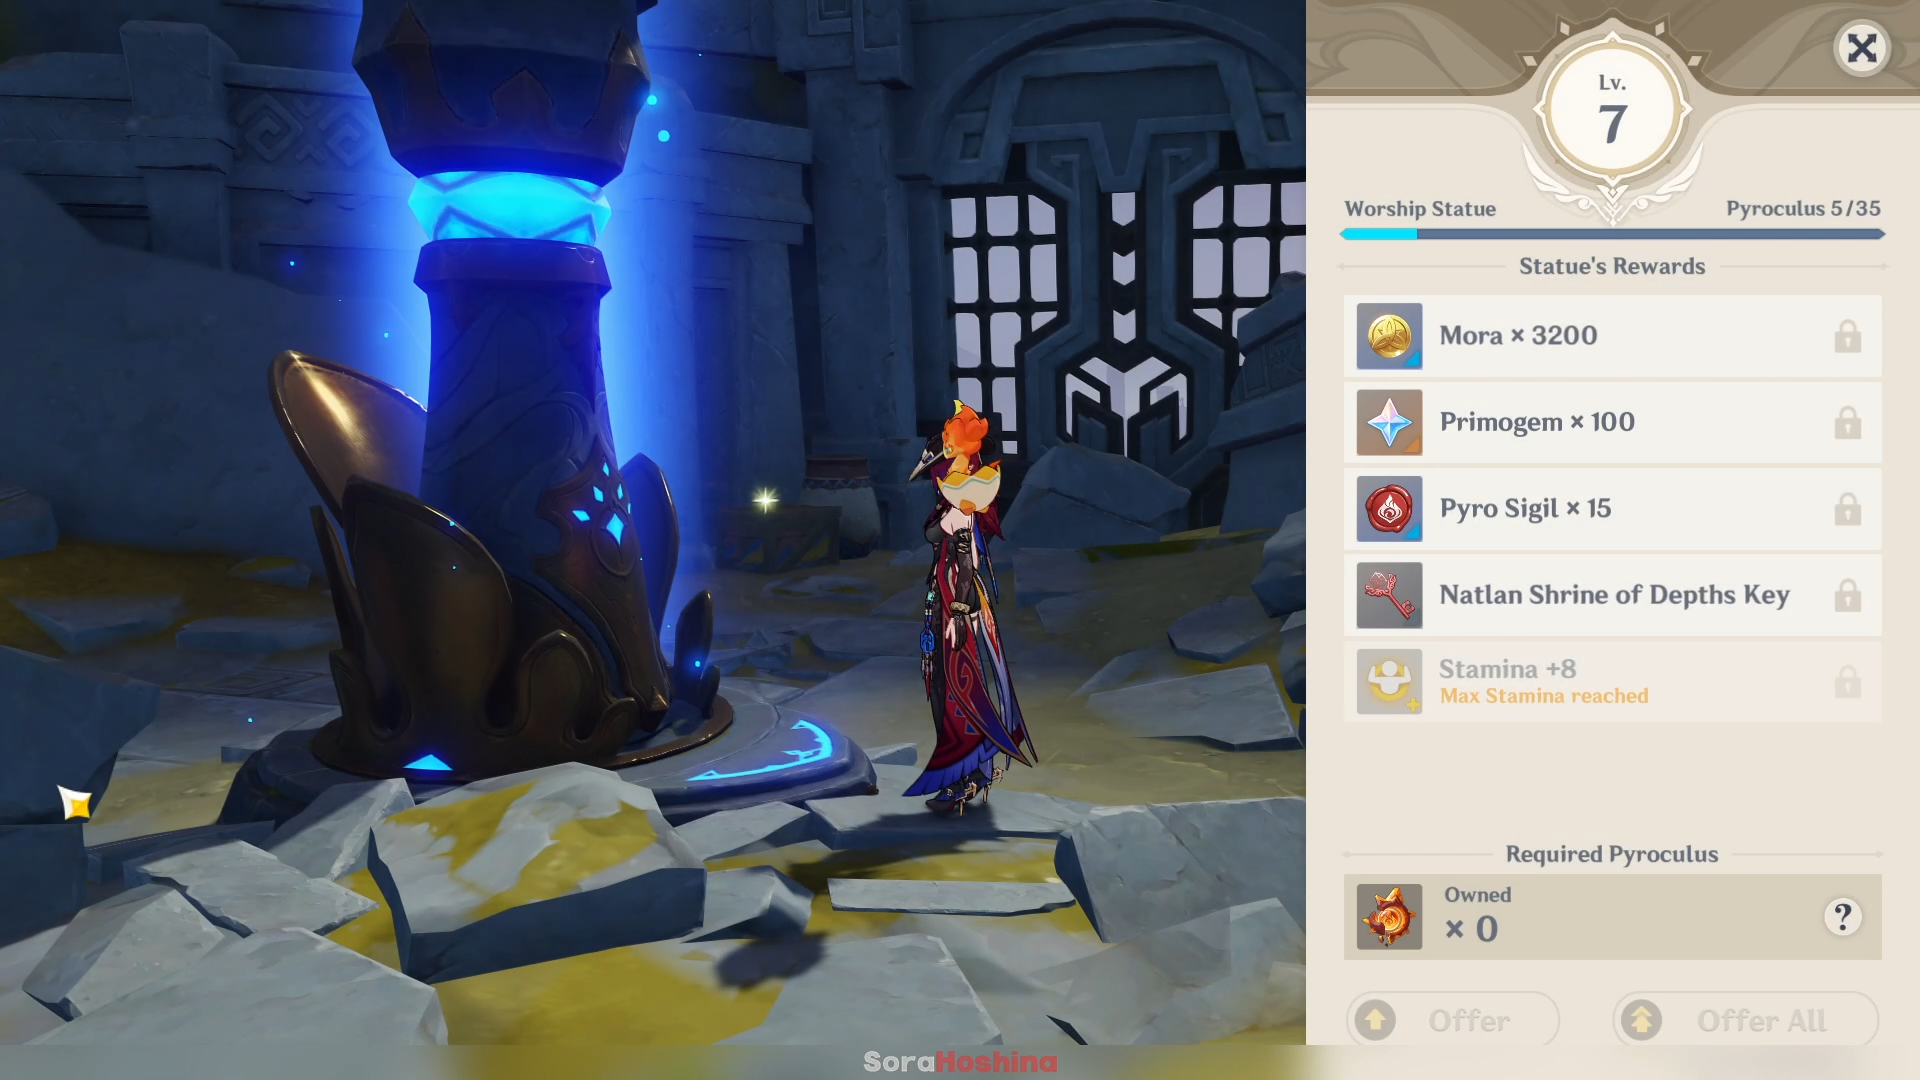
After collecting all Pyroculus in Natlan 5.2 and giving them to the Statue of the Seven, the current level will be Level 7 with 5/35.
If you didn't reach the same number, you may missed some from either this version or version 5.0: All 108 Pyroculus in Natlan 5.0
Location of All 54 Pyroculus in Natlan 5.2
Teyvat Interactive Map
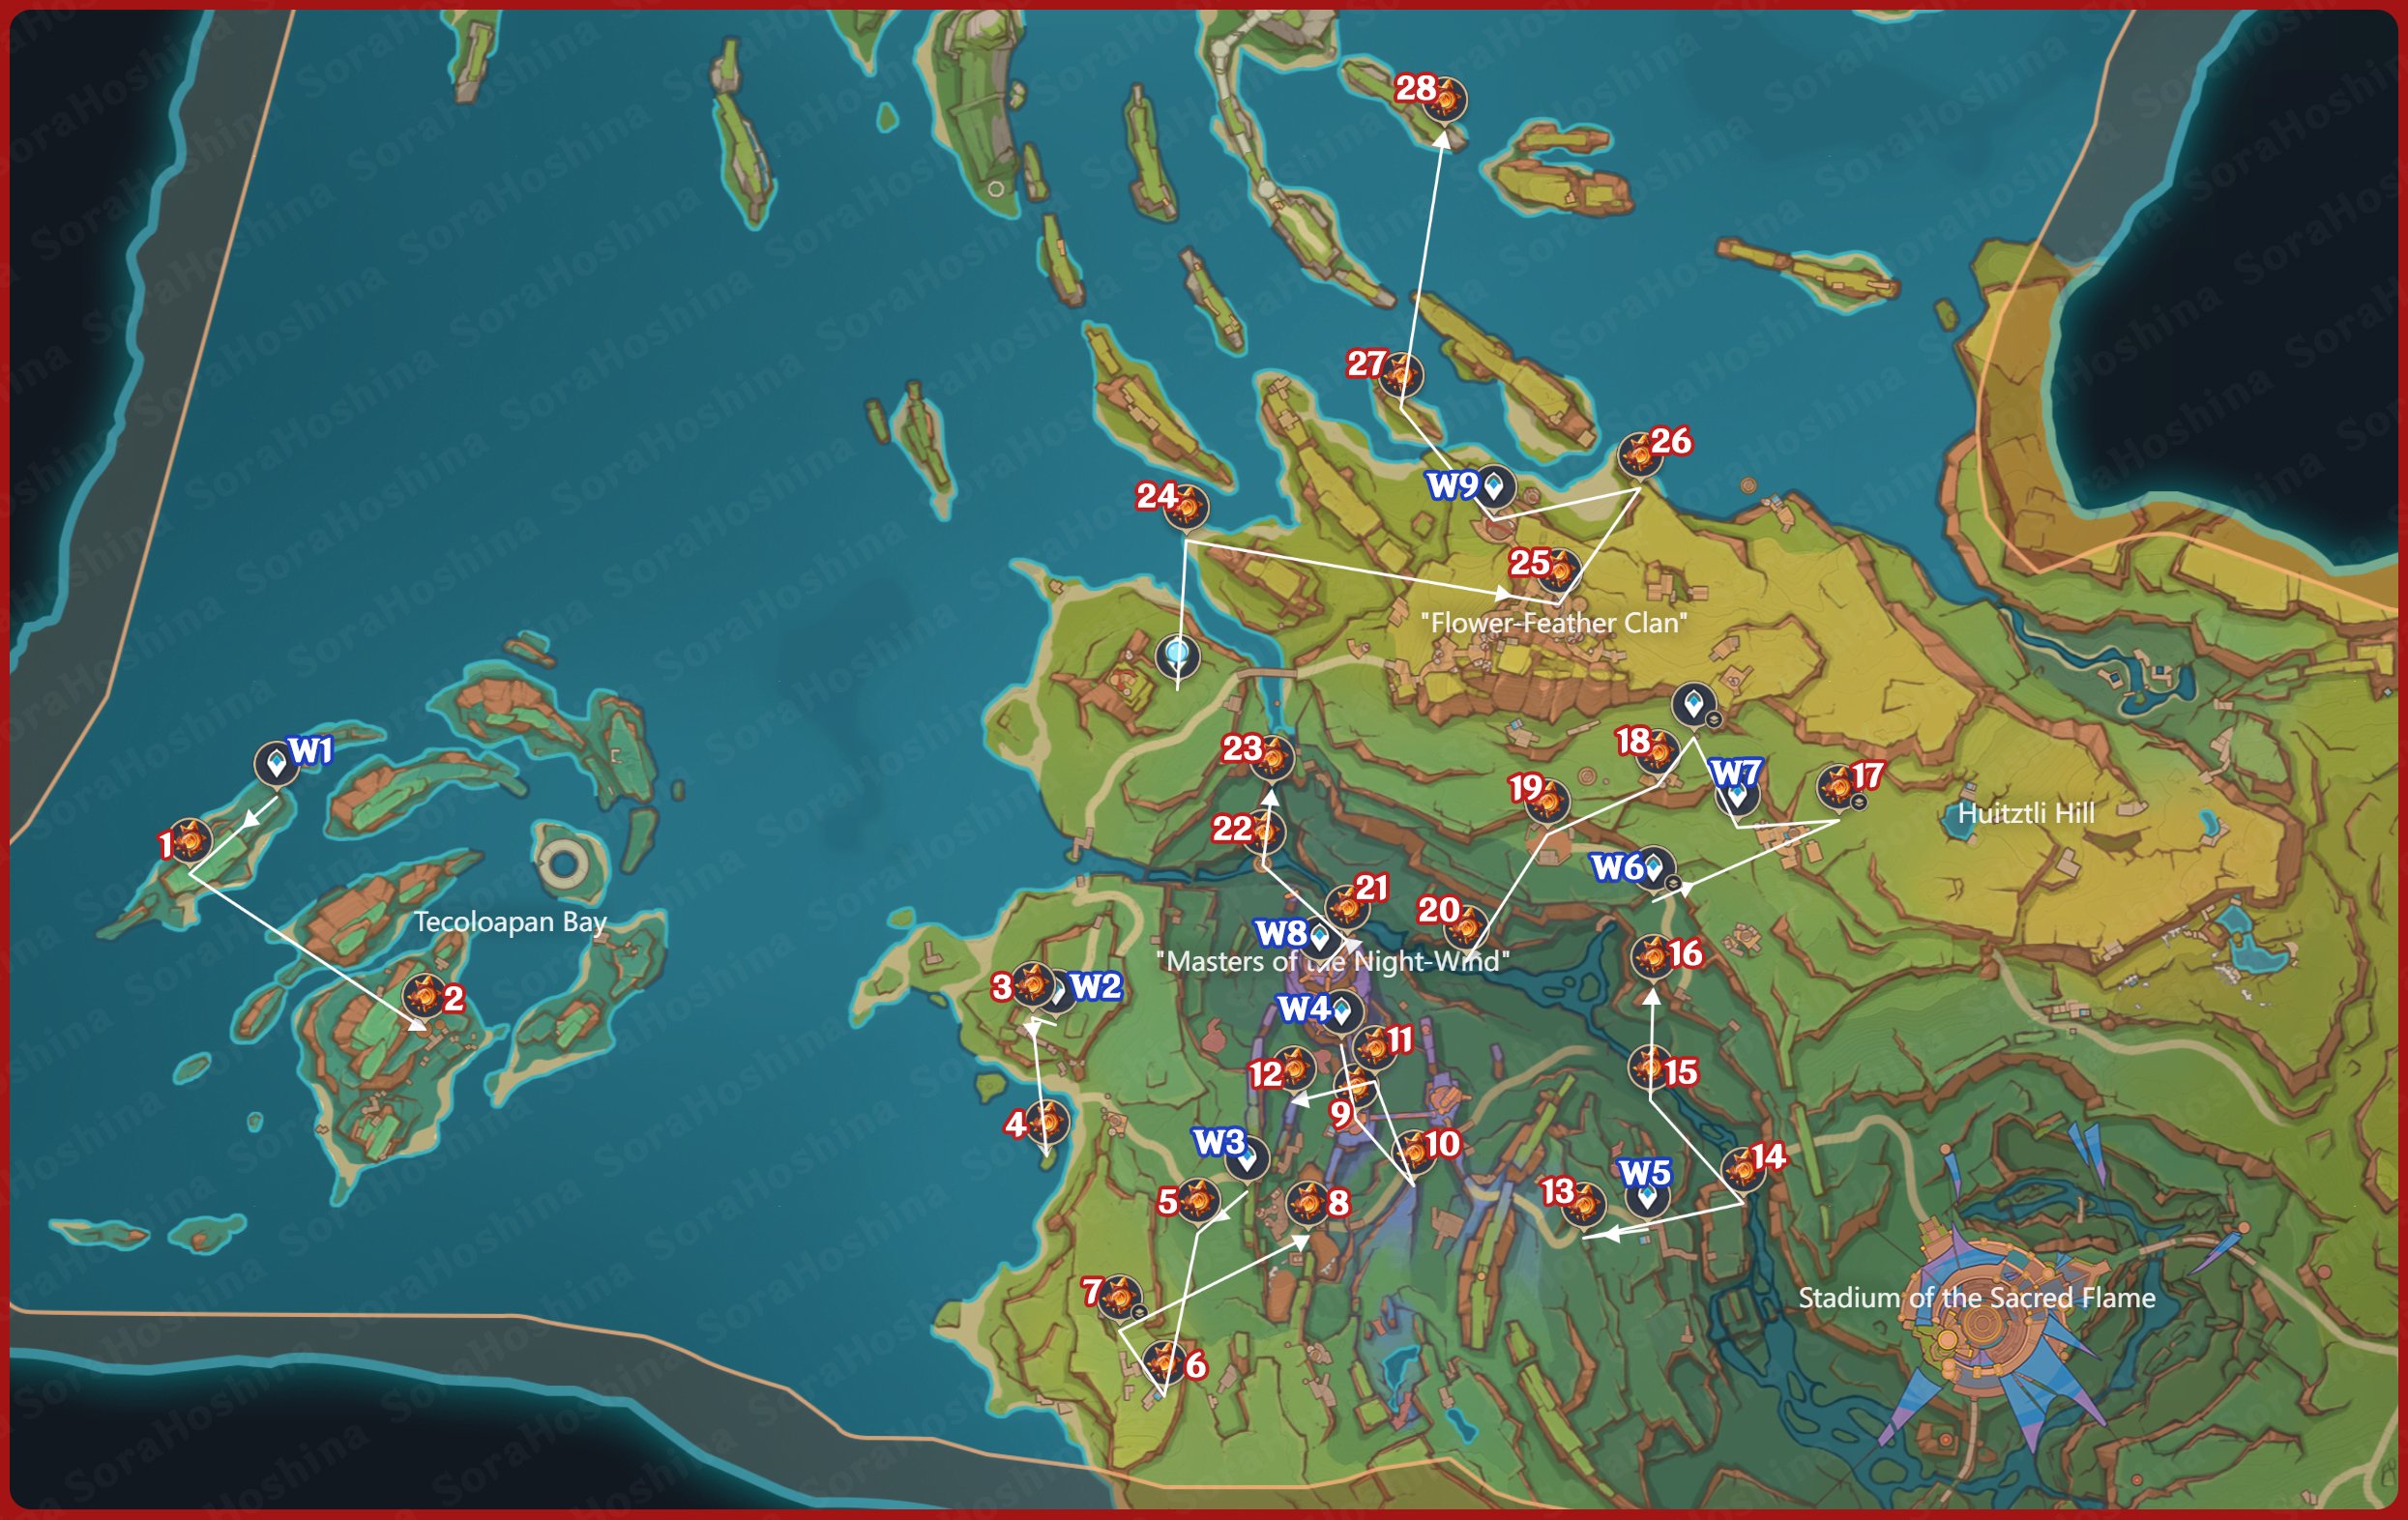
2 Pyroculus in Tecoloapan Bay

1. Teleport to waypoint 1 and head southwest to the top of the mountain where you can see a Pyroculus just floating there.
2. From the previous spot, glide all the way to the southeast until you see a group of Hilichurl and their camp. The Pyroculus is on top of that camp.
14 Pyroculus in Tezcatepetonco Range
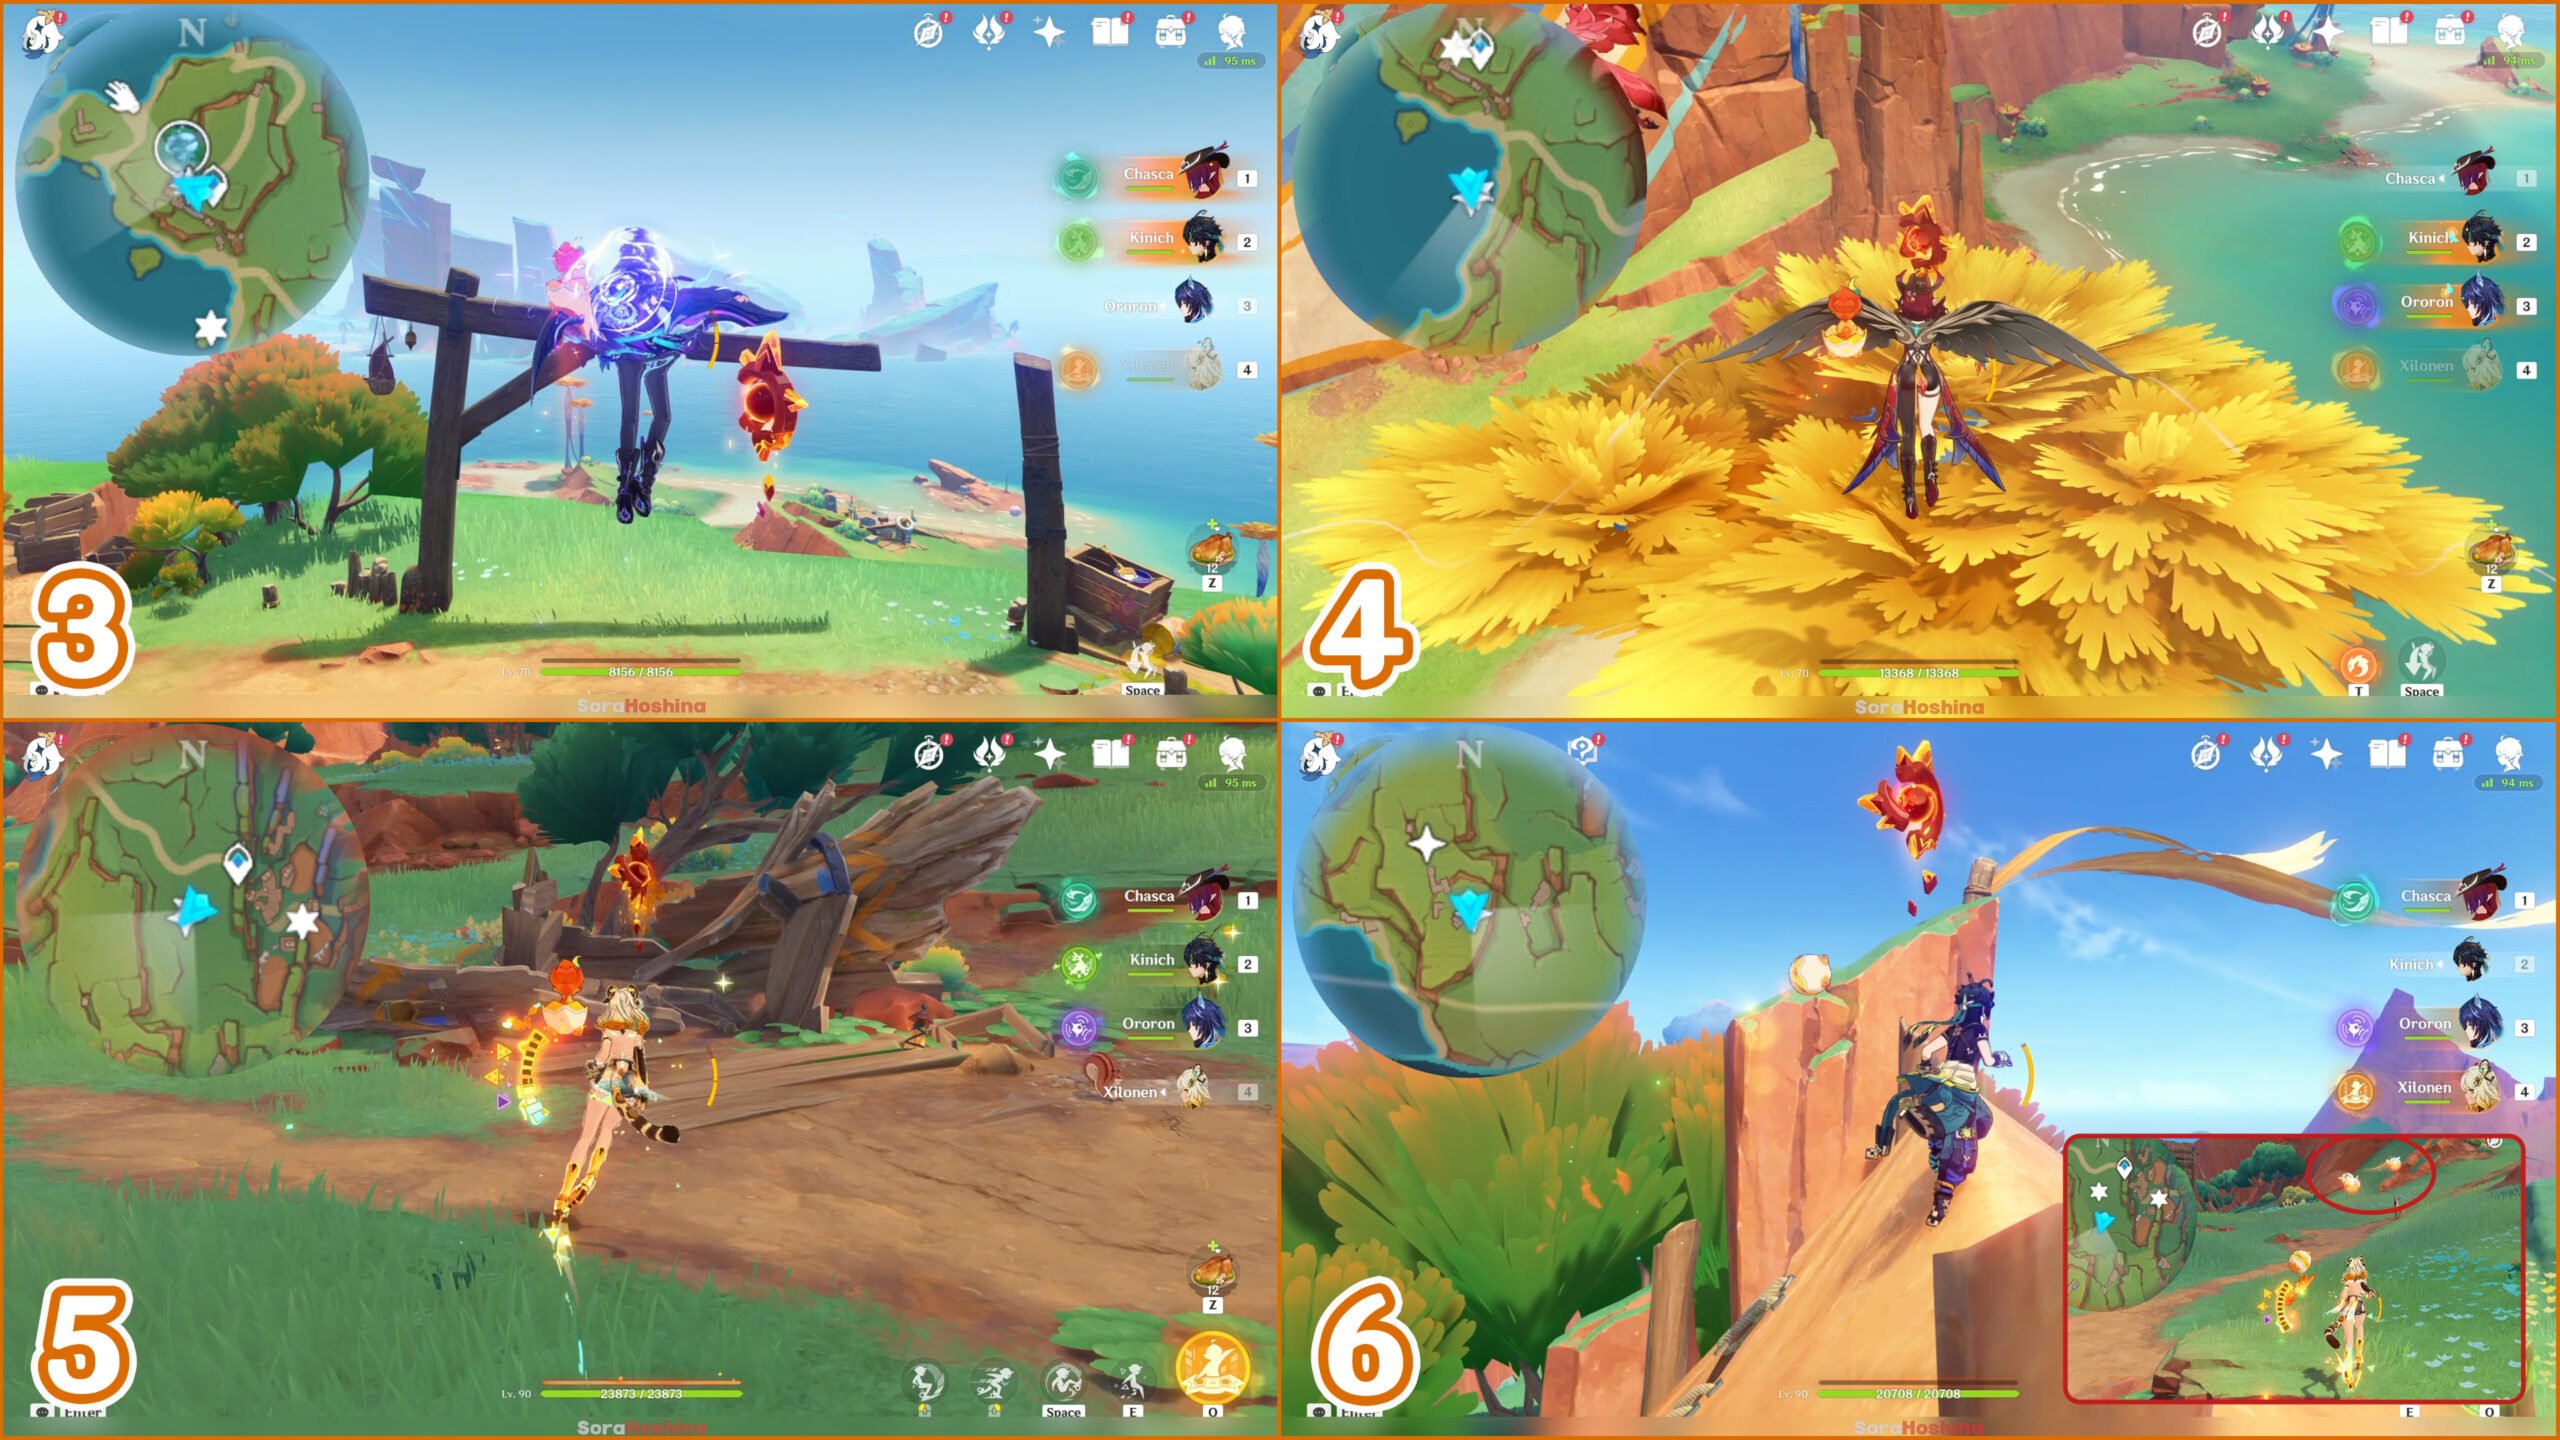
3. Teleport to waypoint 2 and you will immediately see the Pyroculus.
4. Head south using and when you see a Qucusaur, indwell them before flying towards a tree with a Pyroculus on top of it.
5. Teleport to waypoint 3 and head southwest a little until you see a broken Saurian cart.
6. Continue head southwest to the top of the mountain for another Pyroculus. On the way here, there should be orange Monetoos so follow them until it reach a small opening towards a hidden area. Ignore them first and climb the mountain to the top for this Hydroculus first.

7. Go back down towards the Monetoo that you see and you should see its floating. Capture it while its floating so it will return back to a graffiti. Fill the mechanism with Phlogiston to open the door. Inside, use Iktomisaur to create wind current and capture all the Monetoo while they're floating to reduce the water level and get the Pyroculus below.
8. Teleport to waypoint 3 again and indwell a Qucusaur to fly and reach the floating ring on the southeast.
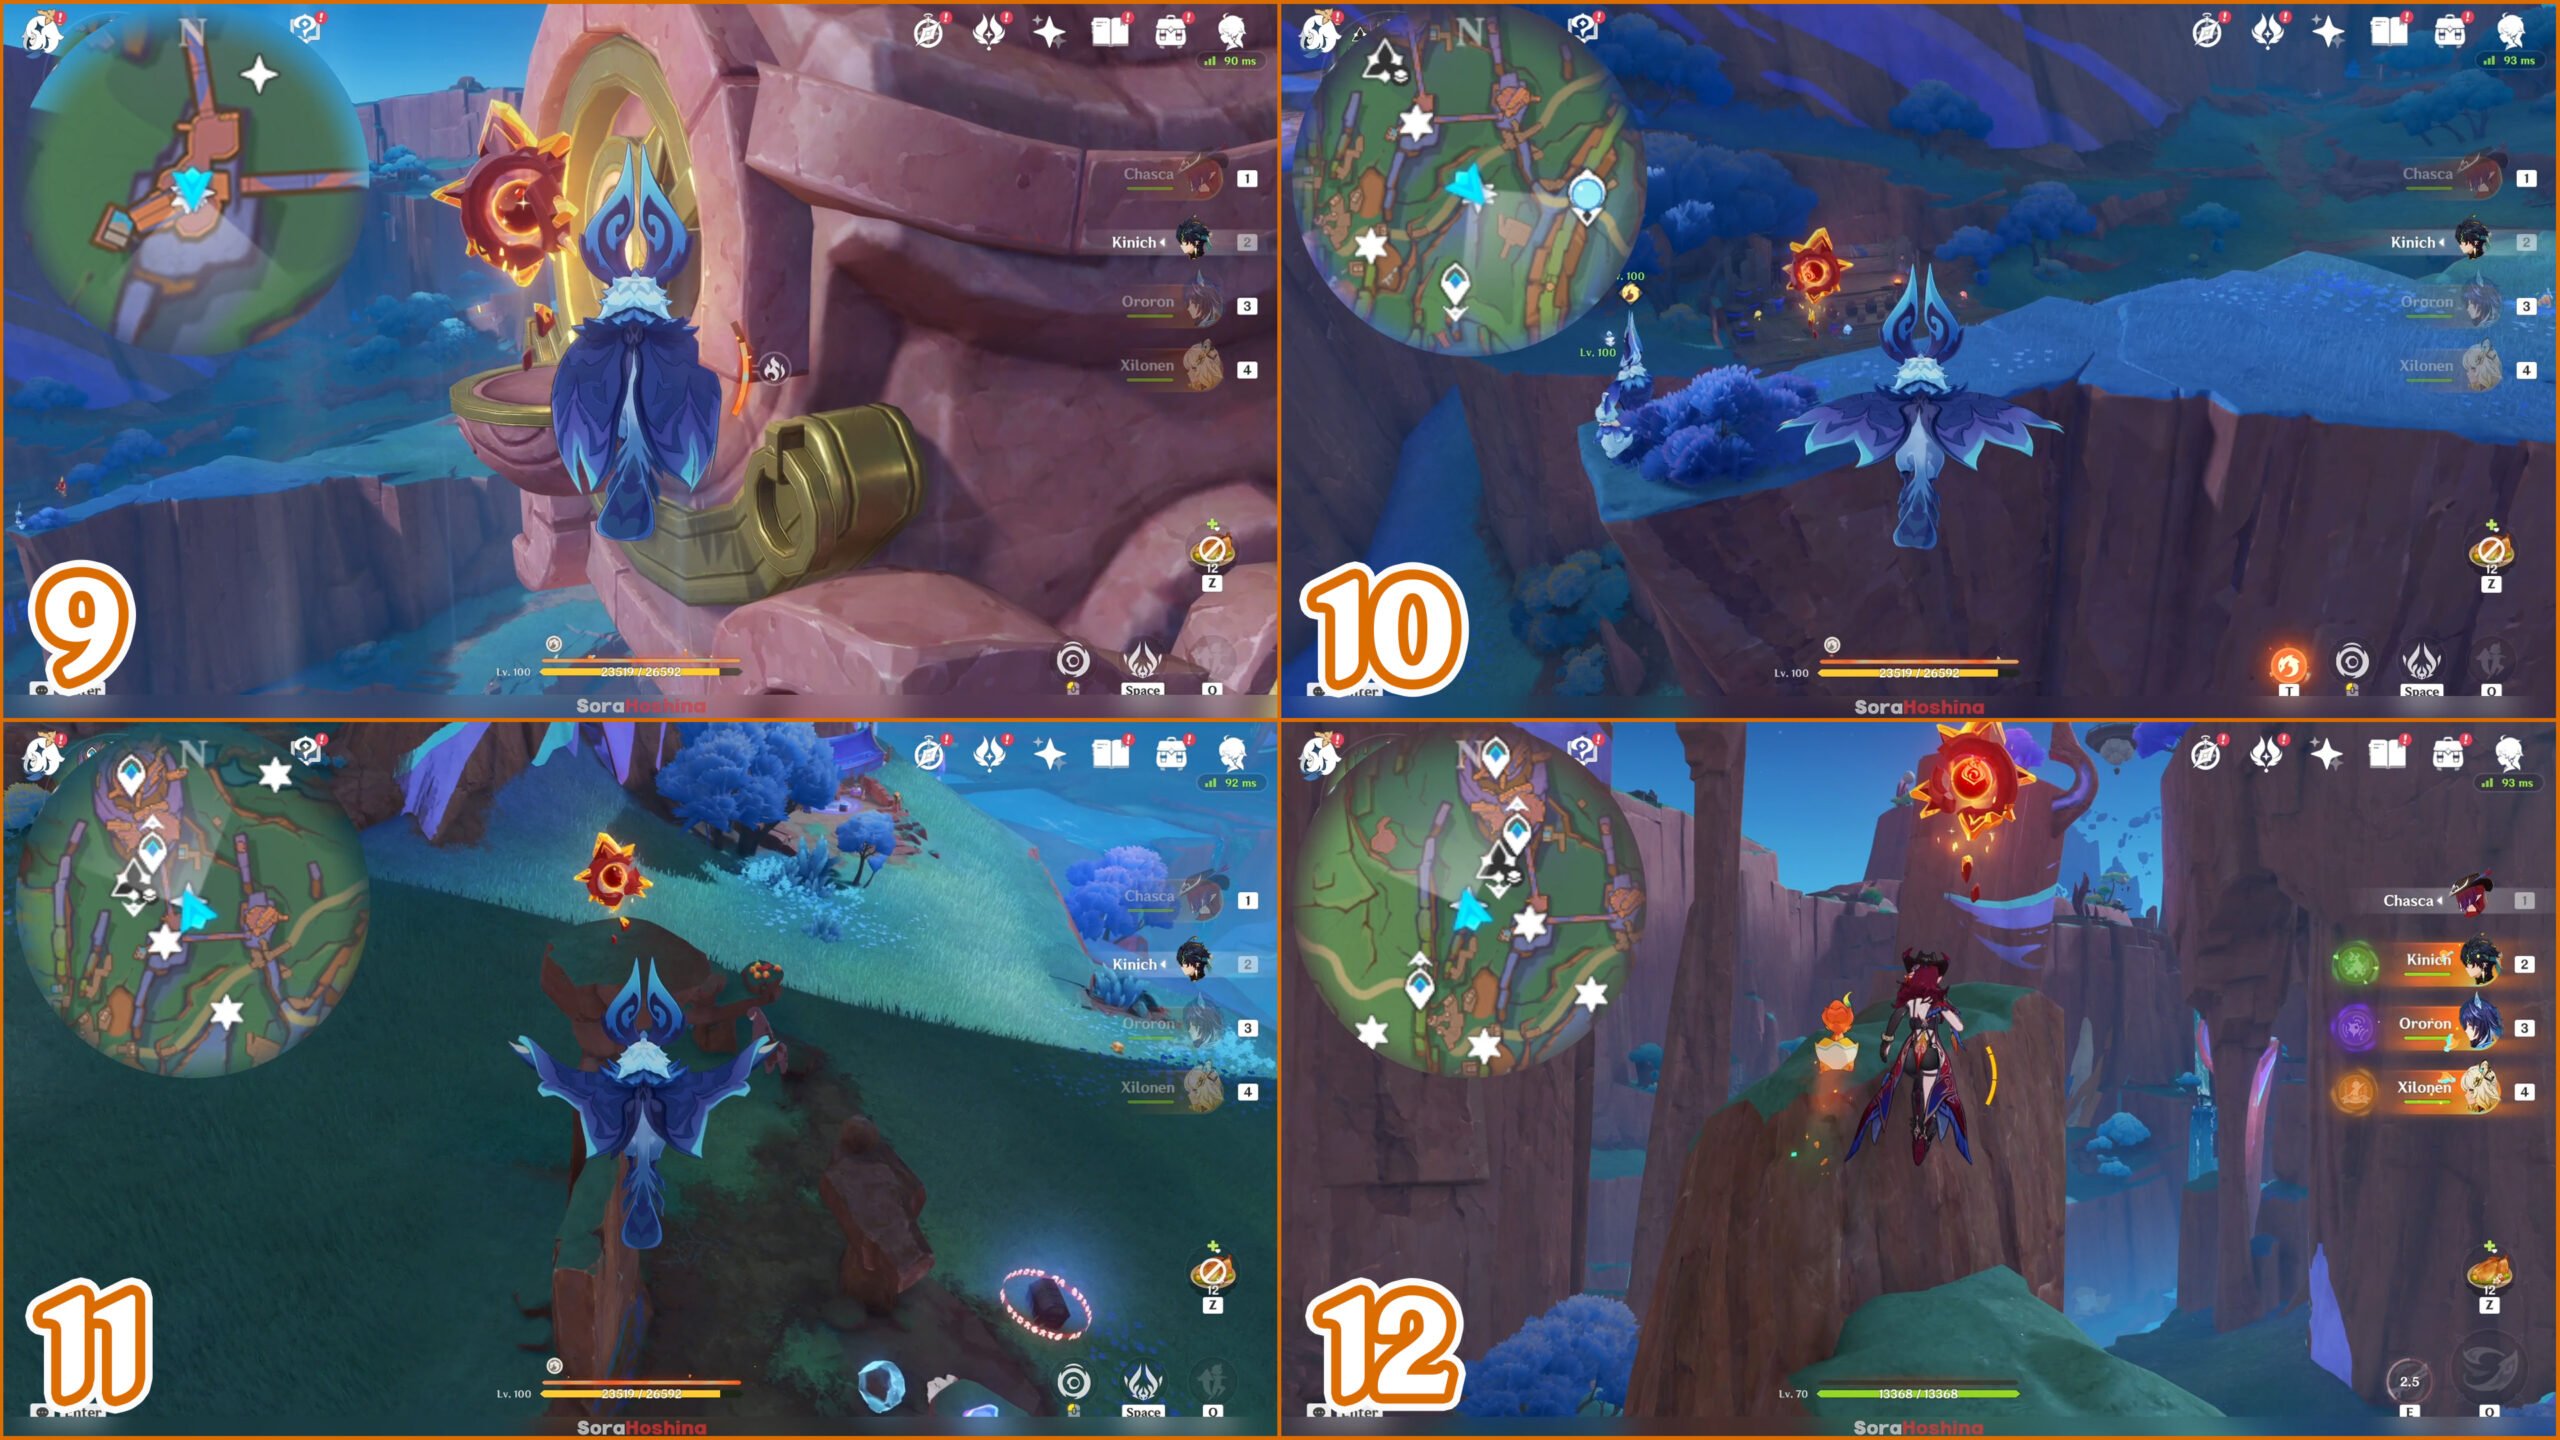
9. Teleport to waypoint 4 and turn around where you see a little building. Use Iktomisaur to absorb the wind current graffiti on the wall so you glide to the top of the building.
10. From the previous position, glide southeast for another Pyroculus on a top of the cliff.
11. Continue gliding downwards to the northwest for another Pyroculus on top of a sharp rock.
12. Turn southwest and you can see another Pyroculus on a higher rock.
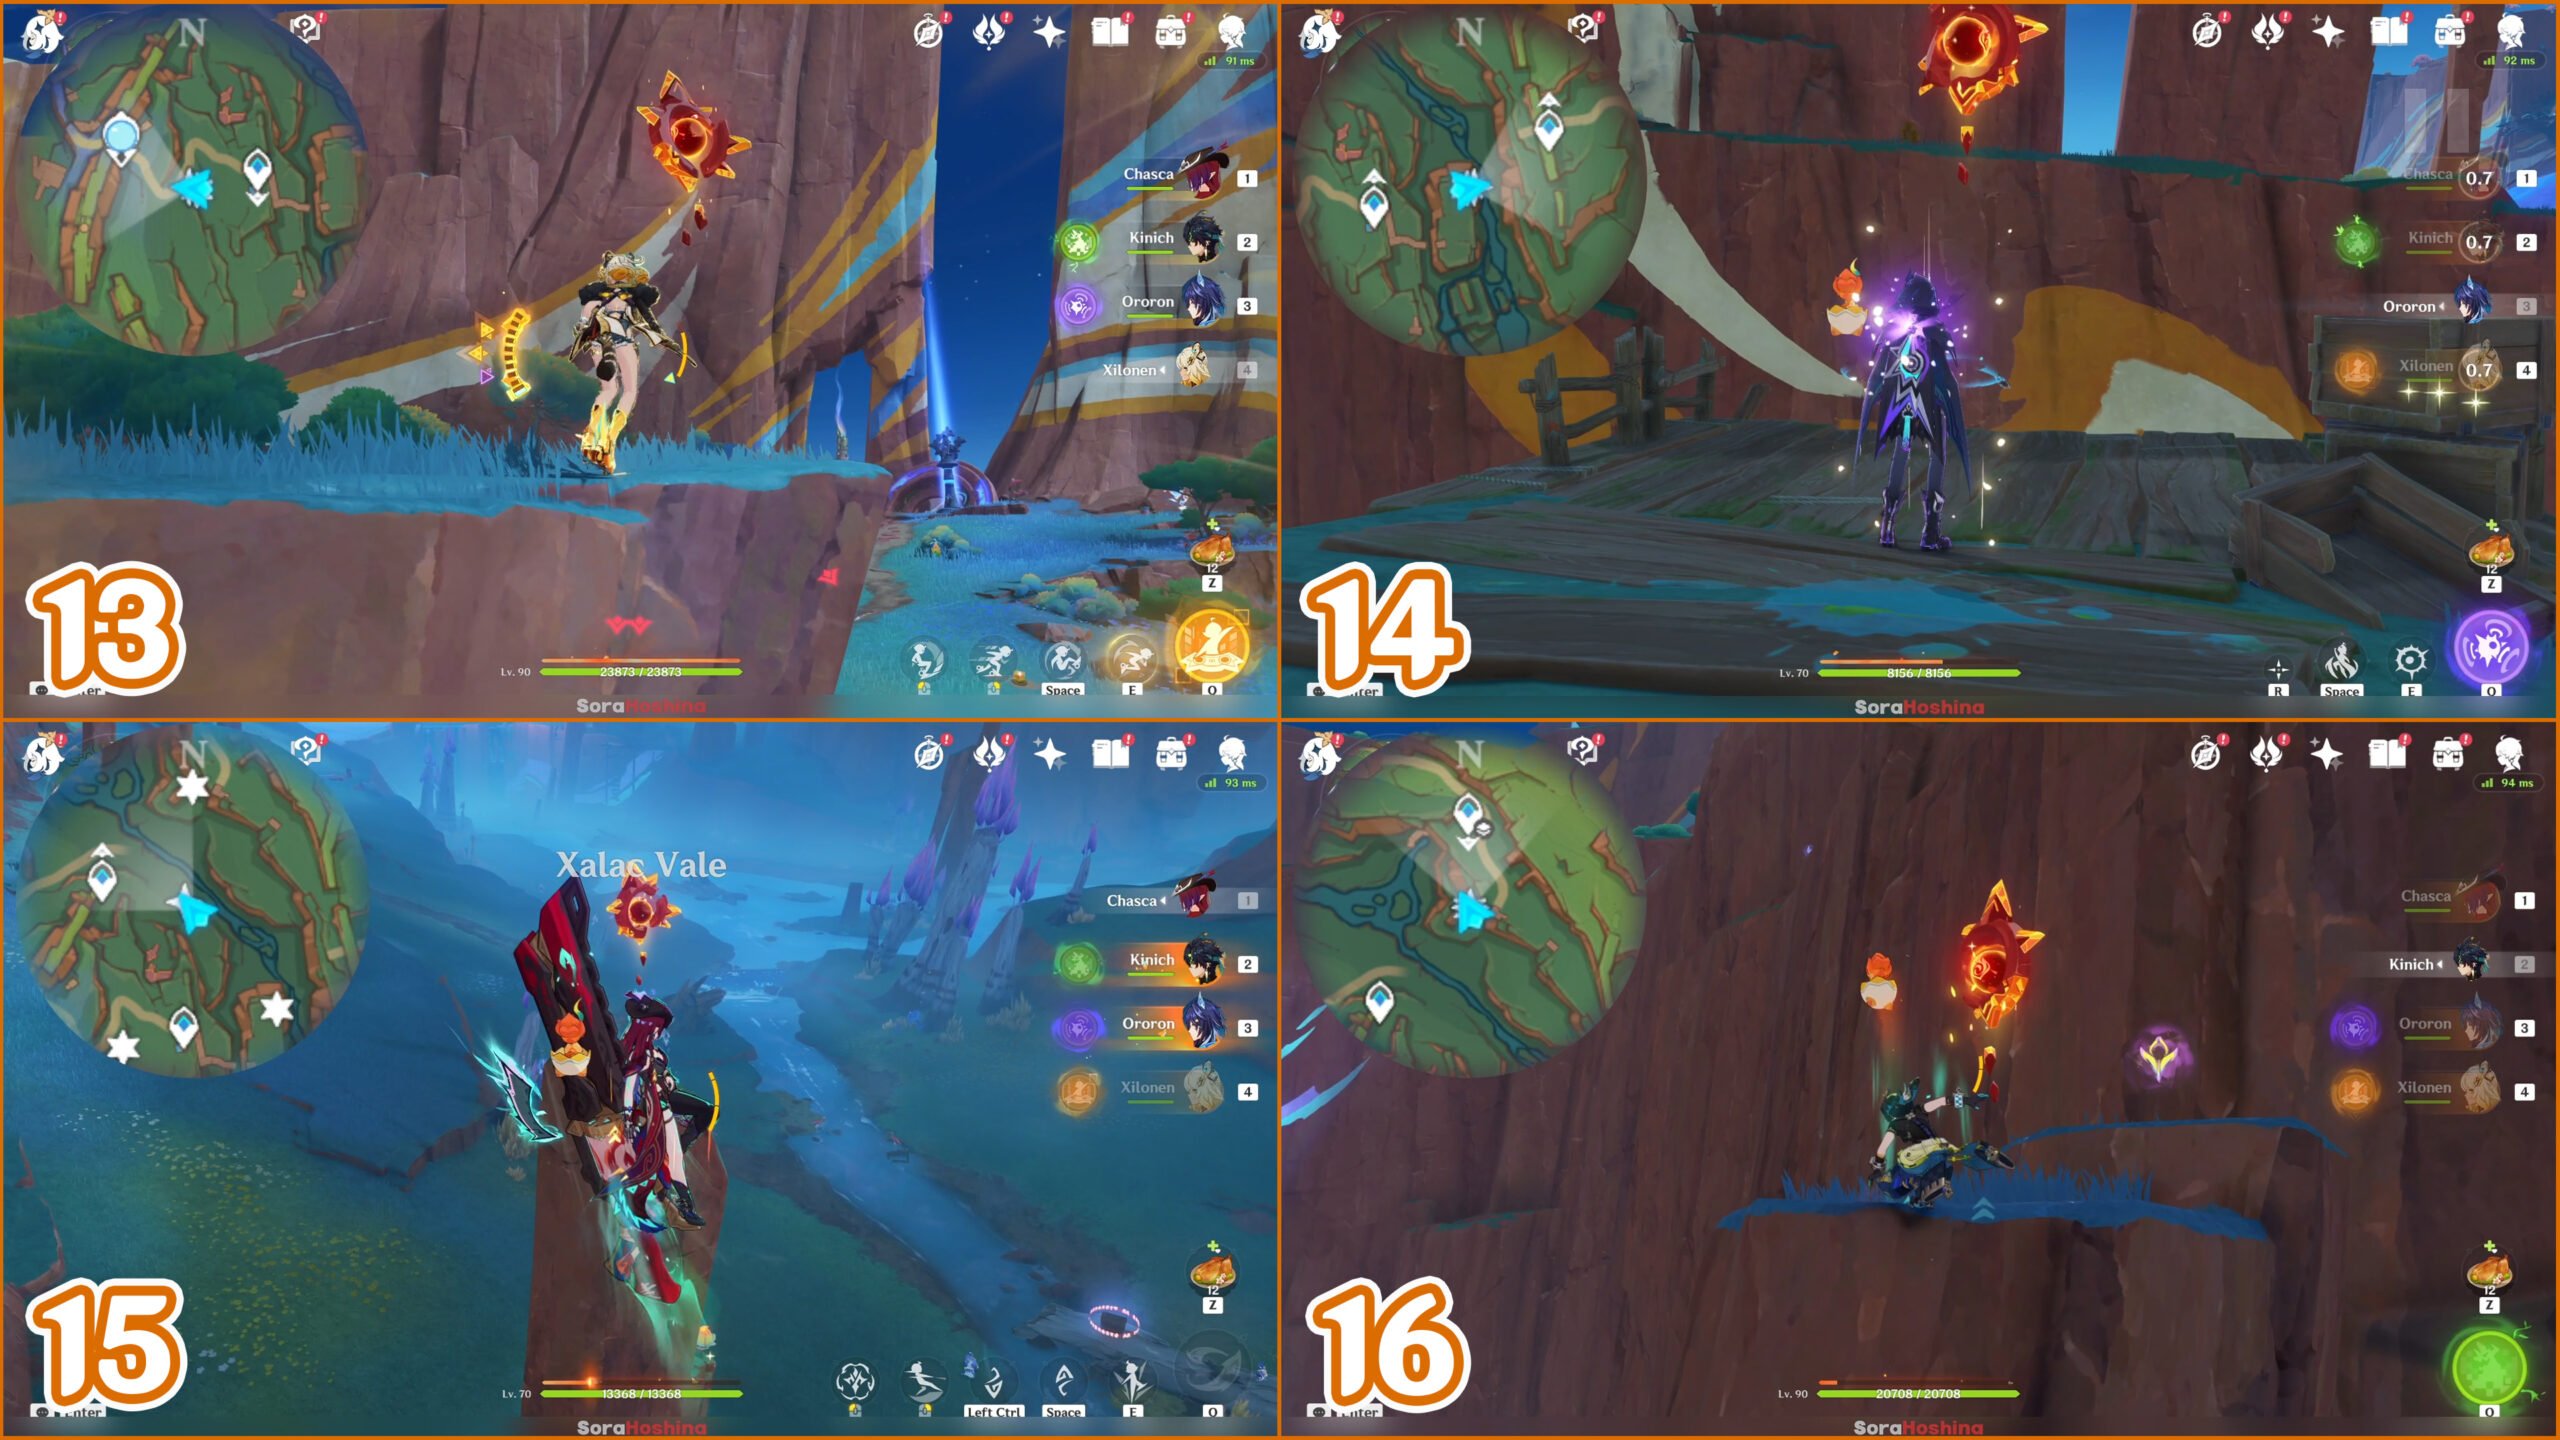
13. Teleport to waypoint 5 and head west to climb a tall rock for the Pyroculus.
14. Teleport to waypoint 5 again but this time head east to the lower mountain.
15. From the previous position, head northwest to the lower altitude for another Pyroculus on top of the tall rock.
16. Head north towards a Pyroculus at a higher rock.
12 Pyroculus in Quahuacan Cliff
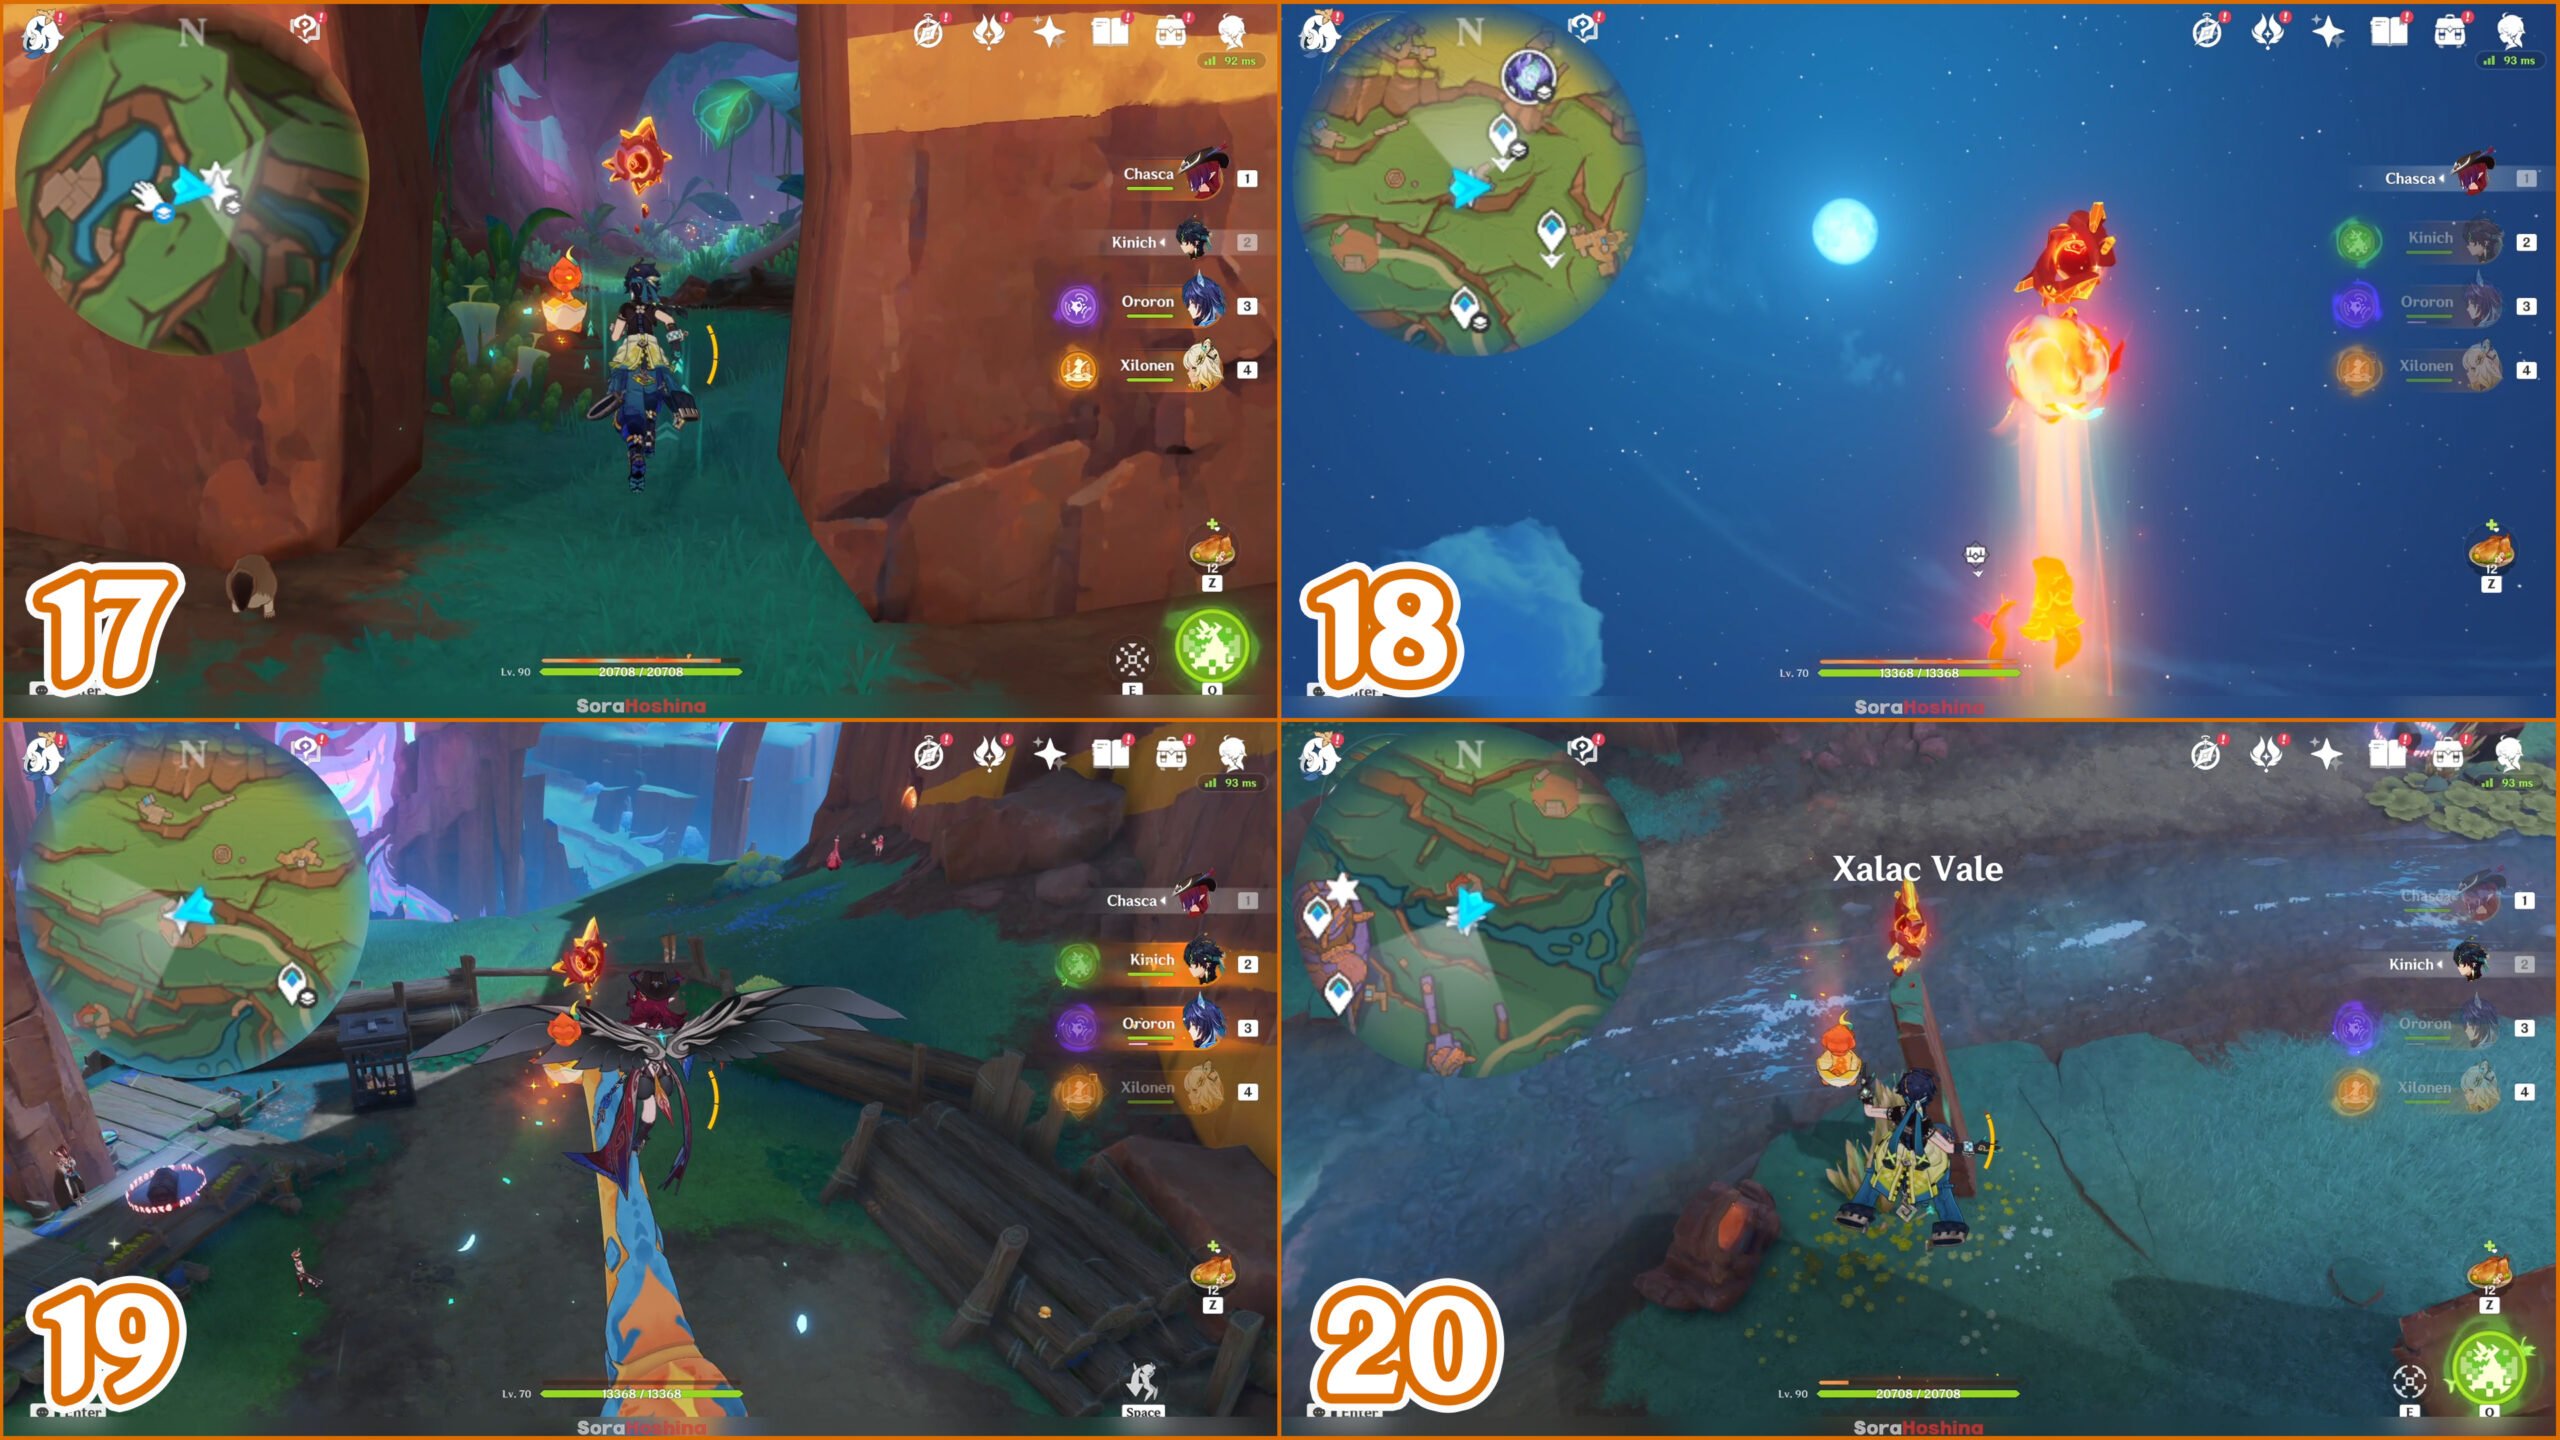
17. Teleport to waypoint 6 and head east before completing the mural puzzle to unlock the hidden area. The solution for said puzzle can be seen here: Every Picture Tells a Story Achievement. After unlocking the hidden area, you will immediately see the Pyroculus.
18. Teleport to waypoint 7 and head northwest to a higher altitude. Indwell a Qucusaur and use the Phlogiston Wind Tunnel to reach the Pyroculus floating high above.
19. From the previous spot, glide southwest and look down for a long-neck dinosaur. Glide to the dinosaur and you can see the Pyroculus on top of its head.
20. Continue gliding southwest to the bottom of the area for the culus beside the river.
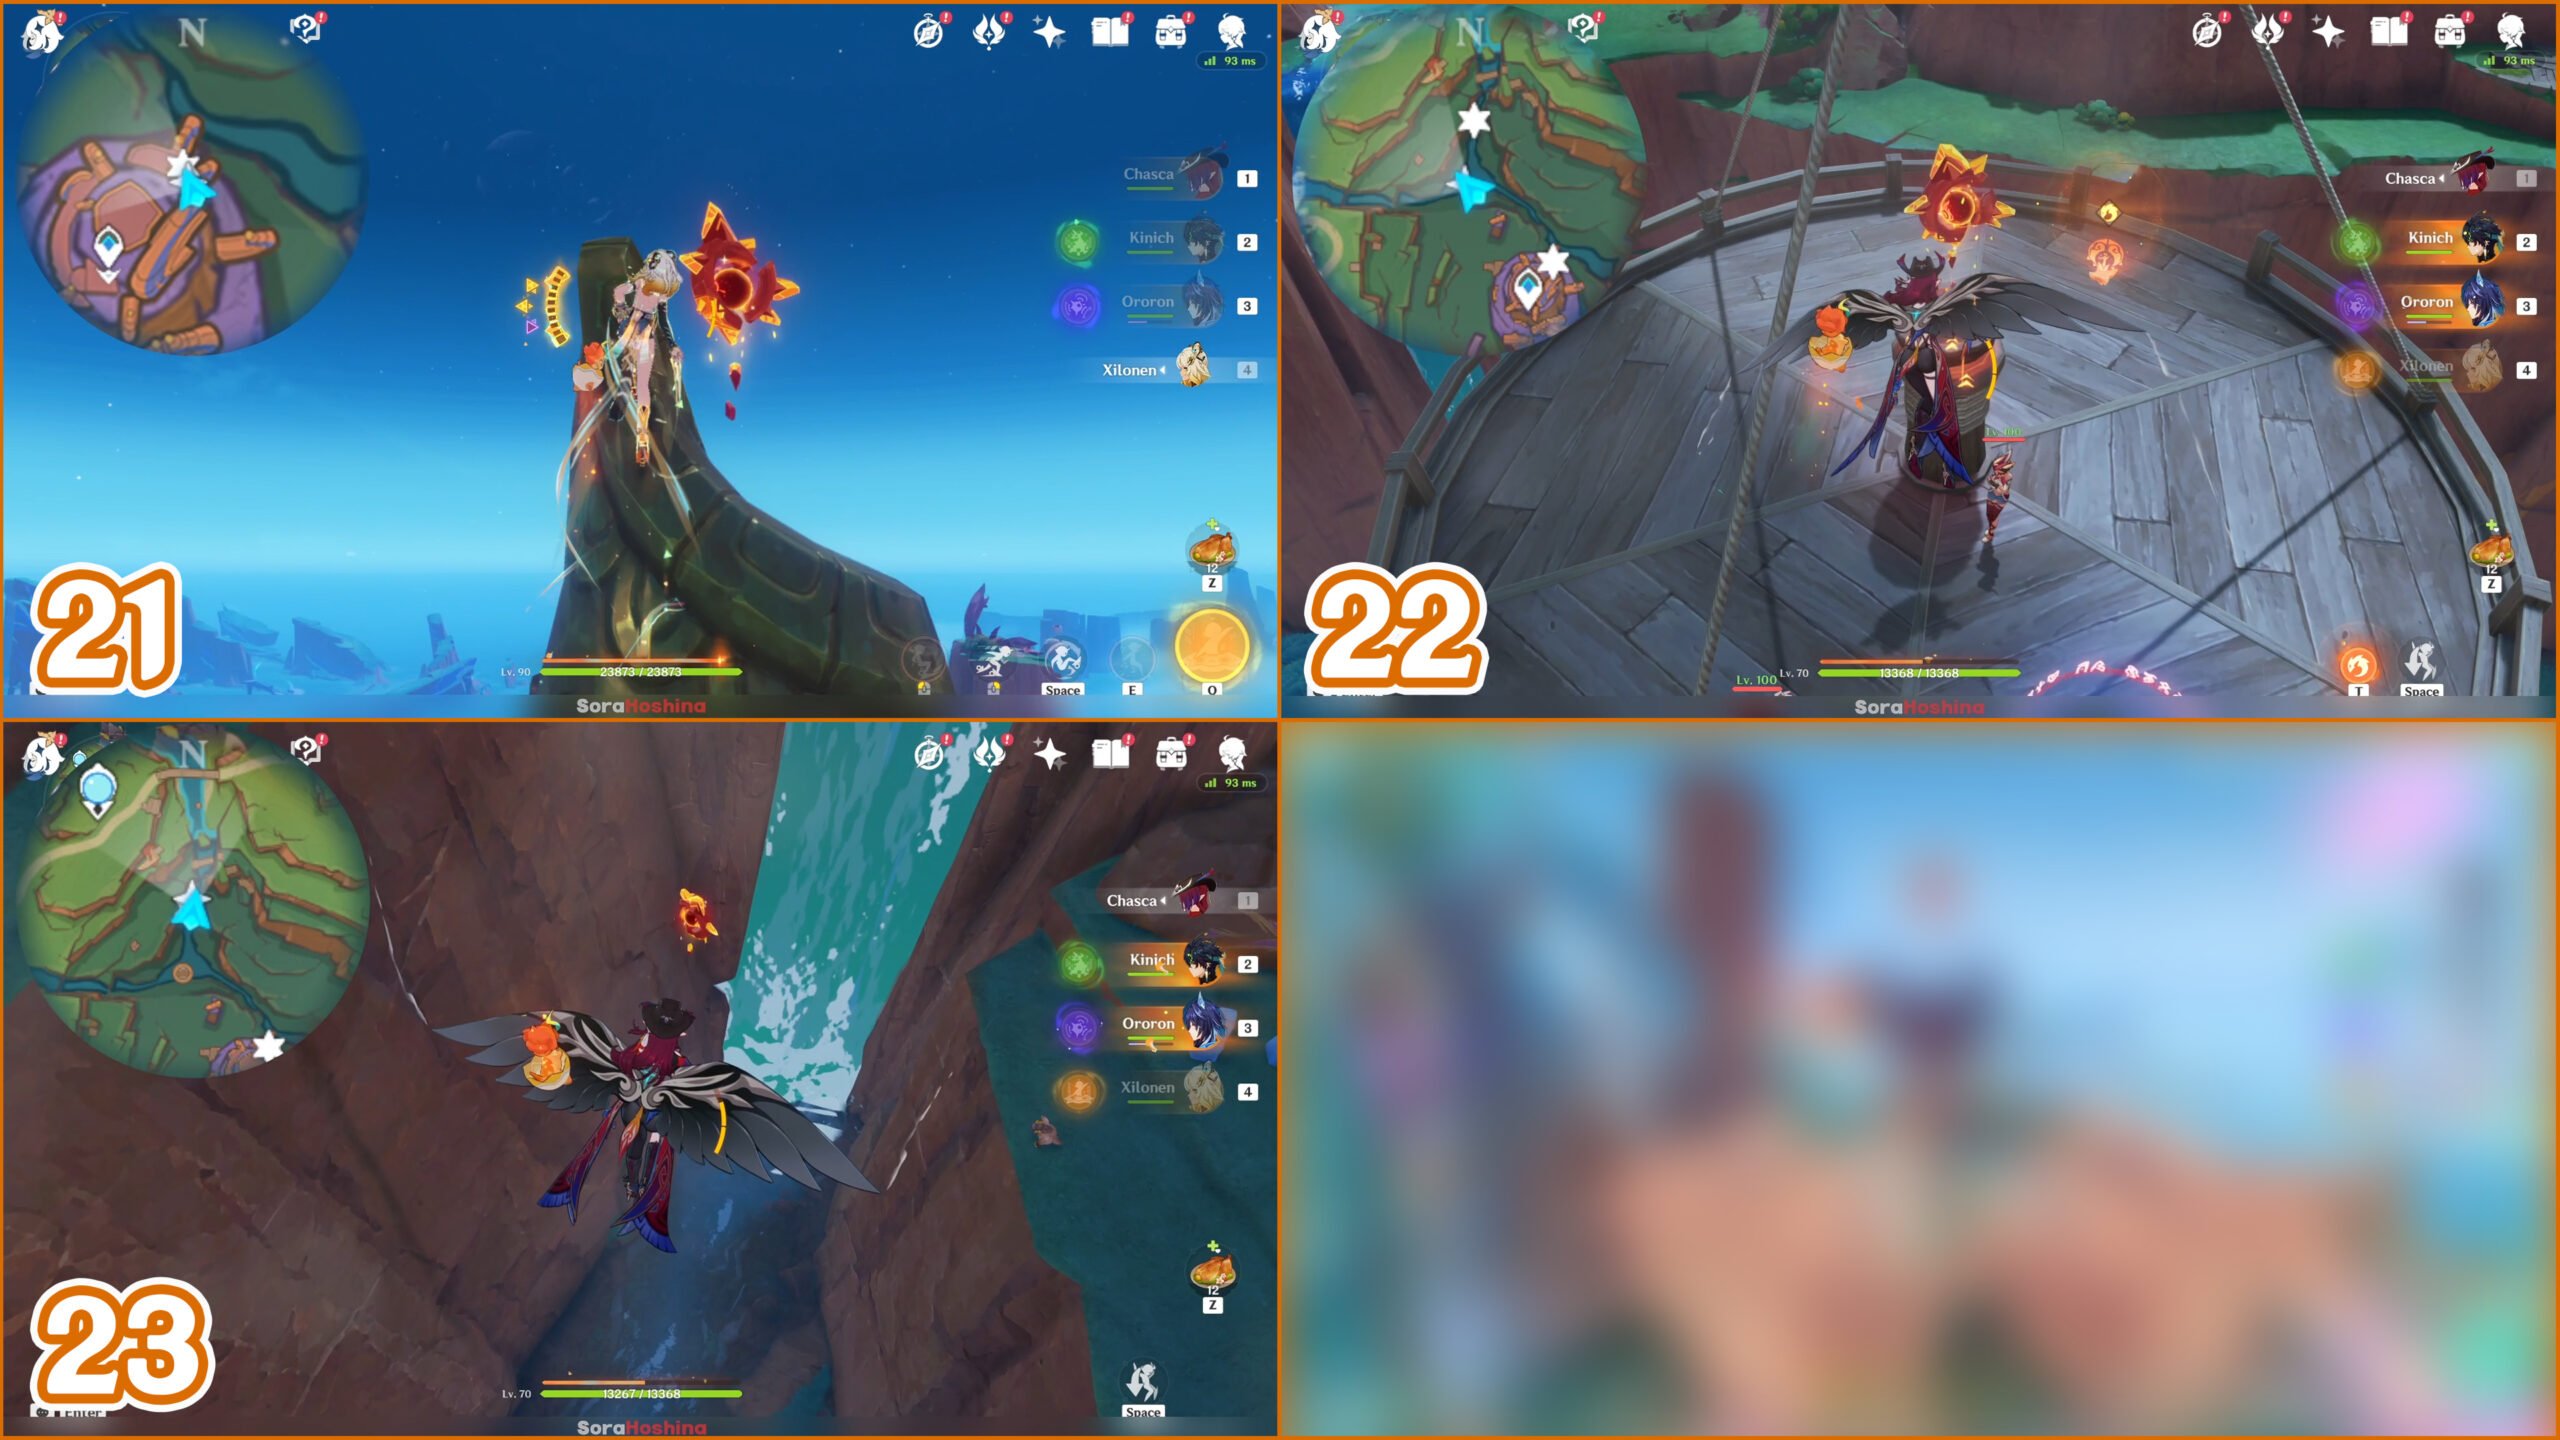
21. Teleport to waypoint 8 and climb the tower to the top for the Pyroculus.
22. From the previous position, look northwest and glide to the hot-air balloon slowly.
23. Glide again but to the waterfall on the north and the Pyroculus is almost at the bottom of the waterfall.
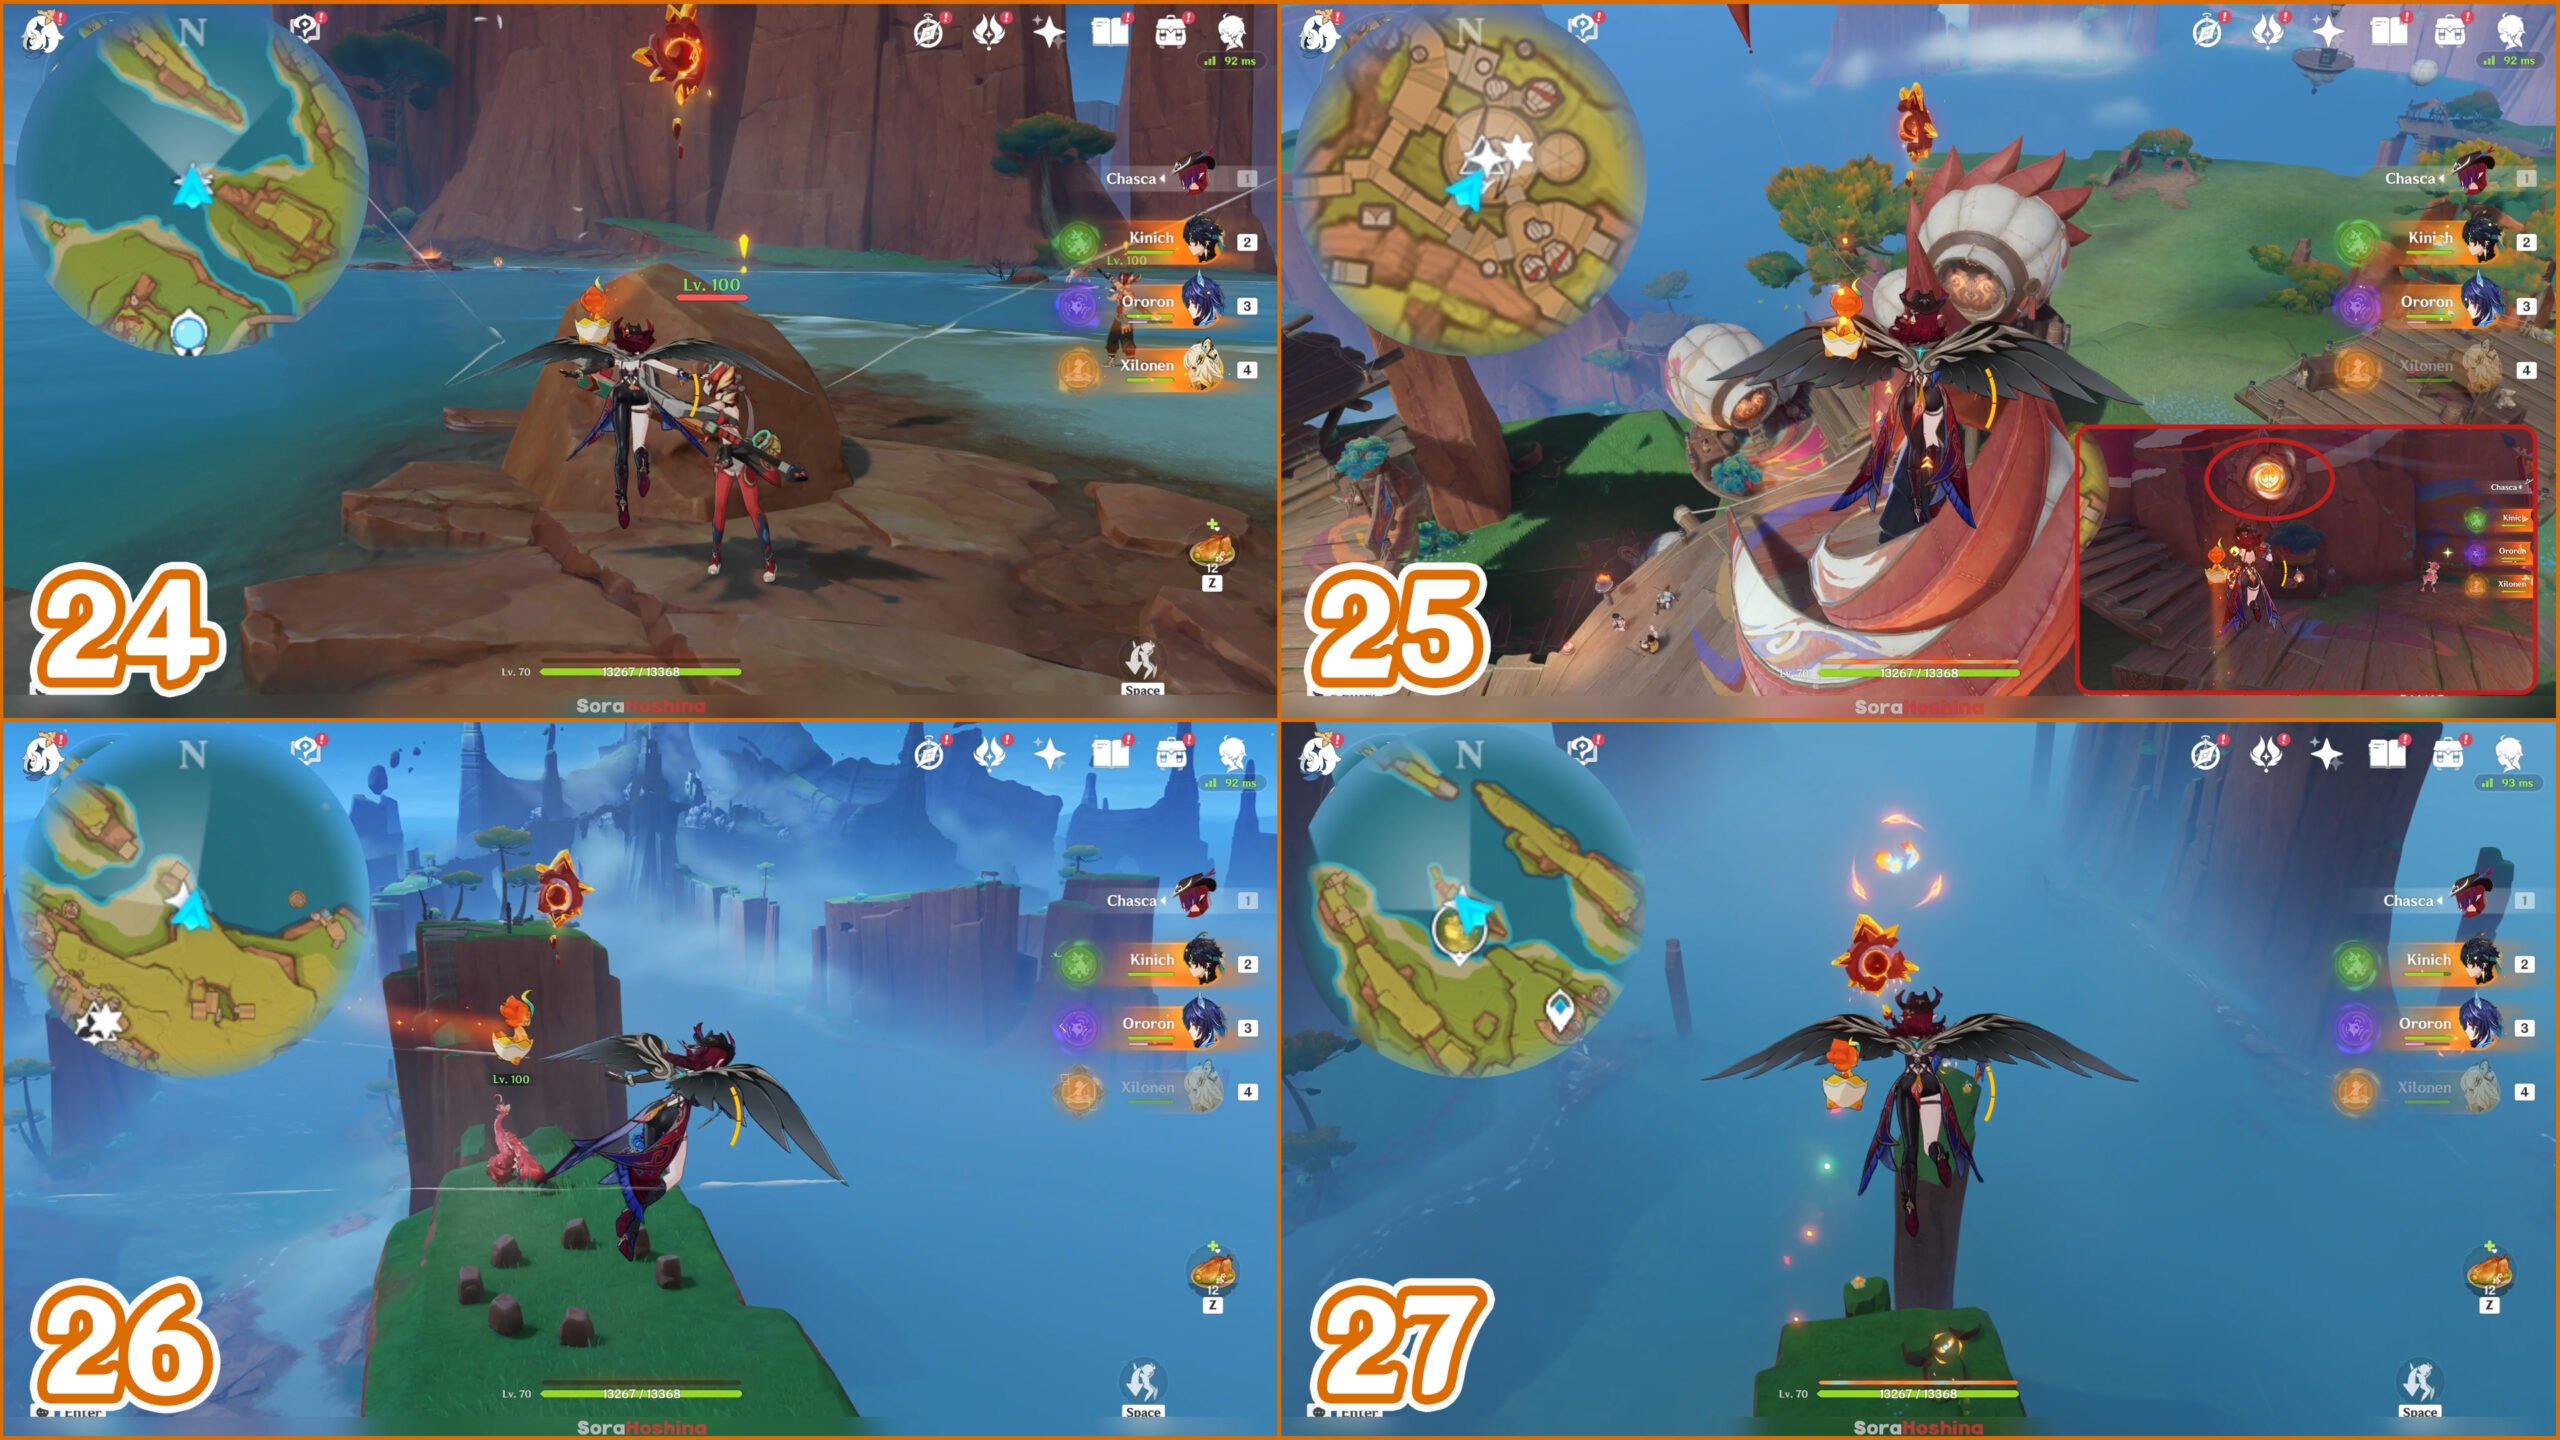
24. Teleport to the S7 west of Flower-Feather Clan and head north to the shore for the Pyroculus.
25. Teleport to the Reputation NPC in Flower-Feather Clan, turn around and use the Phlogiston Wind Tunnel to reach the top of the mountain. Then, glide down to the totem pole to get the Pyroculus at the top.
26. From the previous spot, glide northeast for another Pyroculus. If you didn't manage to get it when gliding, use the nearby Qucusaur to fly there.
27. Teleport to waypoint 9 and glide downwards to the northwest for another Pyroculus.
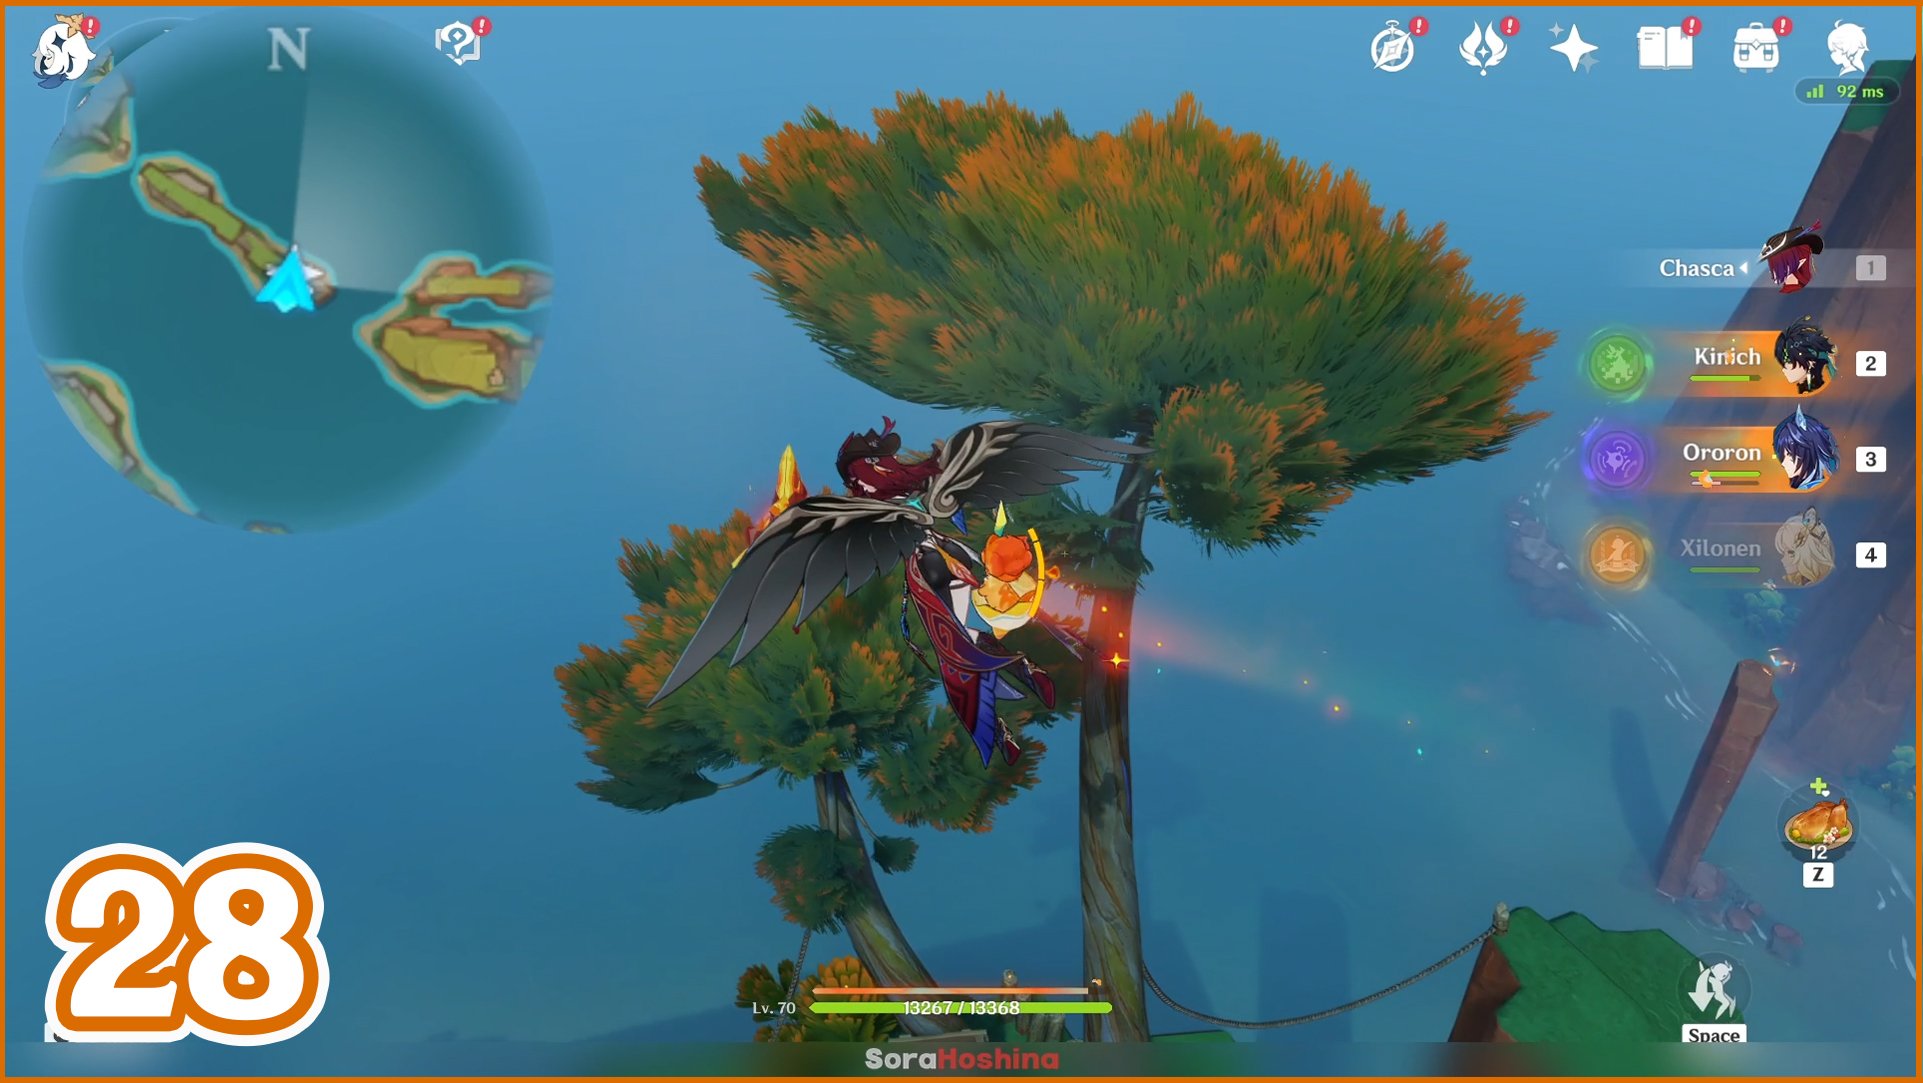
28. From the previous spot, use Qucusaur to fly to the north to the mountain. The Pyroculus is on top of the mountain.
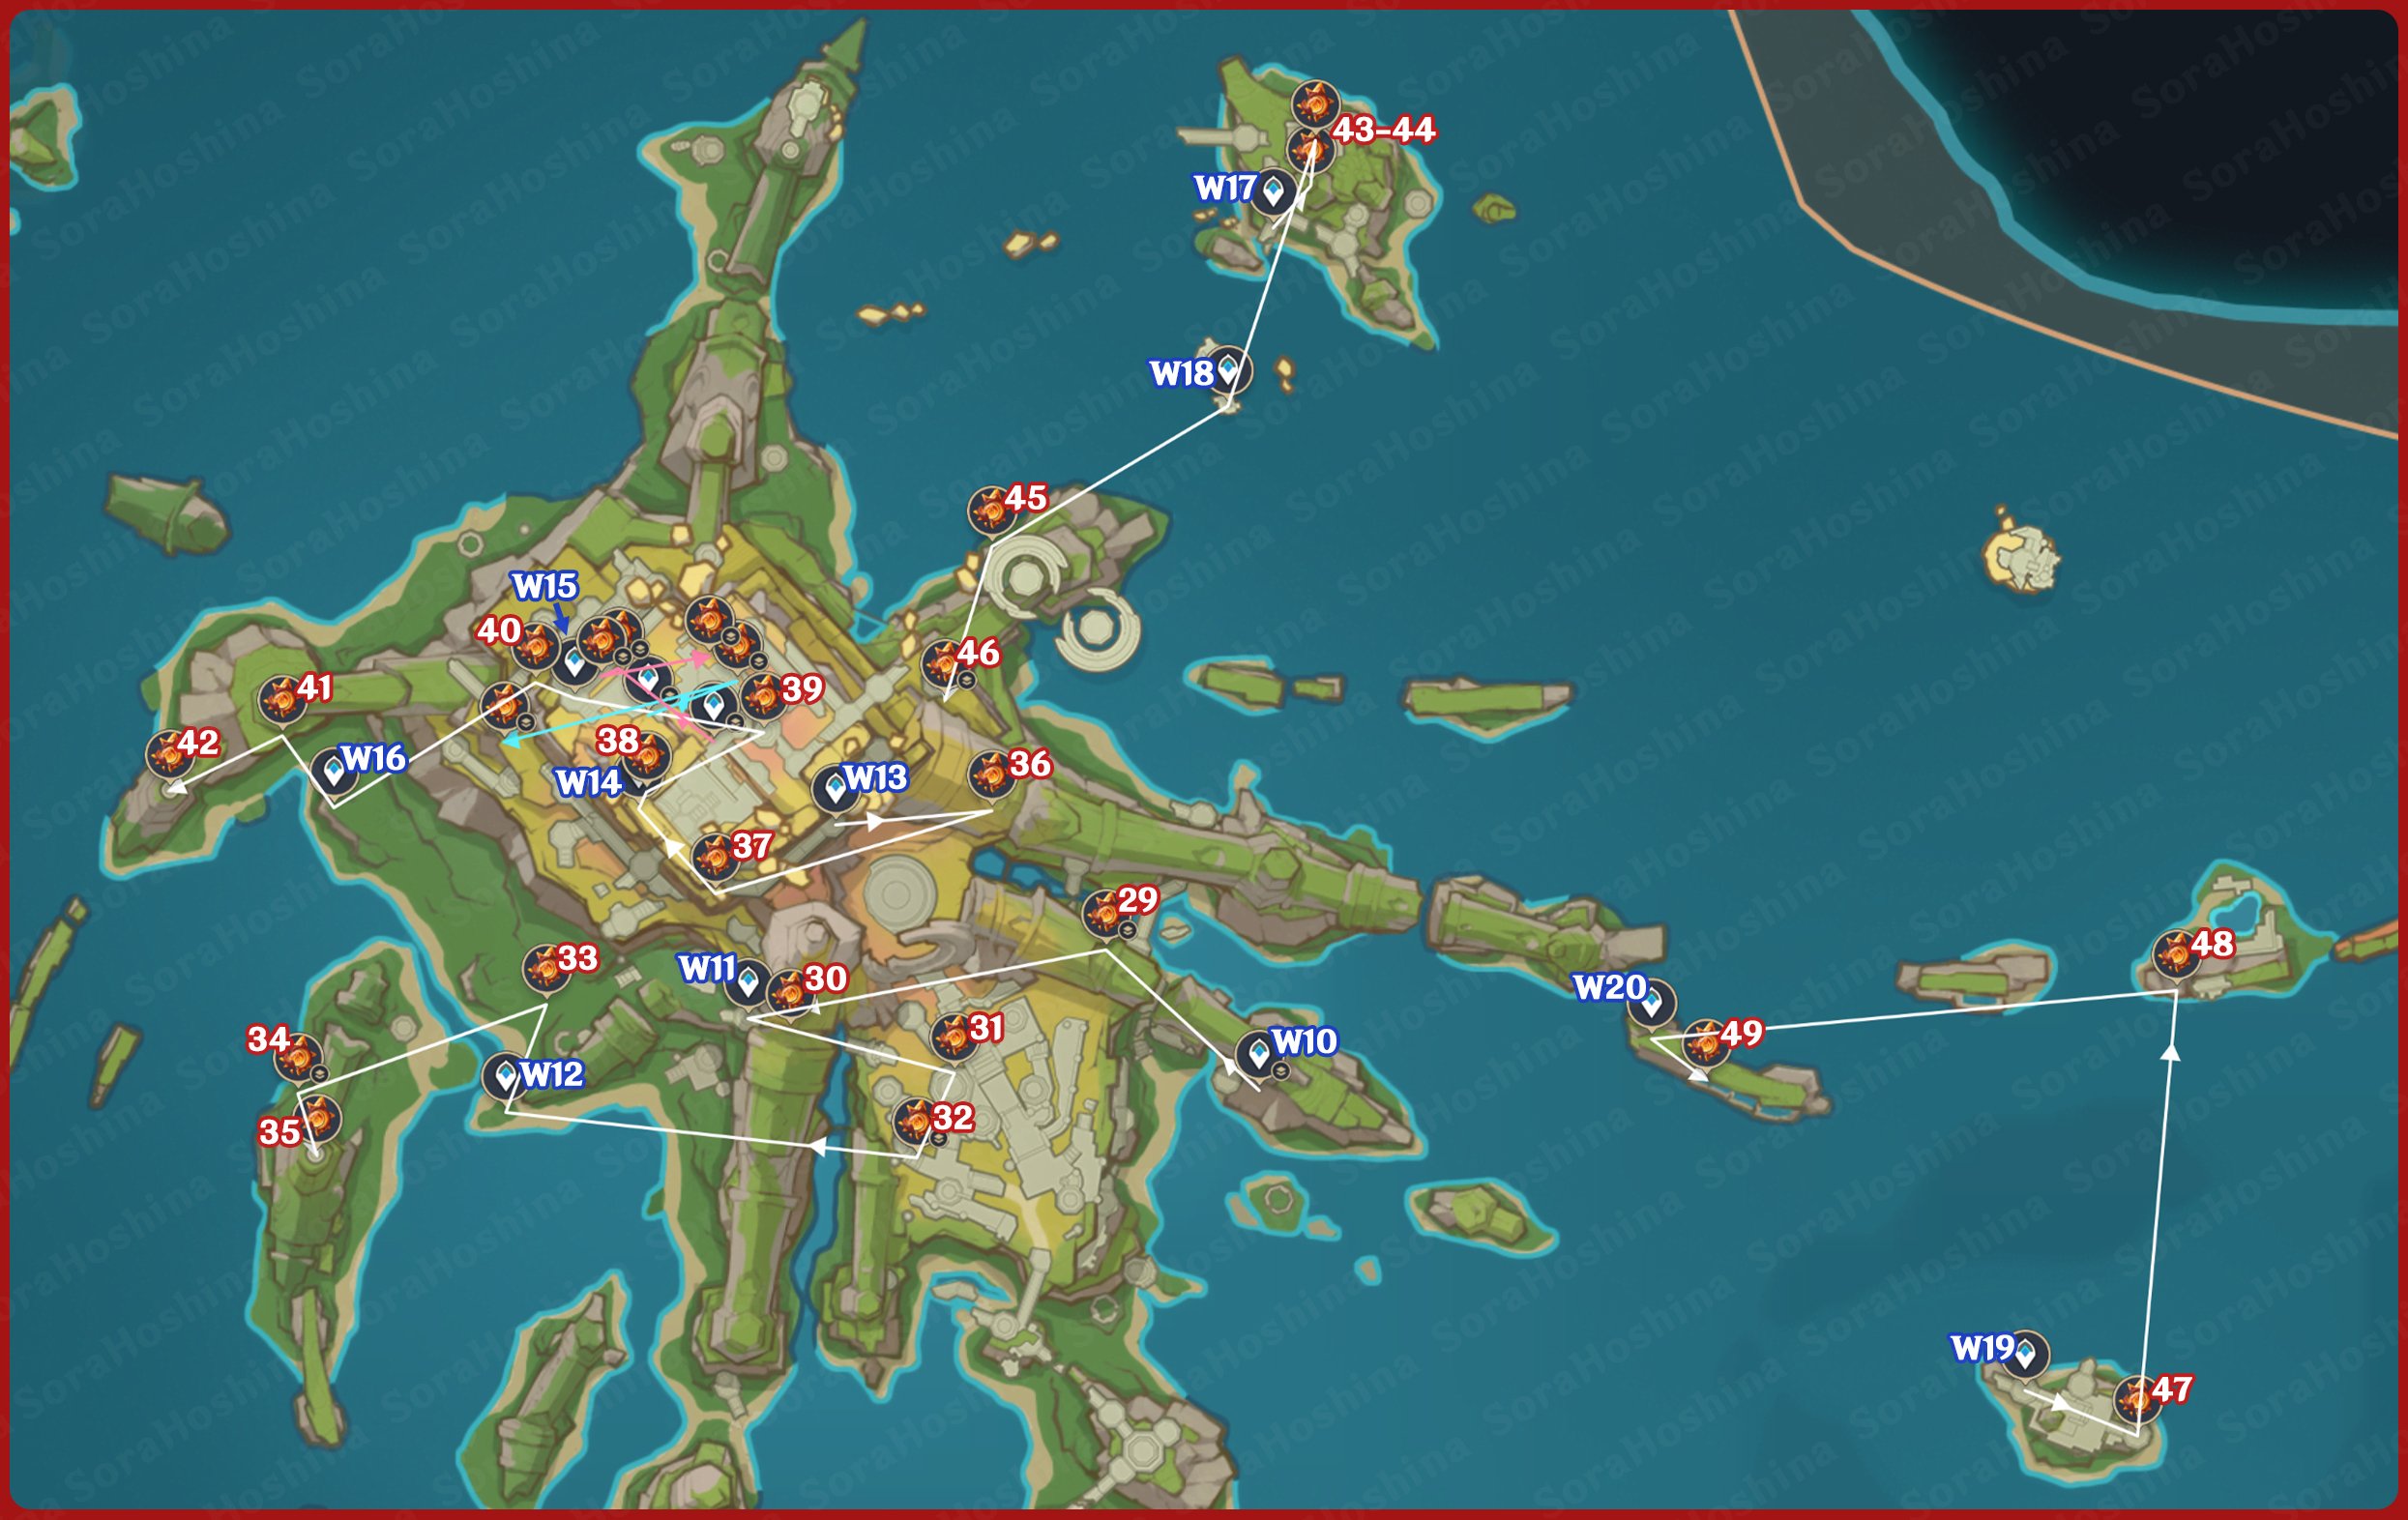
21 Pyroculus in Ochkanatlan
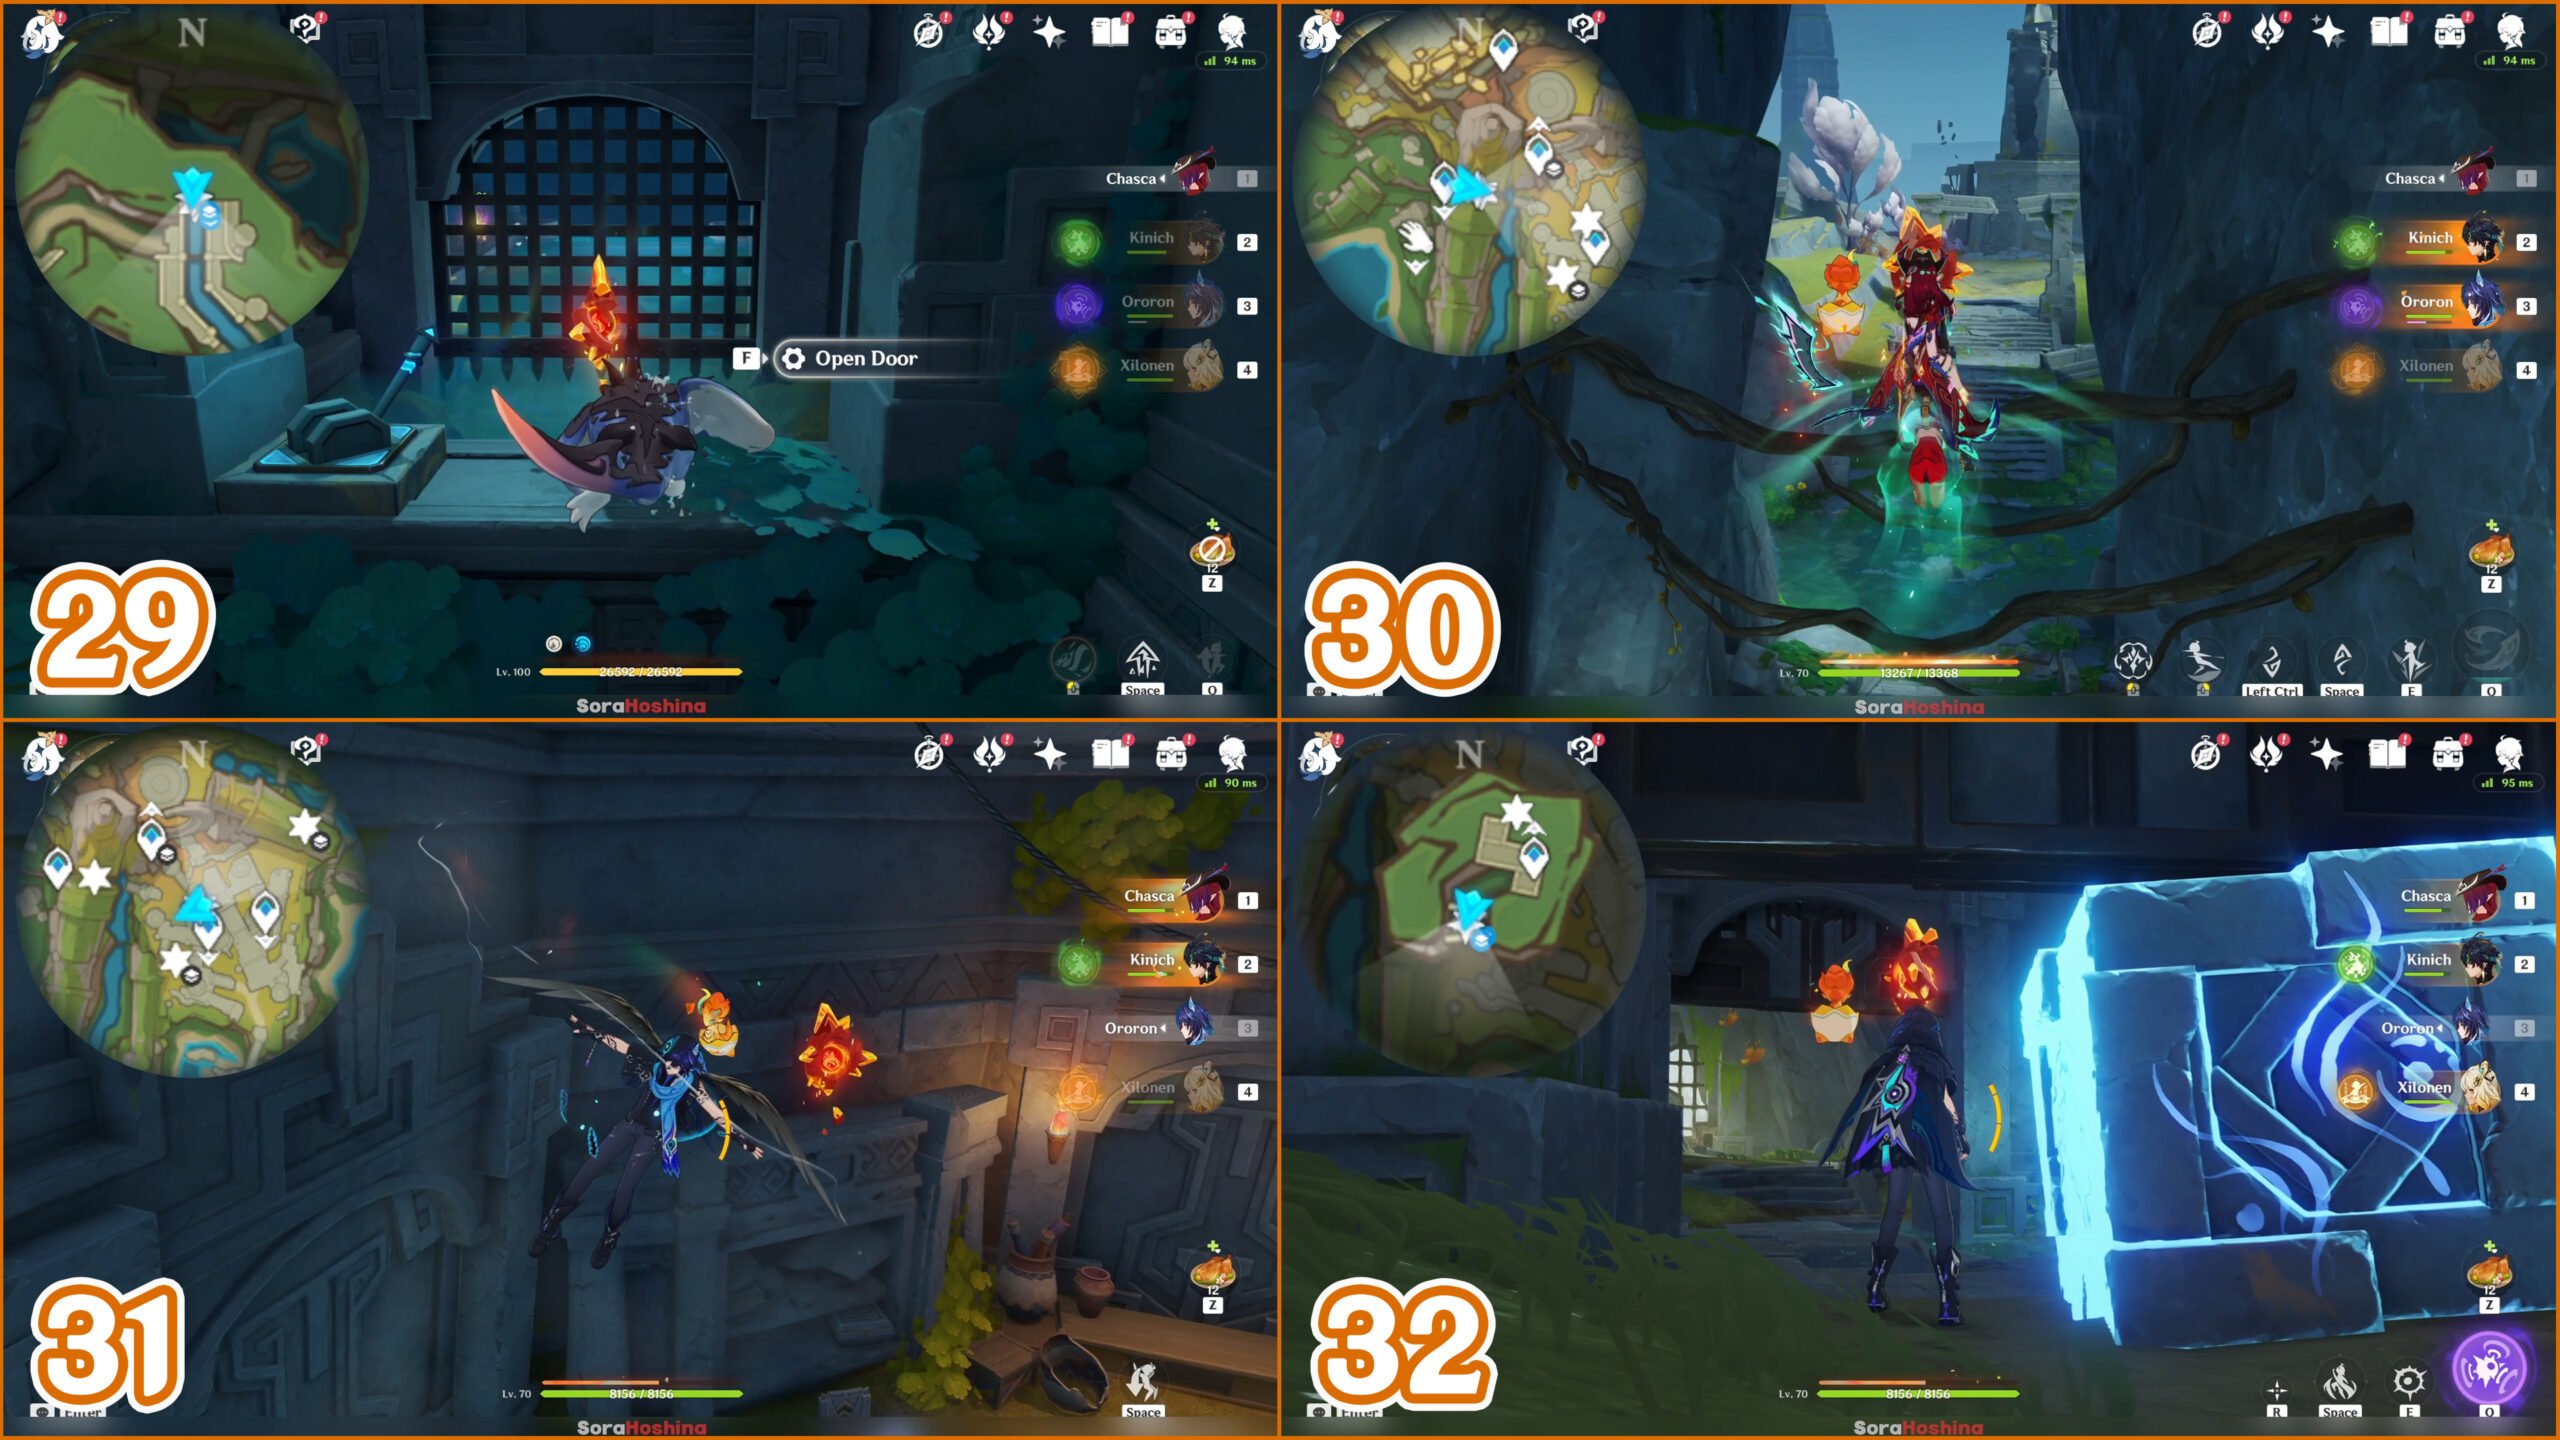
29. Teleport to waypoint 10 and head northwest to a small building on top of a waterfall (there's a Cryo Abyss Mage here). Don't go up the waterfall but go to the side where there's a crack on the wall. Enter there and use Koholasaurus to jump on the water and get the Pyroculus. If you didn't open this waypoint yet, complete the Open Your Heart to Me Quest here.
30. Teleport to waypoint 11 and head east a little bit. The Pyroculus is pretty high so use Qucusaur to reach it.
31. From the previous spot, head southeast towards a small building (You'd enter this place during Lost Traveler in the Ashen Realm Quest. The Pyroculus is on top of the fireplace.
32. Head further deeper inside this building (really deep) and you will see another Pyroculus.
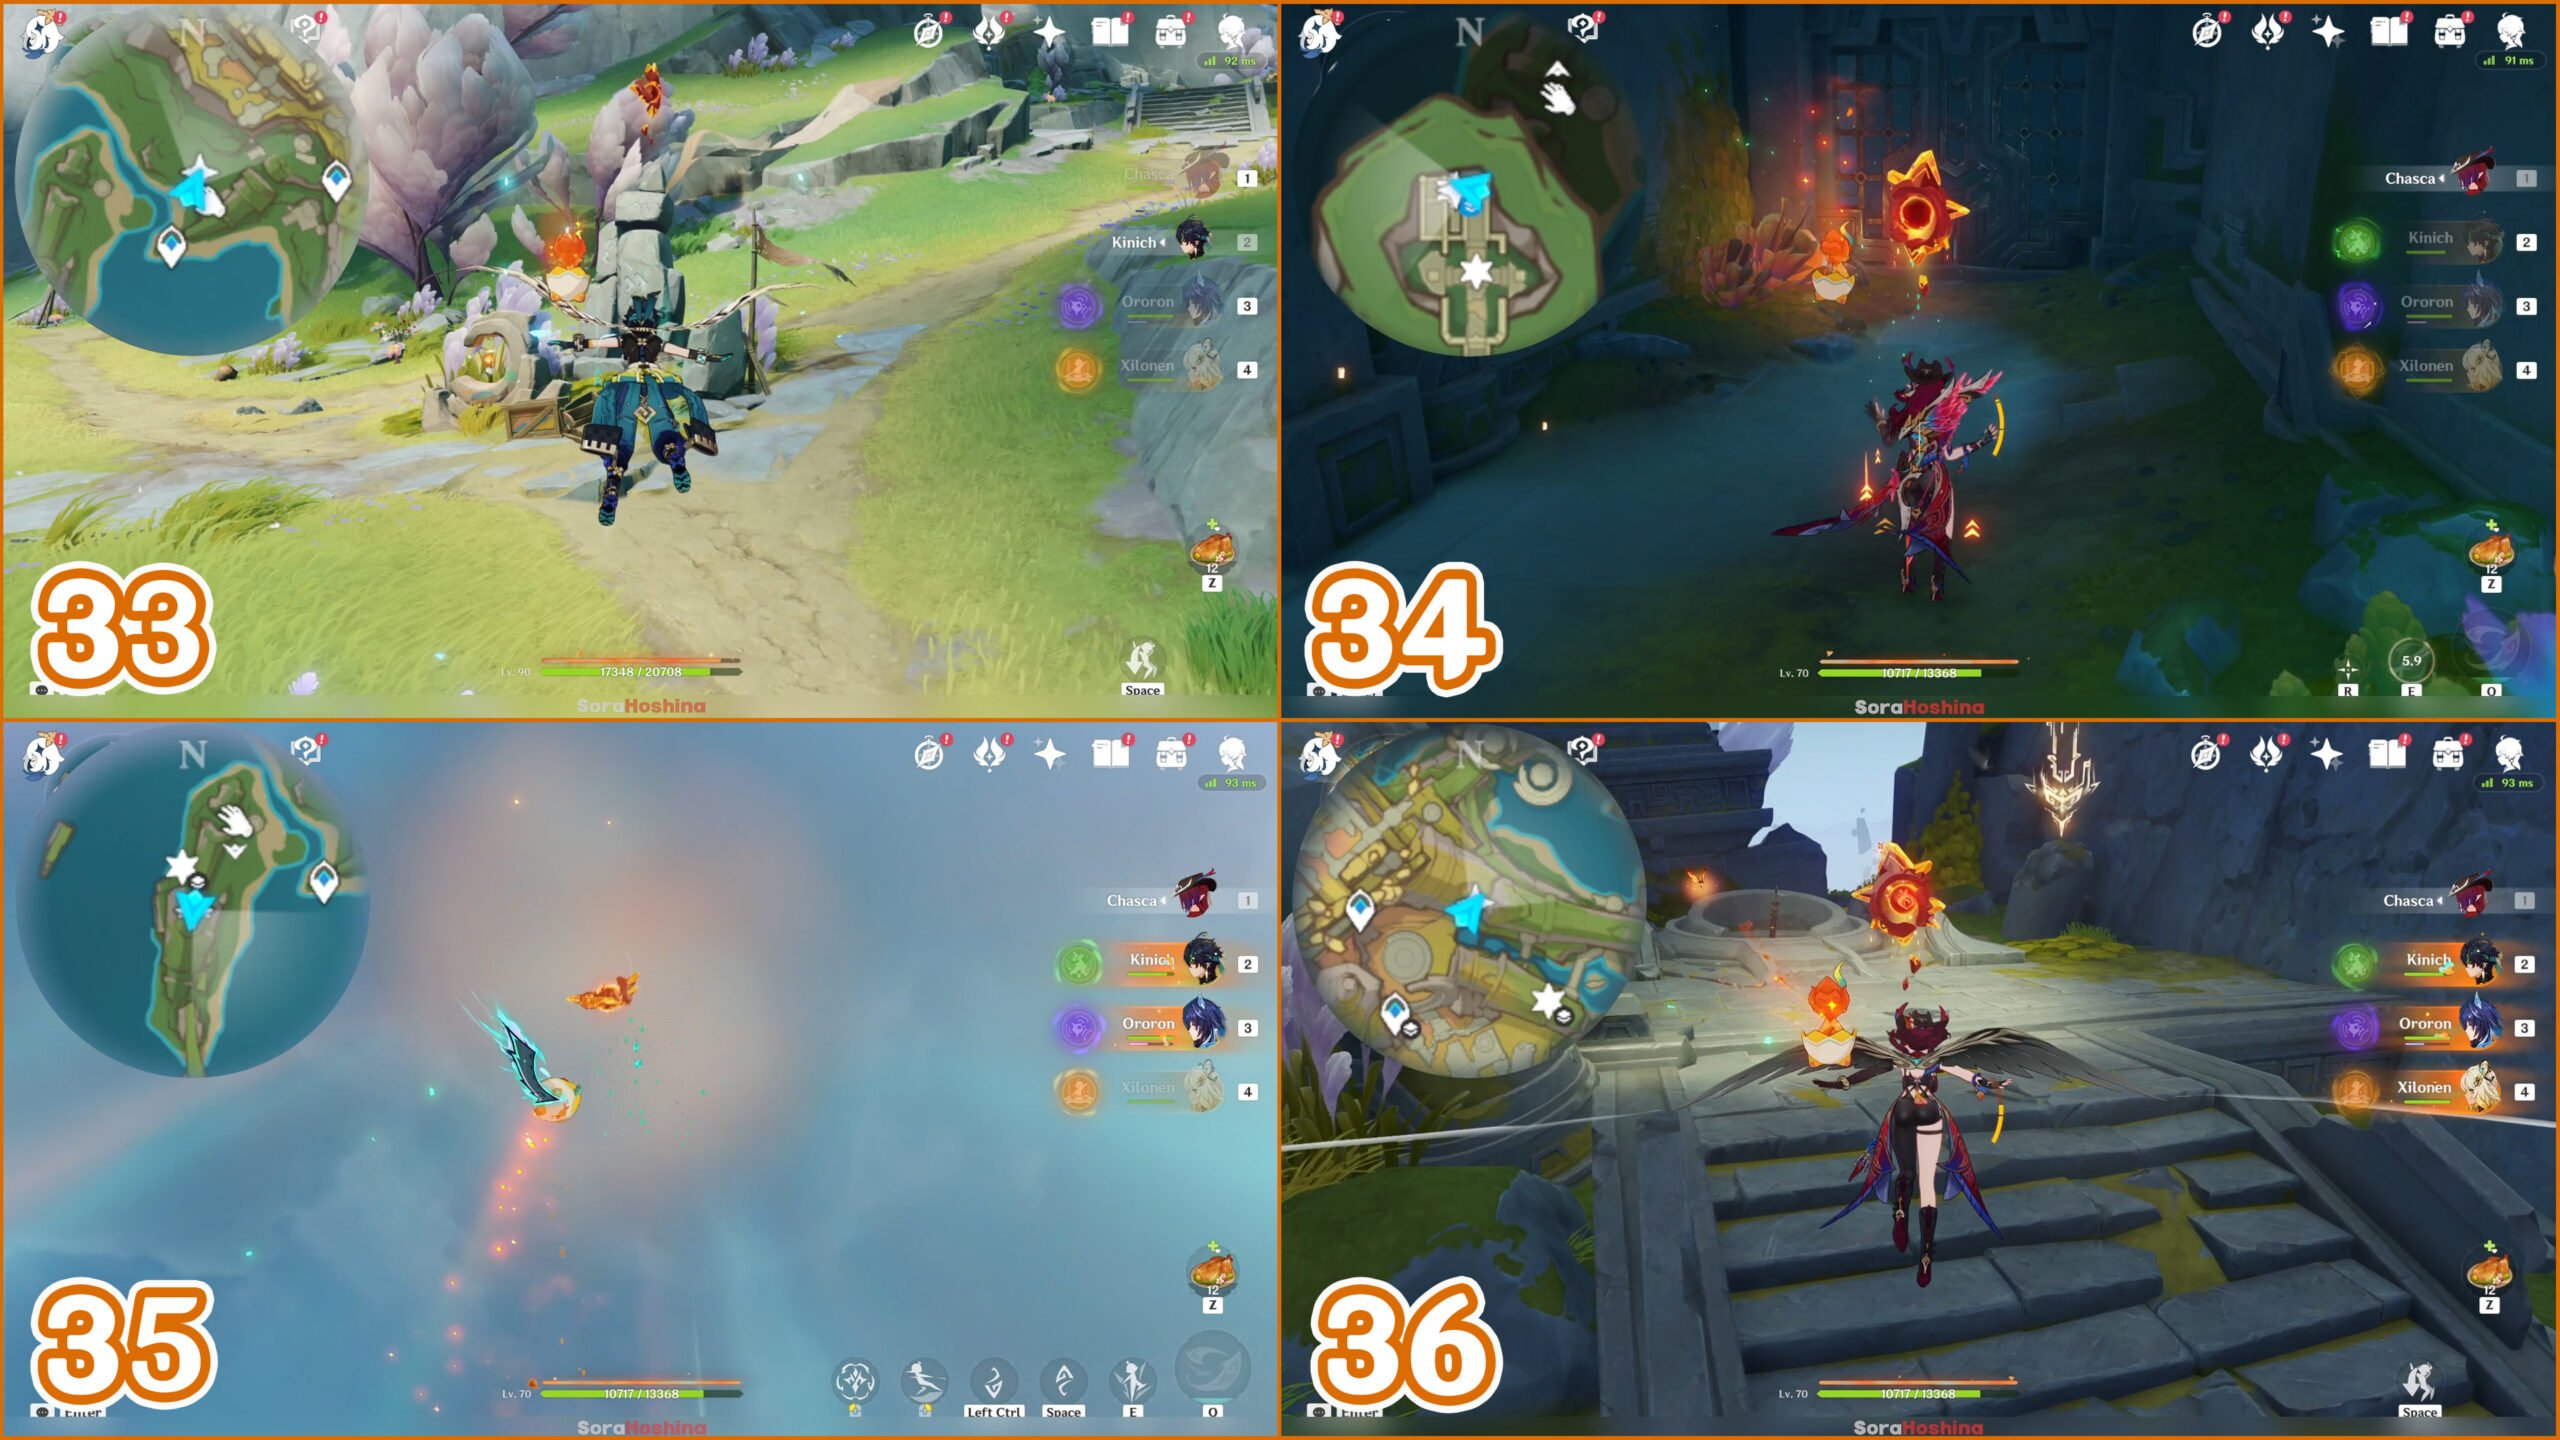
33. Teleport to waypoint 12 and head northeast and you can see the Pyroculus.
34. From the previous spot, head west and interact with the glowing yellow sigil. This will teleport you to Furnaces of Fiery Embers. Complete the puzzle in here and you will be led to the Pyroculus. If you didn't complete the puzzle yet, here's the guide: Embers Rekindled Achievement Guide
35. Once you complete the puzzle, a wind current will appear. Glide on that wind current to the top and you will reach the Pyroculus floating high above.
36. Teleport to waypoint 13 and drop down (slowy) in the direction of east until you see the Pyroculus icon on the map.
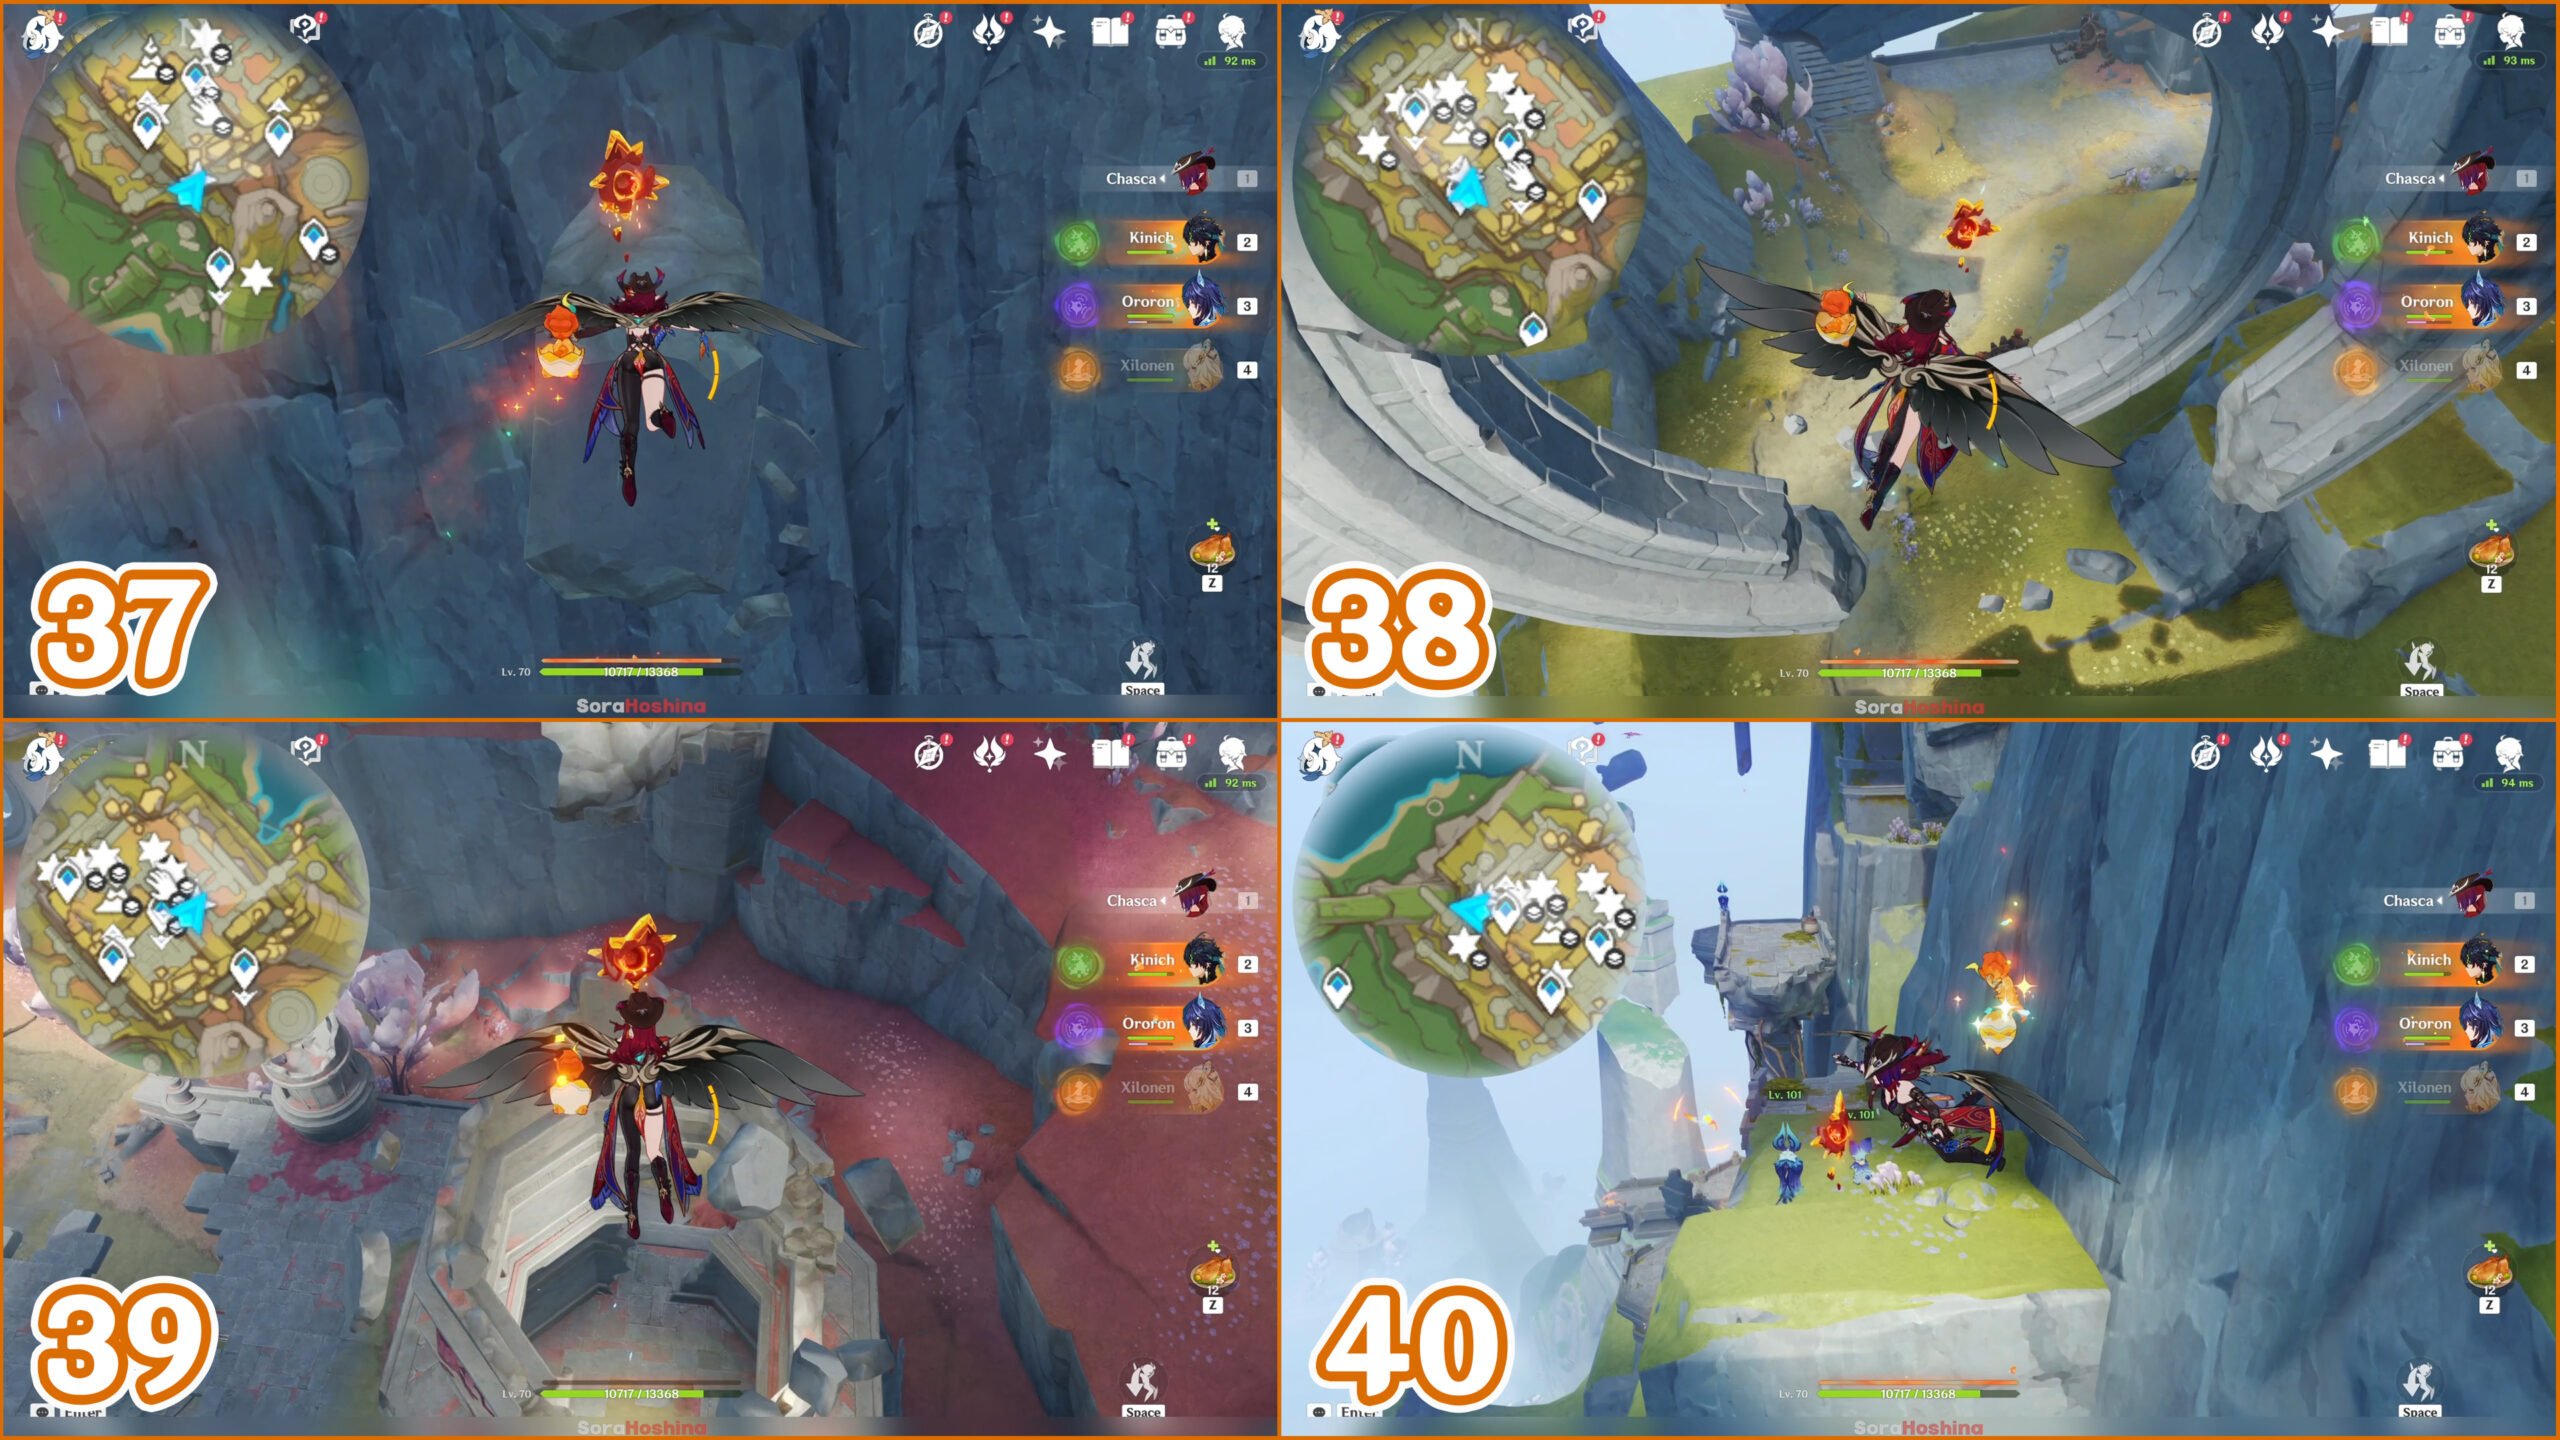
37. Teleport to waypoint 13 again and head southwest before floating down slowly. Keep an eye out on a Pyroculus between the pillar hidden under the mountain.
38. Teleport to waypoint 14 and and drop down to the west until you see the huge circular rock floating on the road.
39. Teleport to waypoint 14 again but this time head northeast before dropping down to the wrecked building.
40. Teleport to waypoint 15 and turn around before jumping down until you see the Pyroculus.
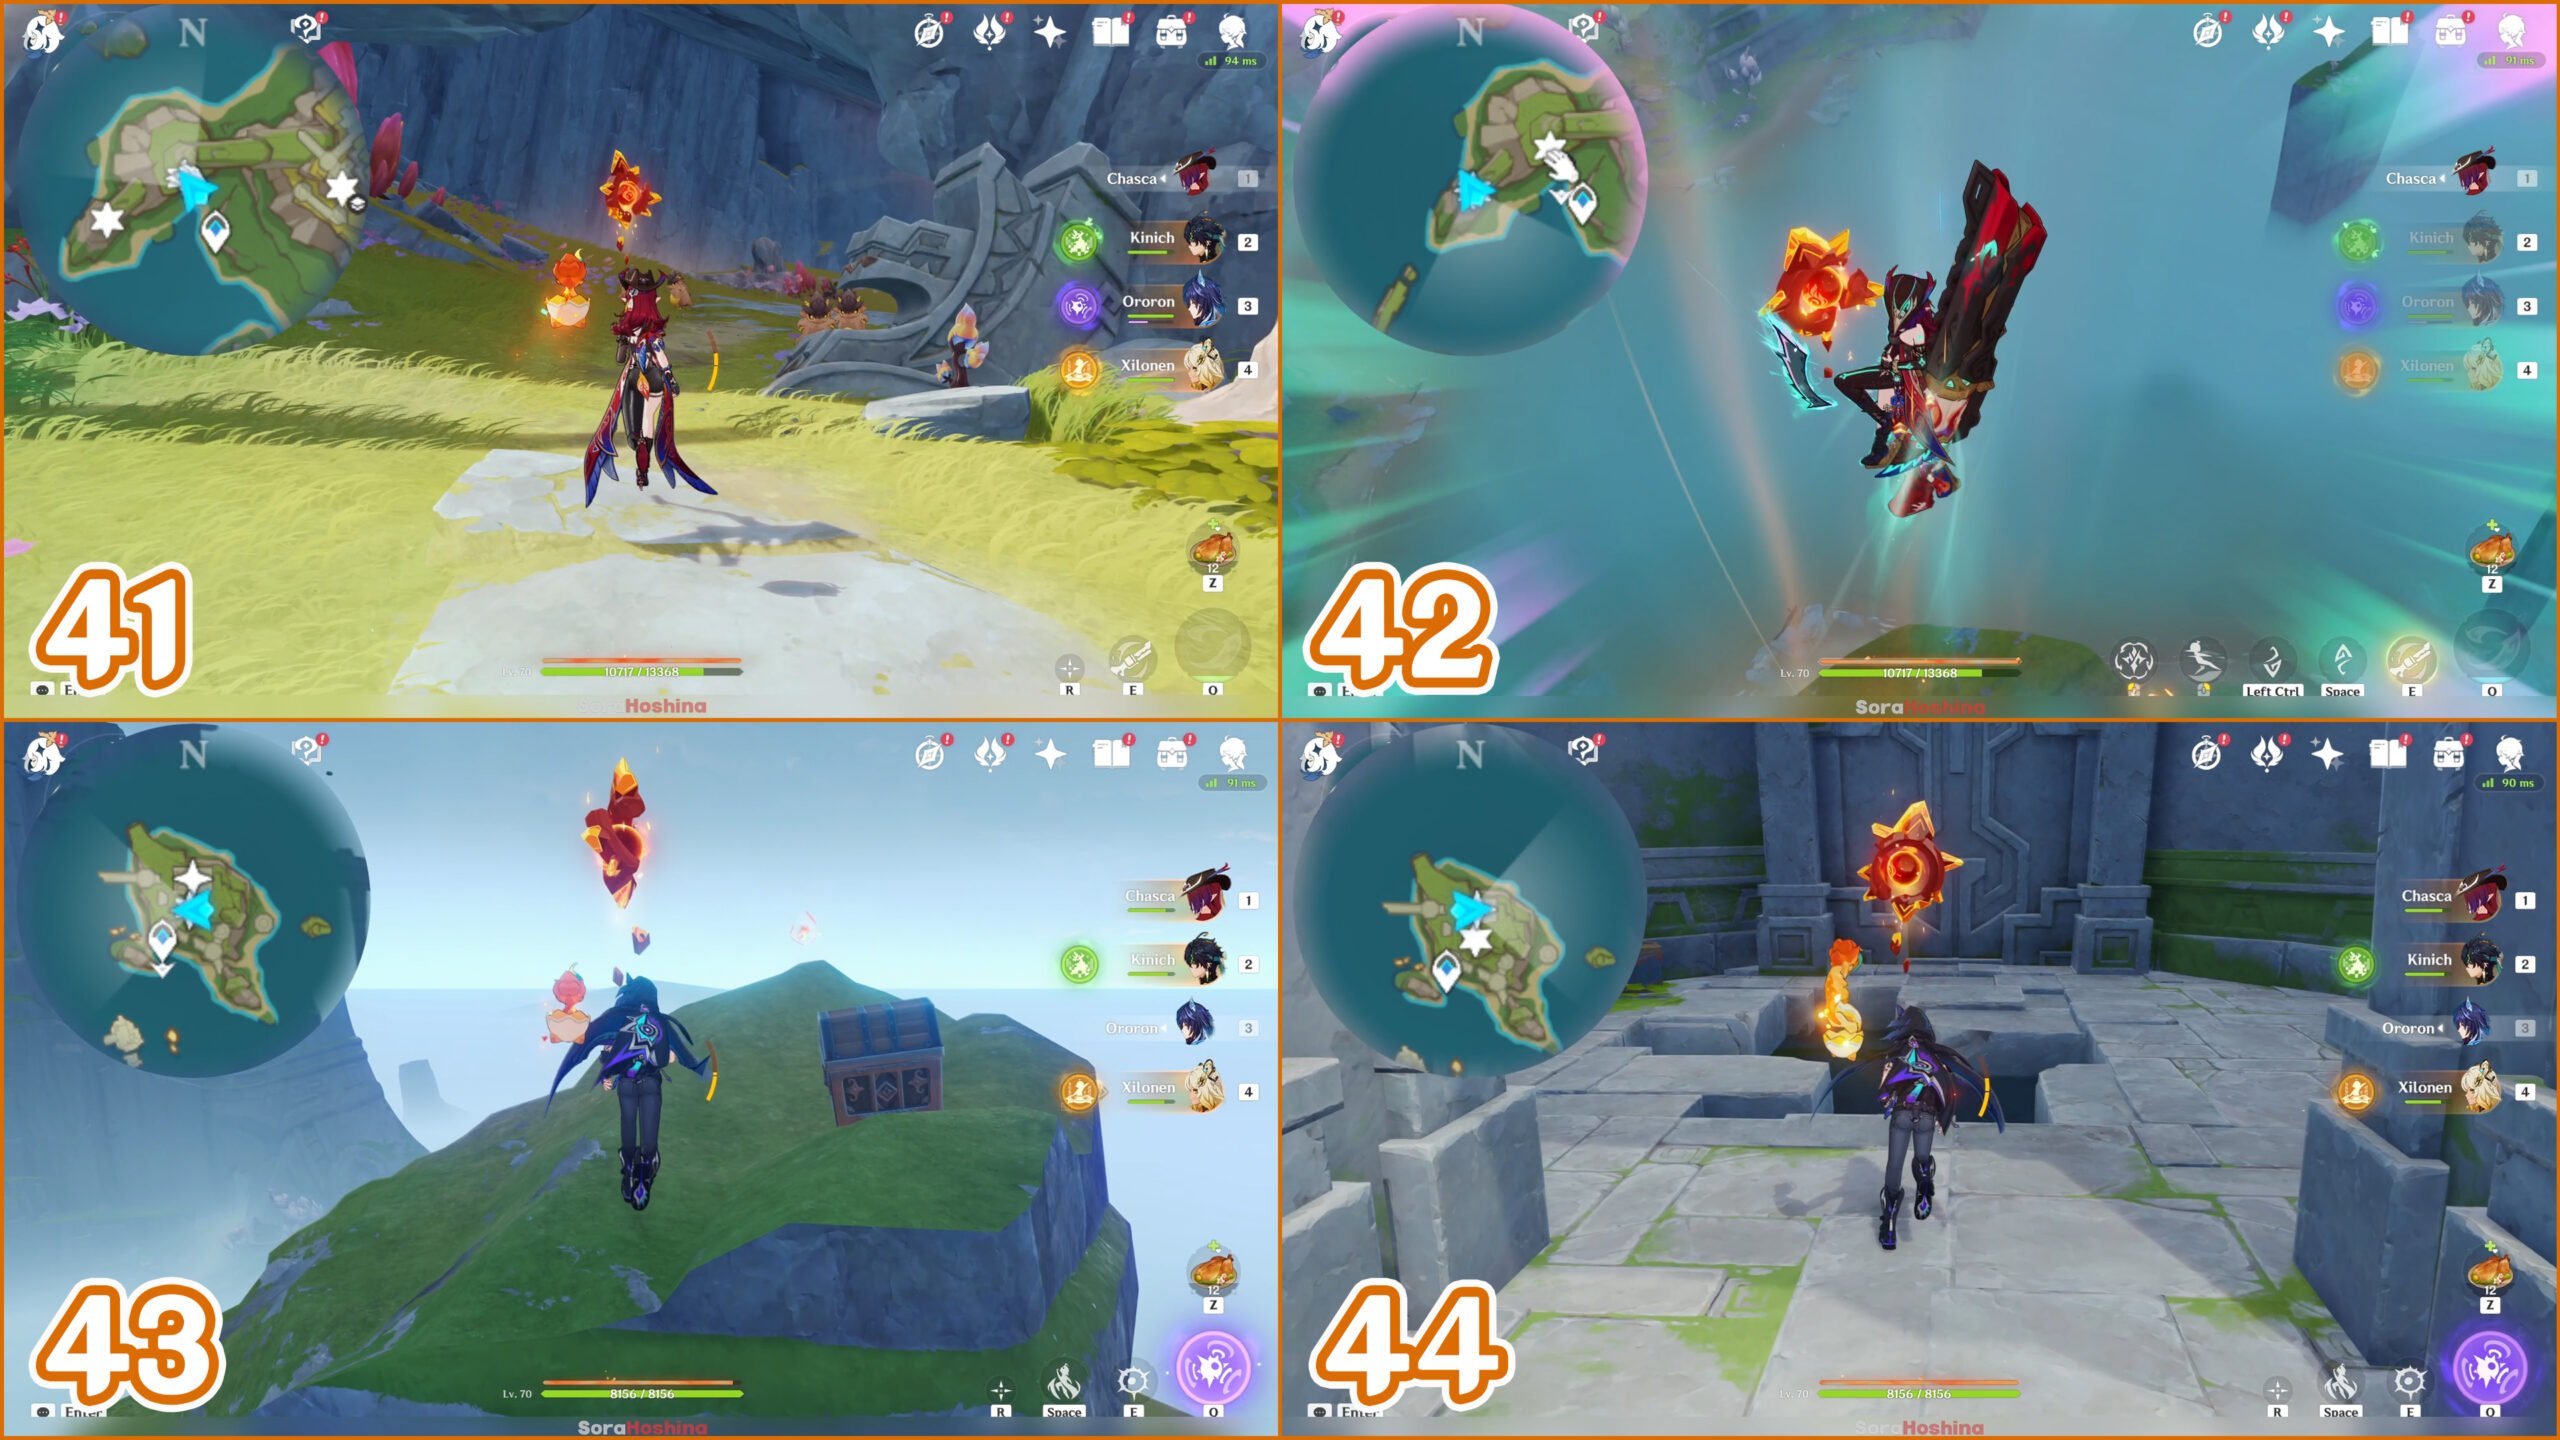
41. Teleport to waypoint 16 and walk forward to the hidden path and get the Pyroculus. If you didn't unlock this path yet, complete the puzzle here to get it. The guide can be seen here: Embers Rekindled Achievement Guide
42. From previous spot, head deeper inside this cave until you reach a wind current (that will only appear once you complete the puzzle in this cave) and glide on the wind current until you reach the Pyroculus at the top.
43. Teleport to waypoint 17 and climb to the top of the mountain on this island to get the Pyroculus. If you want a shortcut, start the puzzle on this island and there will be platforms/elevators that will help you reach the top: The Lone Isle Named Night Quest Guide
44. Drop down and enter the building for another Pyroculus. Now for this one, the door will only be opened once you complete the puzzle: The Lone Isle Named Night Quest Guide
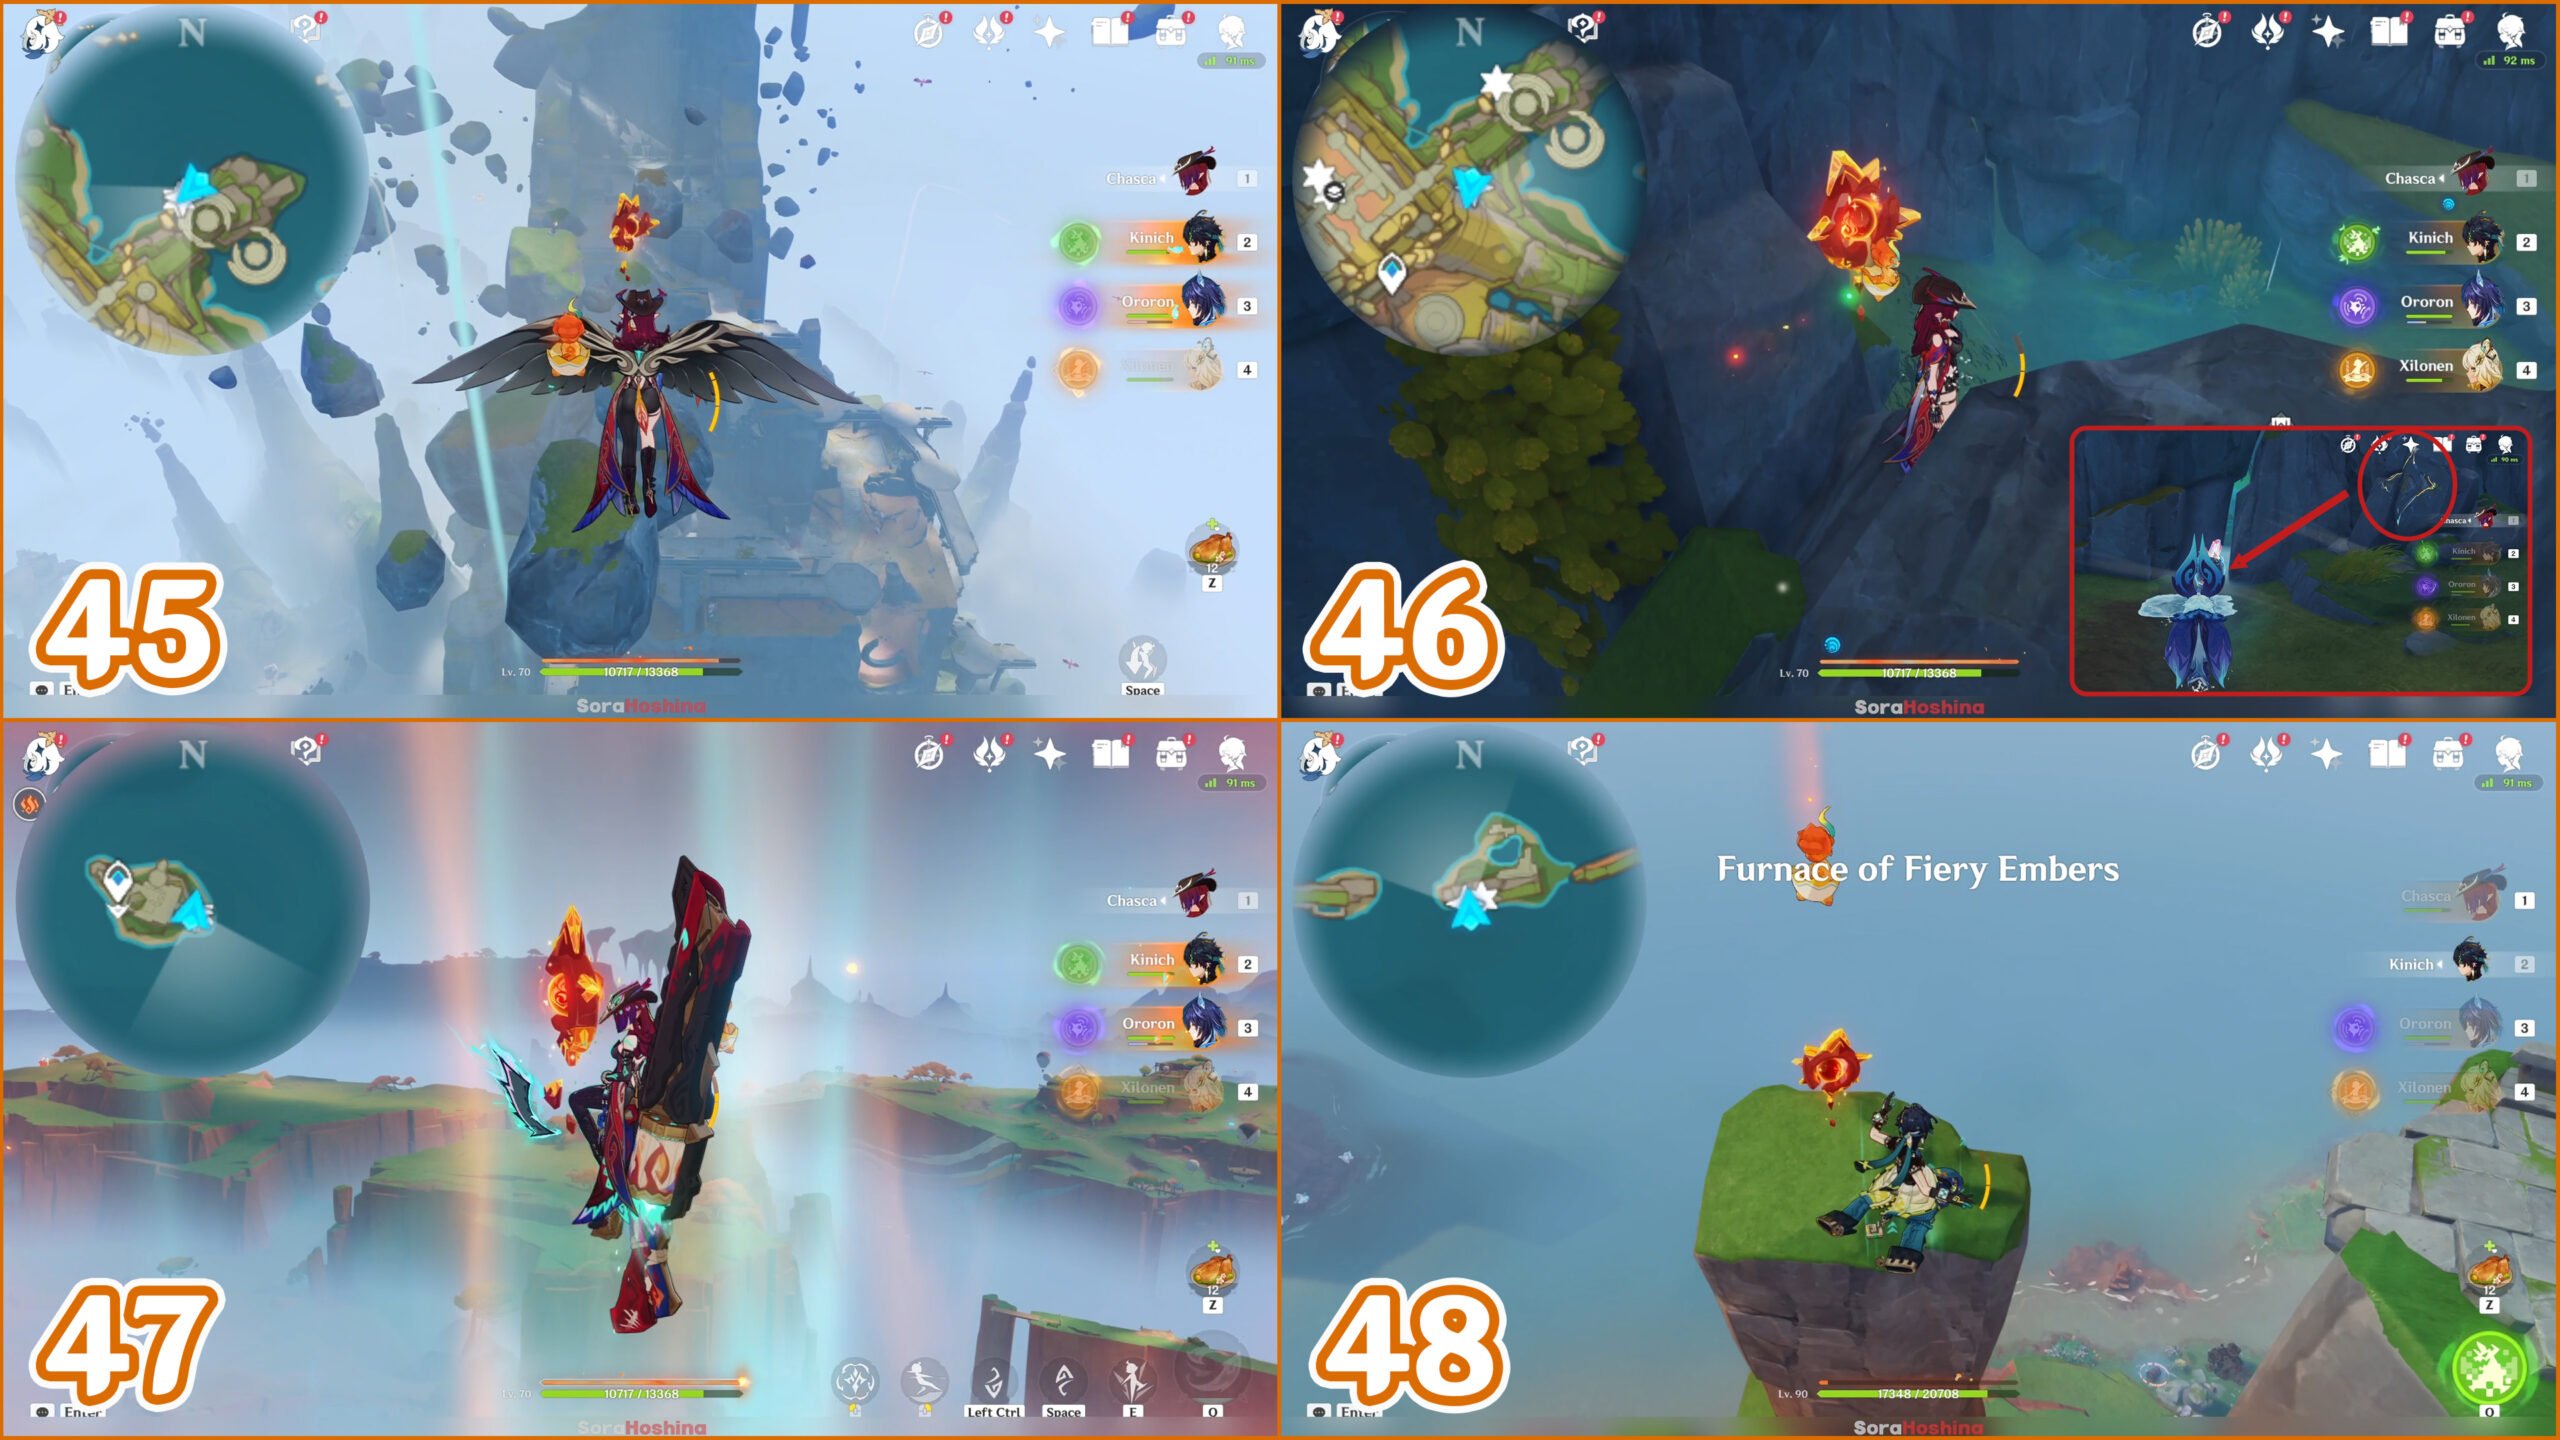
45. Teleport to waypoint 18 and glide down to the southwest.
46. From the previous position, glide down to the southwest again and drop down to the bottom. You should a golden barrier on a small area. Use Iktomisaur to absorb nearby graffiti and place it at the cracked rock. Attack the bomb to destroy the barrier and get the Pyroculus inside.
47. Teleport to waypoint 19 and head south where you can see the wind current. If you didn't complete the Furnaces of Fiery Embers puzzle here first: Embers Rekindled Achievement Guide. The wind current will lead you to the Pyroculus at the top.
48. From the previous position, glide to the north to the top of the mountain for another Pyroculus.
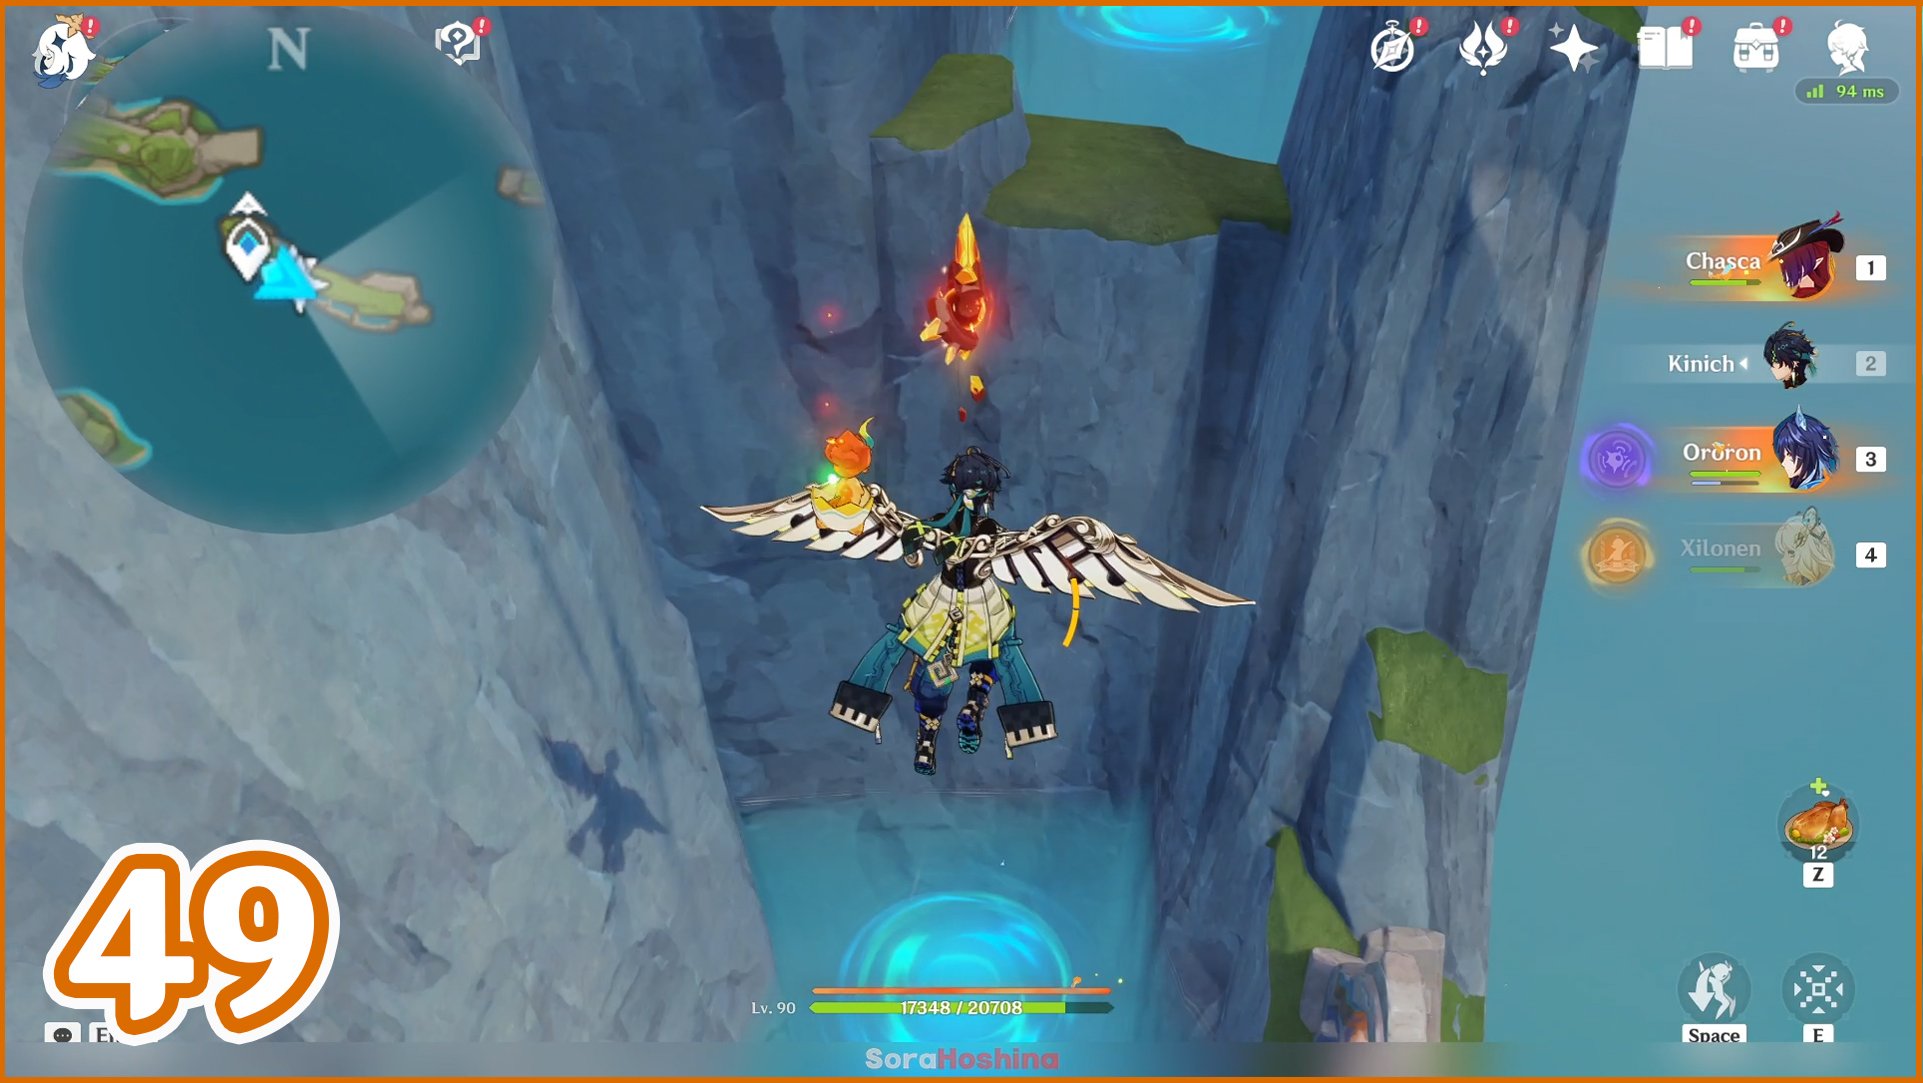
49. Teleport to waypoint 20 and drop down to the south a little bit and you see a Pyroculus on top of a small pond of waters.
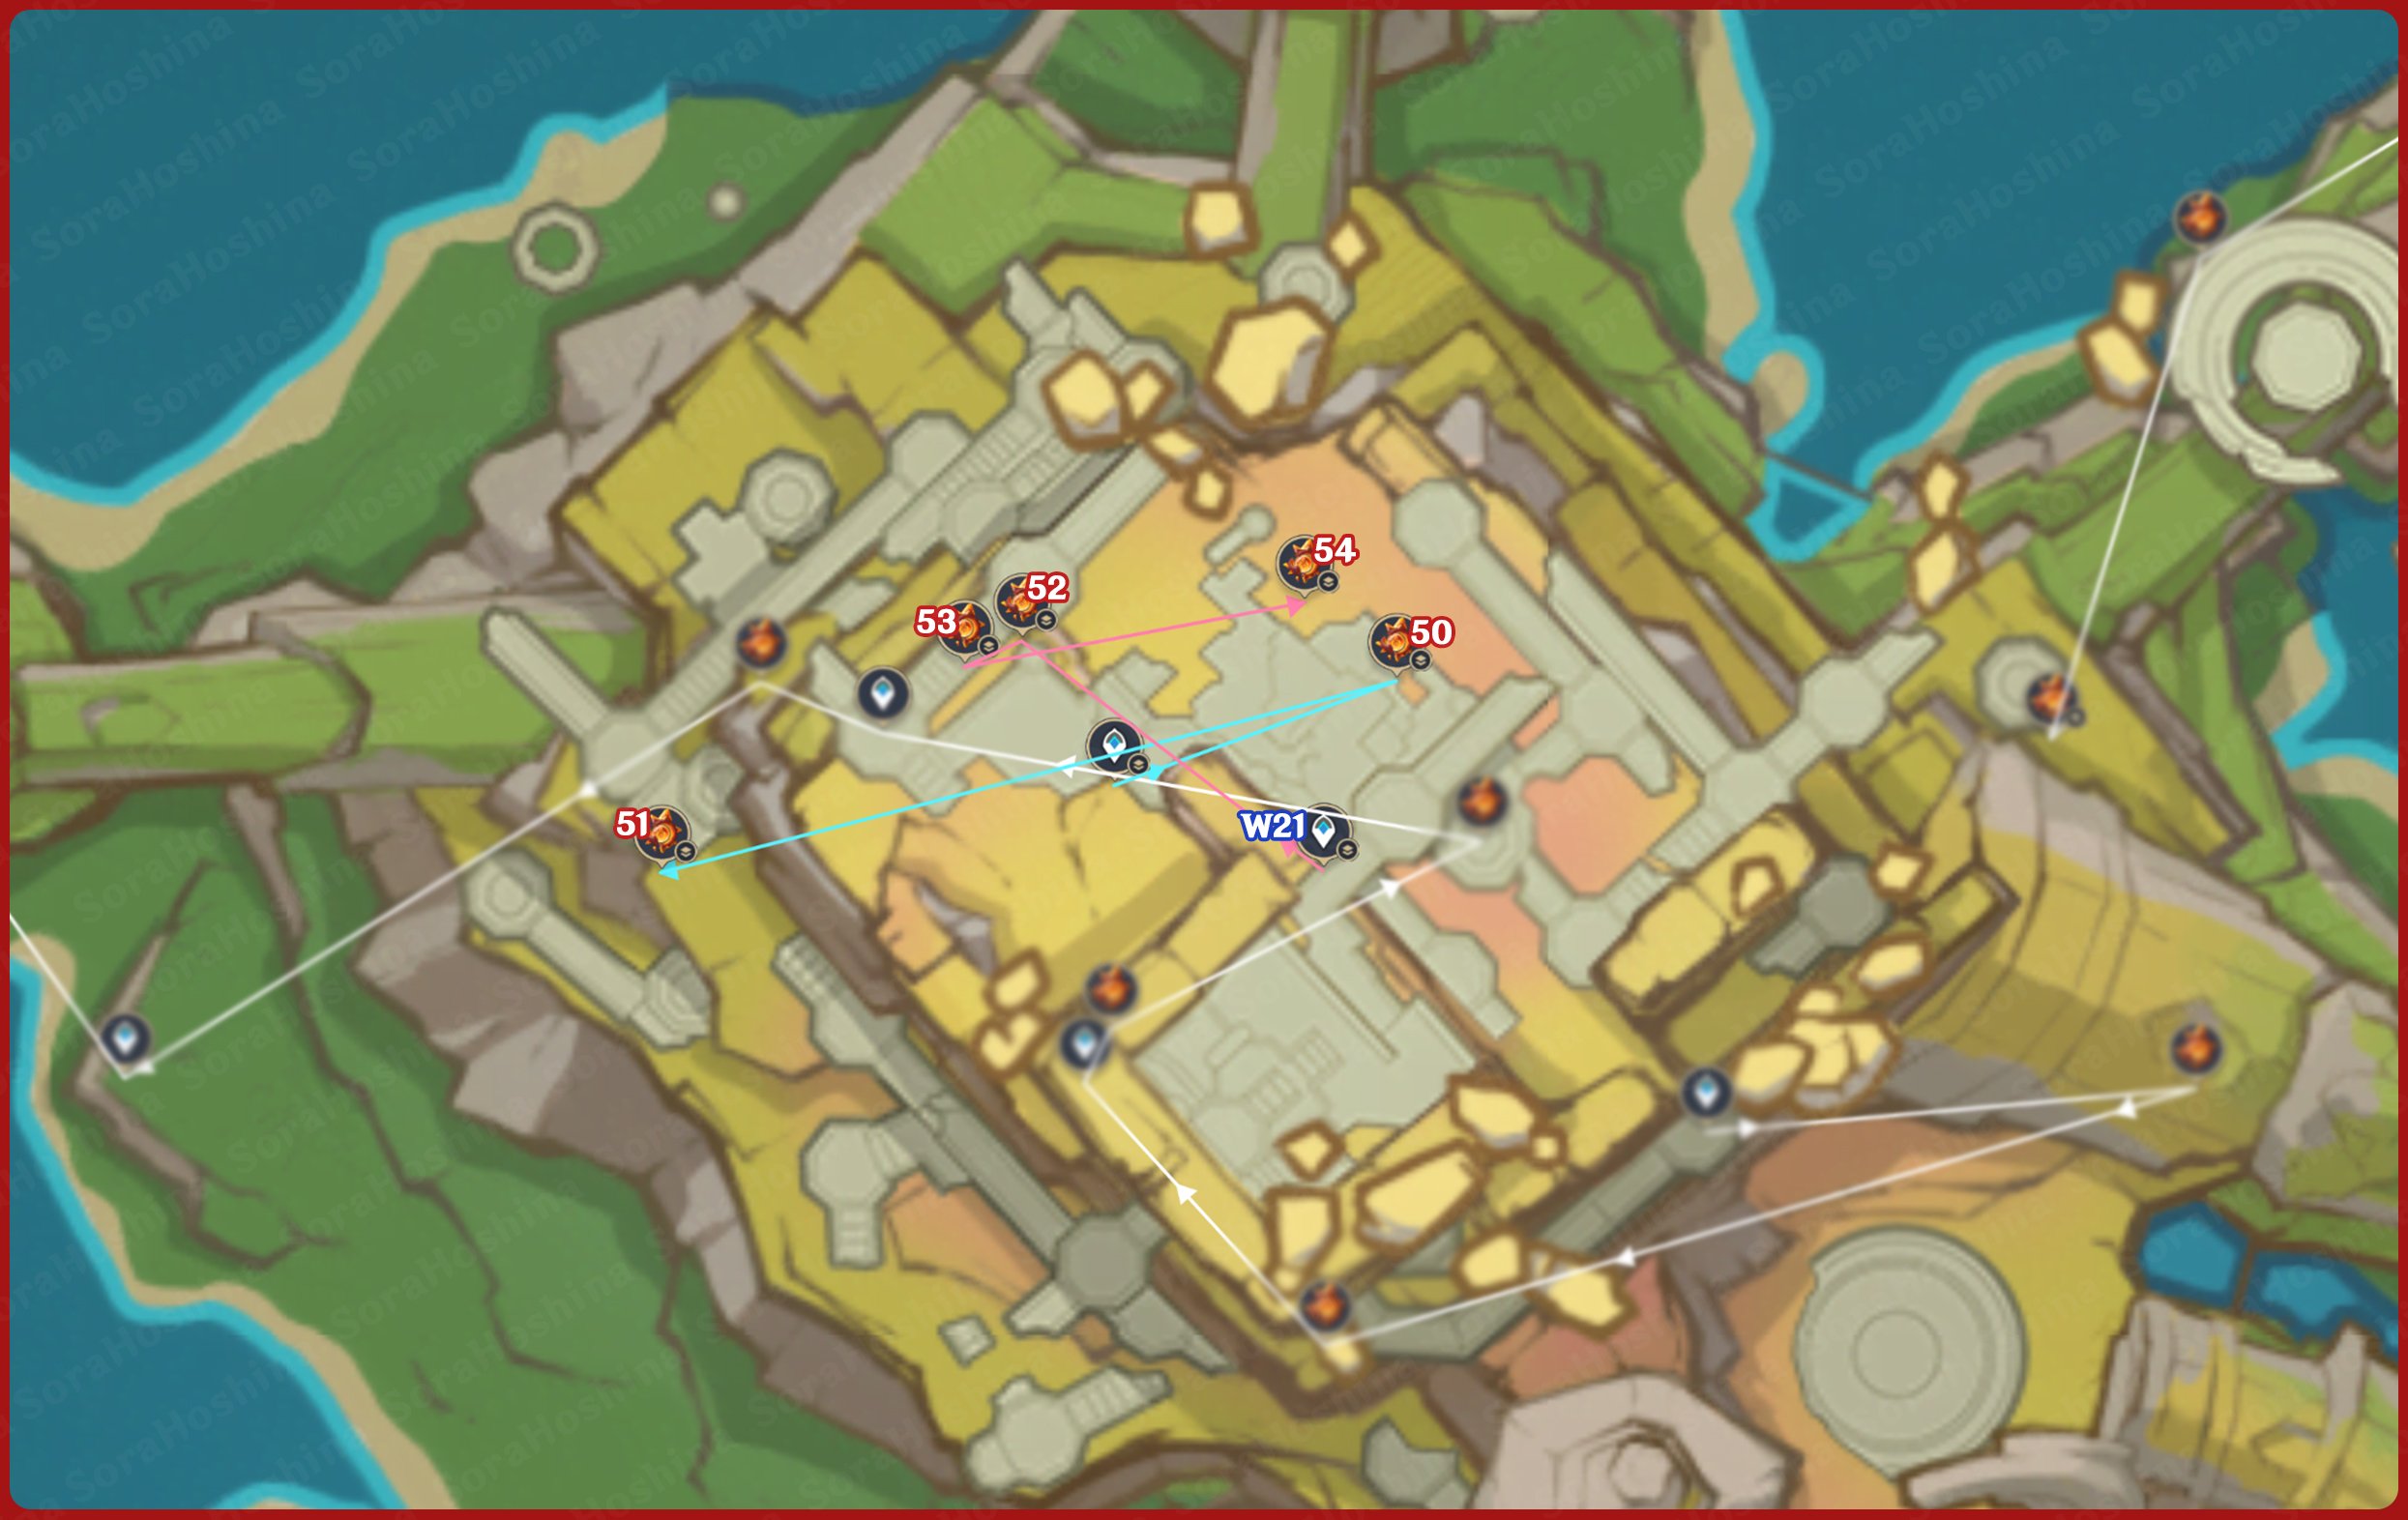
5 Pyroculus in Tonatiuh & Underground of Ochknatlan
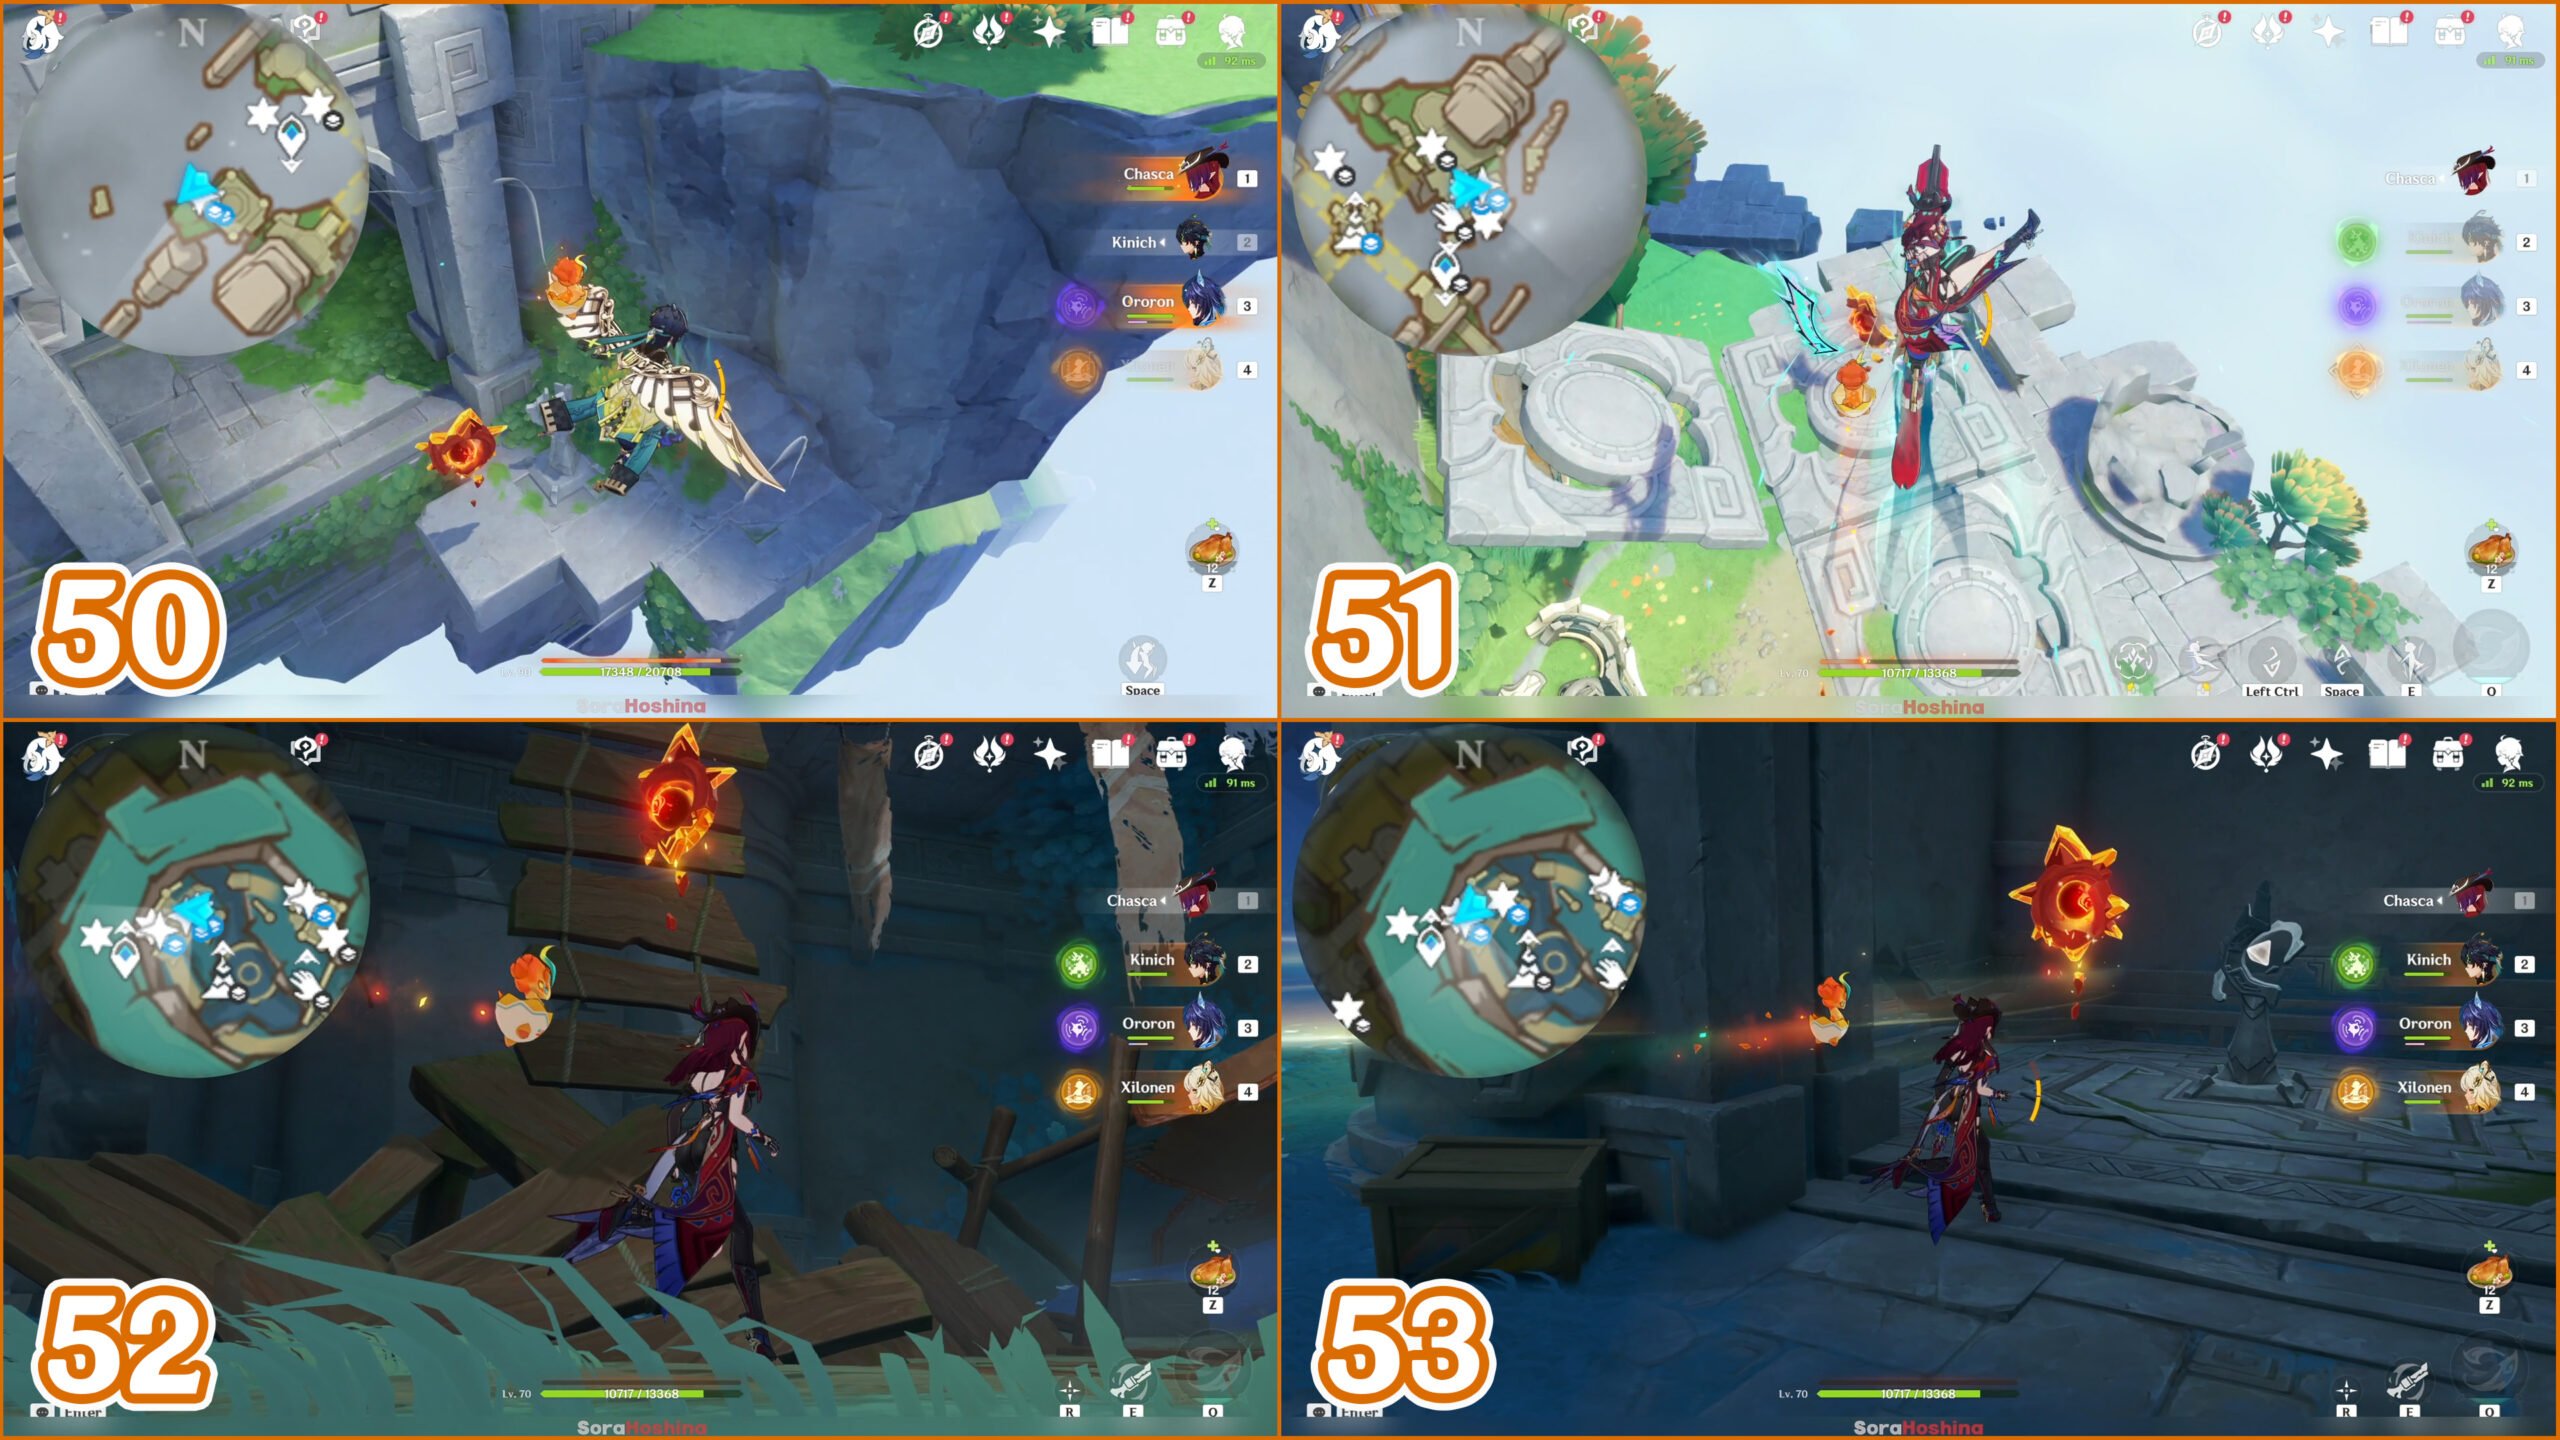
50. Teleport to Tonatiuh and head east to a building. The Pyroculus is on top of a platform.
51. Teleport to Tonatiuh again and head west to the building. Go to the back door and you can see a Pyroculus there.
52. Teleport to waypoint 21 and look up to the northwest. You can see a Pyroculus beside the stairs.
53. Climb the stairs and you can see another Pyroculus.
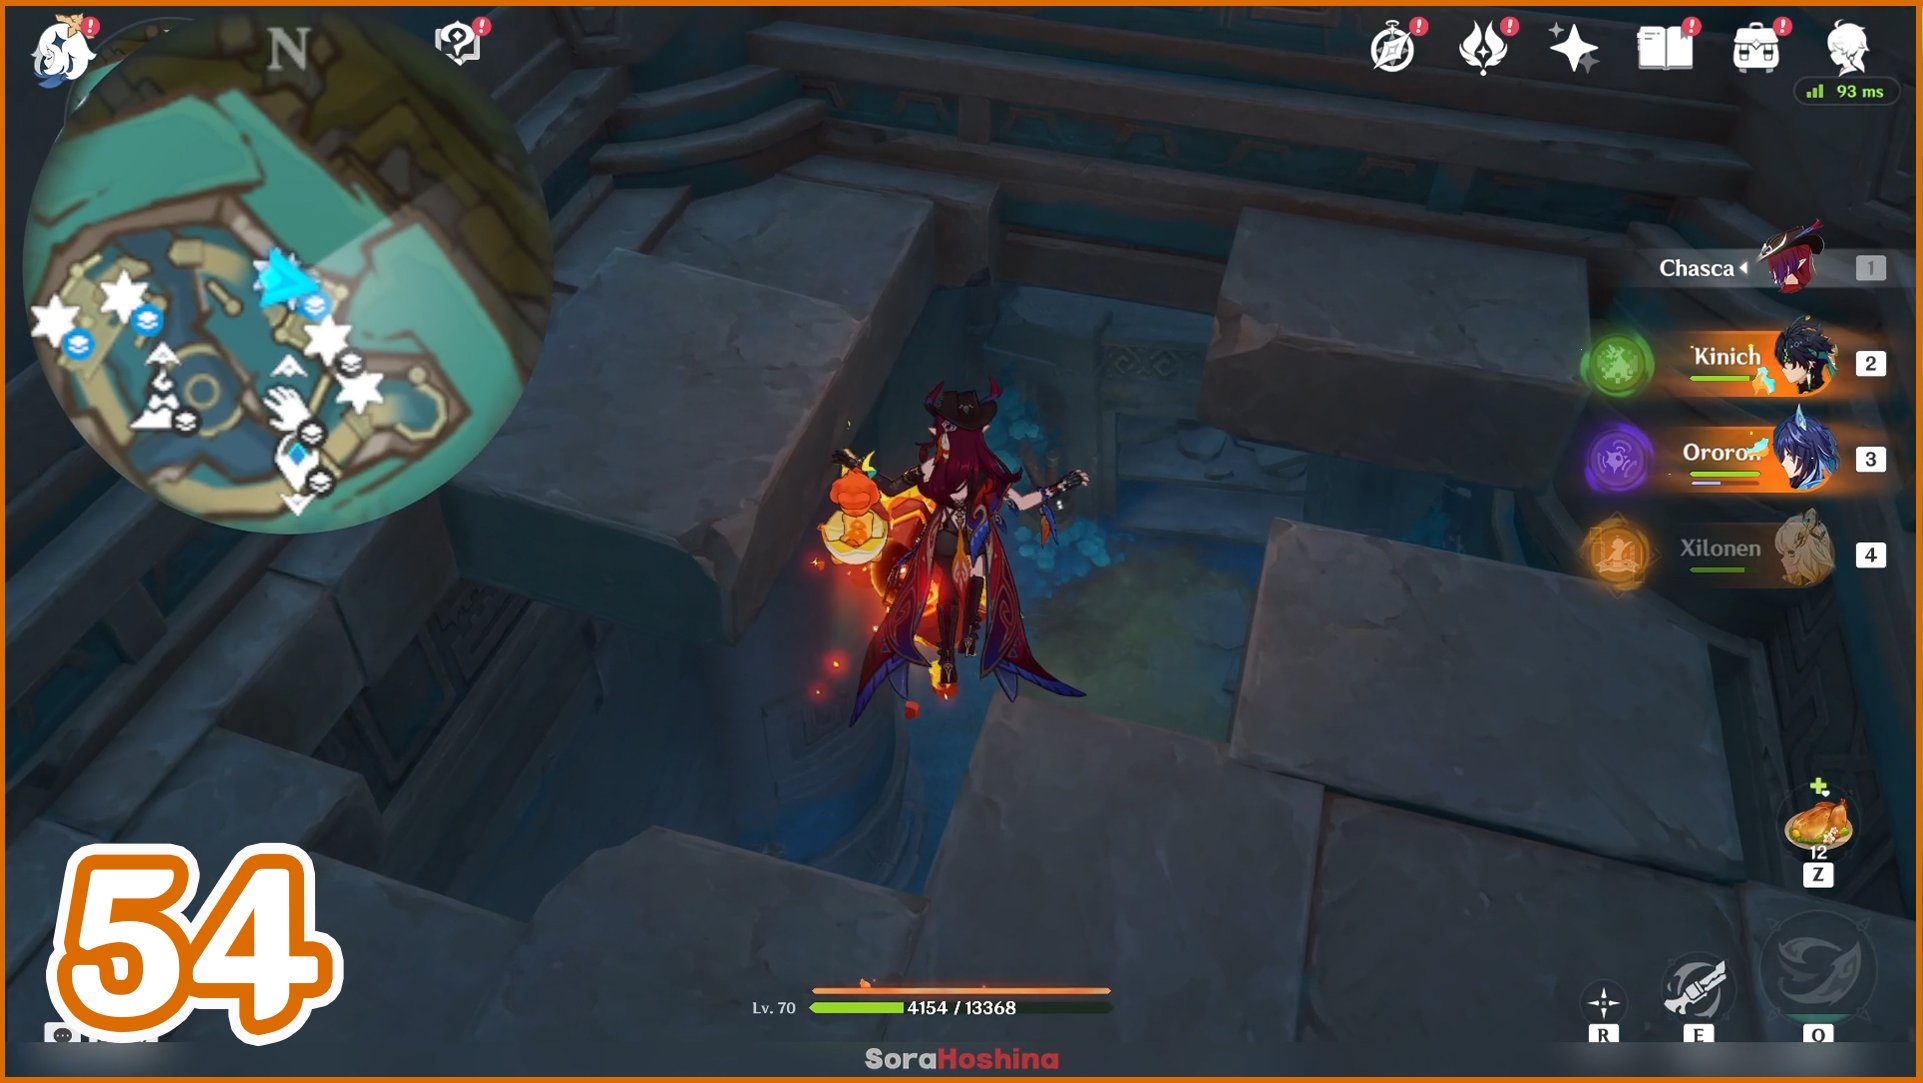
54. From the previous position, head east for the last Pyroculus.


