Table of Contents

The Department of Ecology's "Unknown Lifeform Smell-Induced Perceptions and Hallucinations" special test has begun. You have been specially invited as a qualified tester...
Gameplay Overview
Event Gameplay Duration:
➥ 2024/01/17 12:00:00– 2024/02/05 03:59:00 (server time)
Eligibility:
➥ Complete the Trailblaze Mission "Jarilo-VI — Silent Galaxy"
Event Overview:
➥ After the event begins, Trailblazers will need to face and defeat the illusory enemies generated in the "Unknown Lifeform Smell-Induced Perceptions and Hallucinations." This will assist the Department of Ecology in collecting crucial data.
➥ After the Virtual Scentventure event begins, the Normal Mode stages will be unlocked. After clearing all stages in Normal Mode, you can talk to Cloudbot to unlock the Despair Mode stages.
➥ Before the battles in the Virtual Scentventure event start, Trailblazers can choose to configure different scent plug-ins to gain various buff effects.
➥ In the battles during the Virtual Scentventure event, there is a Remaining Action Value mechanic, which changes based on the actions of both the player and the enemies.
➥ At the end of the Virtual Scentventure event battle challenges, the score obtained by the Trailblazer in the current stage will be calculated based on the total DMG dealt to illusions and the remaining action value.
➥ After the Trailblazer achieves a certain score in the current stage, they can unlock the next stage.
Gameplay Tutorial

After clearing the Illusion Challenge, you will earn a score for each stage and a rank. Rank SS is the highest rating.

Phantoms will activate different traits in combat. Please pay close attention to their traits in order to defeat them.

Before starting the stage, you can apply different scent plug-ins based on your current team to get different buffs in each stage.
Virtual Scentventure
1) Everlasting Dream

- Abundant Ebon Deer takes less DMG. After Weakness is broken, additionally delays action and additionally increases DMG taken.
- Once Abundant Ebon Deer's Weakness is broken, all allies will recover Energy and Skill Points while also eliminating all Ambrosial Arbor branches.
- Abundant Ebon Deer gains Toughness Perfection when there are 4 Ambrosial Arbor branches on the field. Defeat any Ambrosial Arbor branches to remove the Toughness Protection effect.
- Upon summoning Twig of Marple Leaf, Abundant Ebon Deer grants it Cultivation, greatly increasing its Retaliation DMG.
Team Recommendation


You've been given Seele and Silver Wolf Trial so use them. For the other 2, it's the usual buffer and healer/shielder. If you have Fu Xuan and Ruan Mei, both of them are among the best candidates for Seele's team. If not, Tingyun is the next to be added.
Example: Seele + Silver Wolf + Ruan Mei + Fu Xuan
Buff: Garlic-Flavored & Pickled Pepper-Flavored
Walkthrough Video
Tips

Right from the start of the battle, the boss will gain Toughness Protection because there are 4 branches on the field. What you need to do now is defeat 1 branch to remove that Toughness Protection. Make sure your team attacks the same branch.

After at least 1 branch is defeated, you can see that the boss will lose its Toughness Protection and you can now reduce its Weakness. Now, focus all your manpower on the boss until it gets a Weakness Break. But, if the boss summons a branch that makes it a total of 4 branches on the field, focus on defeating another branch again.

Once the boss' Weakness has been Broken, you will gain the following bonuses:
+ Your team will gain Energy (not maximum Energy but still a lot)
+ Your team gains Skill Points
- The boss will have their action delayed
- The boss has increased DMG taken
2) Confusing Lies

- Kafka takes less DMG. After Weakness is broken, additionally delays action and additionally increases DMG taken.
- When Kafka's Weakness is broken, all allies recover Energy and Skill Points.
- Kafka absorbs Performance Points from other enemy units during her turn, and successfully doing so greatly enhances her current attack.
- Attaches Outsourcing to the action bar. Every time Outsourcing takes action, summons IPC Workers.
Team Recommendation

Dan Heng IL and Ruan Mei are the trial characters here, add them to your team. Now, if you choose buffs like Honey-Flavored or Mustard-Flavored, remember that you don't want to destroy the Performance Points buff with Luocha or Pela's Ultimate/Skill. Instead, just bring another buffer/debuffer and healer/shielder for the last slot.
Example: DHIL + Ruan Mei + Silver Wolf + Fu Xuan
Buff: Plum-Scented & Honey-Flavored

If you did NOT choose Honey-Flavored and Mustard-Flavored buff, Luocha or Pela is a great option here. Because they can remove buffs from IPC Workers (their Performance Point). You want to destroy those buffs or Kafka will absorb them and enhance her attacks. But remember that these 2 destroy the Performance Point, so you can't absorb it.
If you add Luocha, then the next character can be any buffer or debuffer you want. If you add Pela, then the next character should be a healer or shielder to increase survivability, hopefully, one that can remove debuff as Kafka's numerous Skill can inflict Dominated on your character.
Example: DHIL + Ruan Mei + Silver Wolf + Luocha
Buff: Plum-Scented & Peony-Scented
Walkthrough Video
Tips

First of all, the Outsourcing. What is it? It's in the Action Bar on the left side with the IPC (Interastral Peace Corporation) logo that looks like a flower/padlock. Every time the Outsourcing takes action, more IPC workers will appear. In Kafka's first phase, only 2 IPC workers will spawn. But in Kafka's second phase, 4 IPC Workers will appear.

Now for the Performance Points. If you fought Topaz's goons before, you know they will gain 1 Performance Point each time they hit you. You can remove those points to obstruct Kafka from taking it (to enhance her next attack) by Weakness-Breaking them (you will absorb the Performance Points) or using a buff-destroyer like Luocha or Pela.

However, remember that if you use Luocha's Ultimate or Pela's Skill, you will essentially remove those Performance Points, not absorb them, so you won't be getting the buffs if you choose Honey-Flavored or Mustard-Flavored buff in this stage.

Whenever it's your turn to move, pay attention to the IPC Workers' actions. If they're the next attacker, save your Ultimate (that deals DMG) and let them attack your team first. Then, they will gain Performance Points. After they get the point, use your Ultimate to defeat them and absorb those points to buff your team (if you choose Honey-Flavored or Mustard-Flavored buff).
Example: In the image above, I let the IPC hit me first so they gained Performance Point. Then, I used Fu Xuan's Ultimate to Weakness Break them, and absorb those points.

If you didn't choose Honey-Flavored or Mustard-Flavored buff, then just focus everything on Kafka. Honestly, I don't think her damage that was boosted by the Performance Point is dangerous. It's not one-shot kill of course. As long as you have a decent shielder or healer, you should be able to survive her attacks.
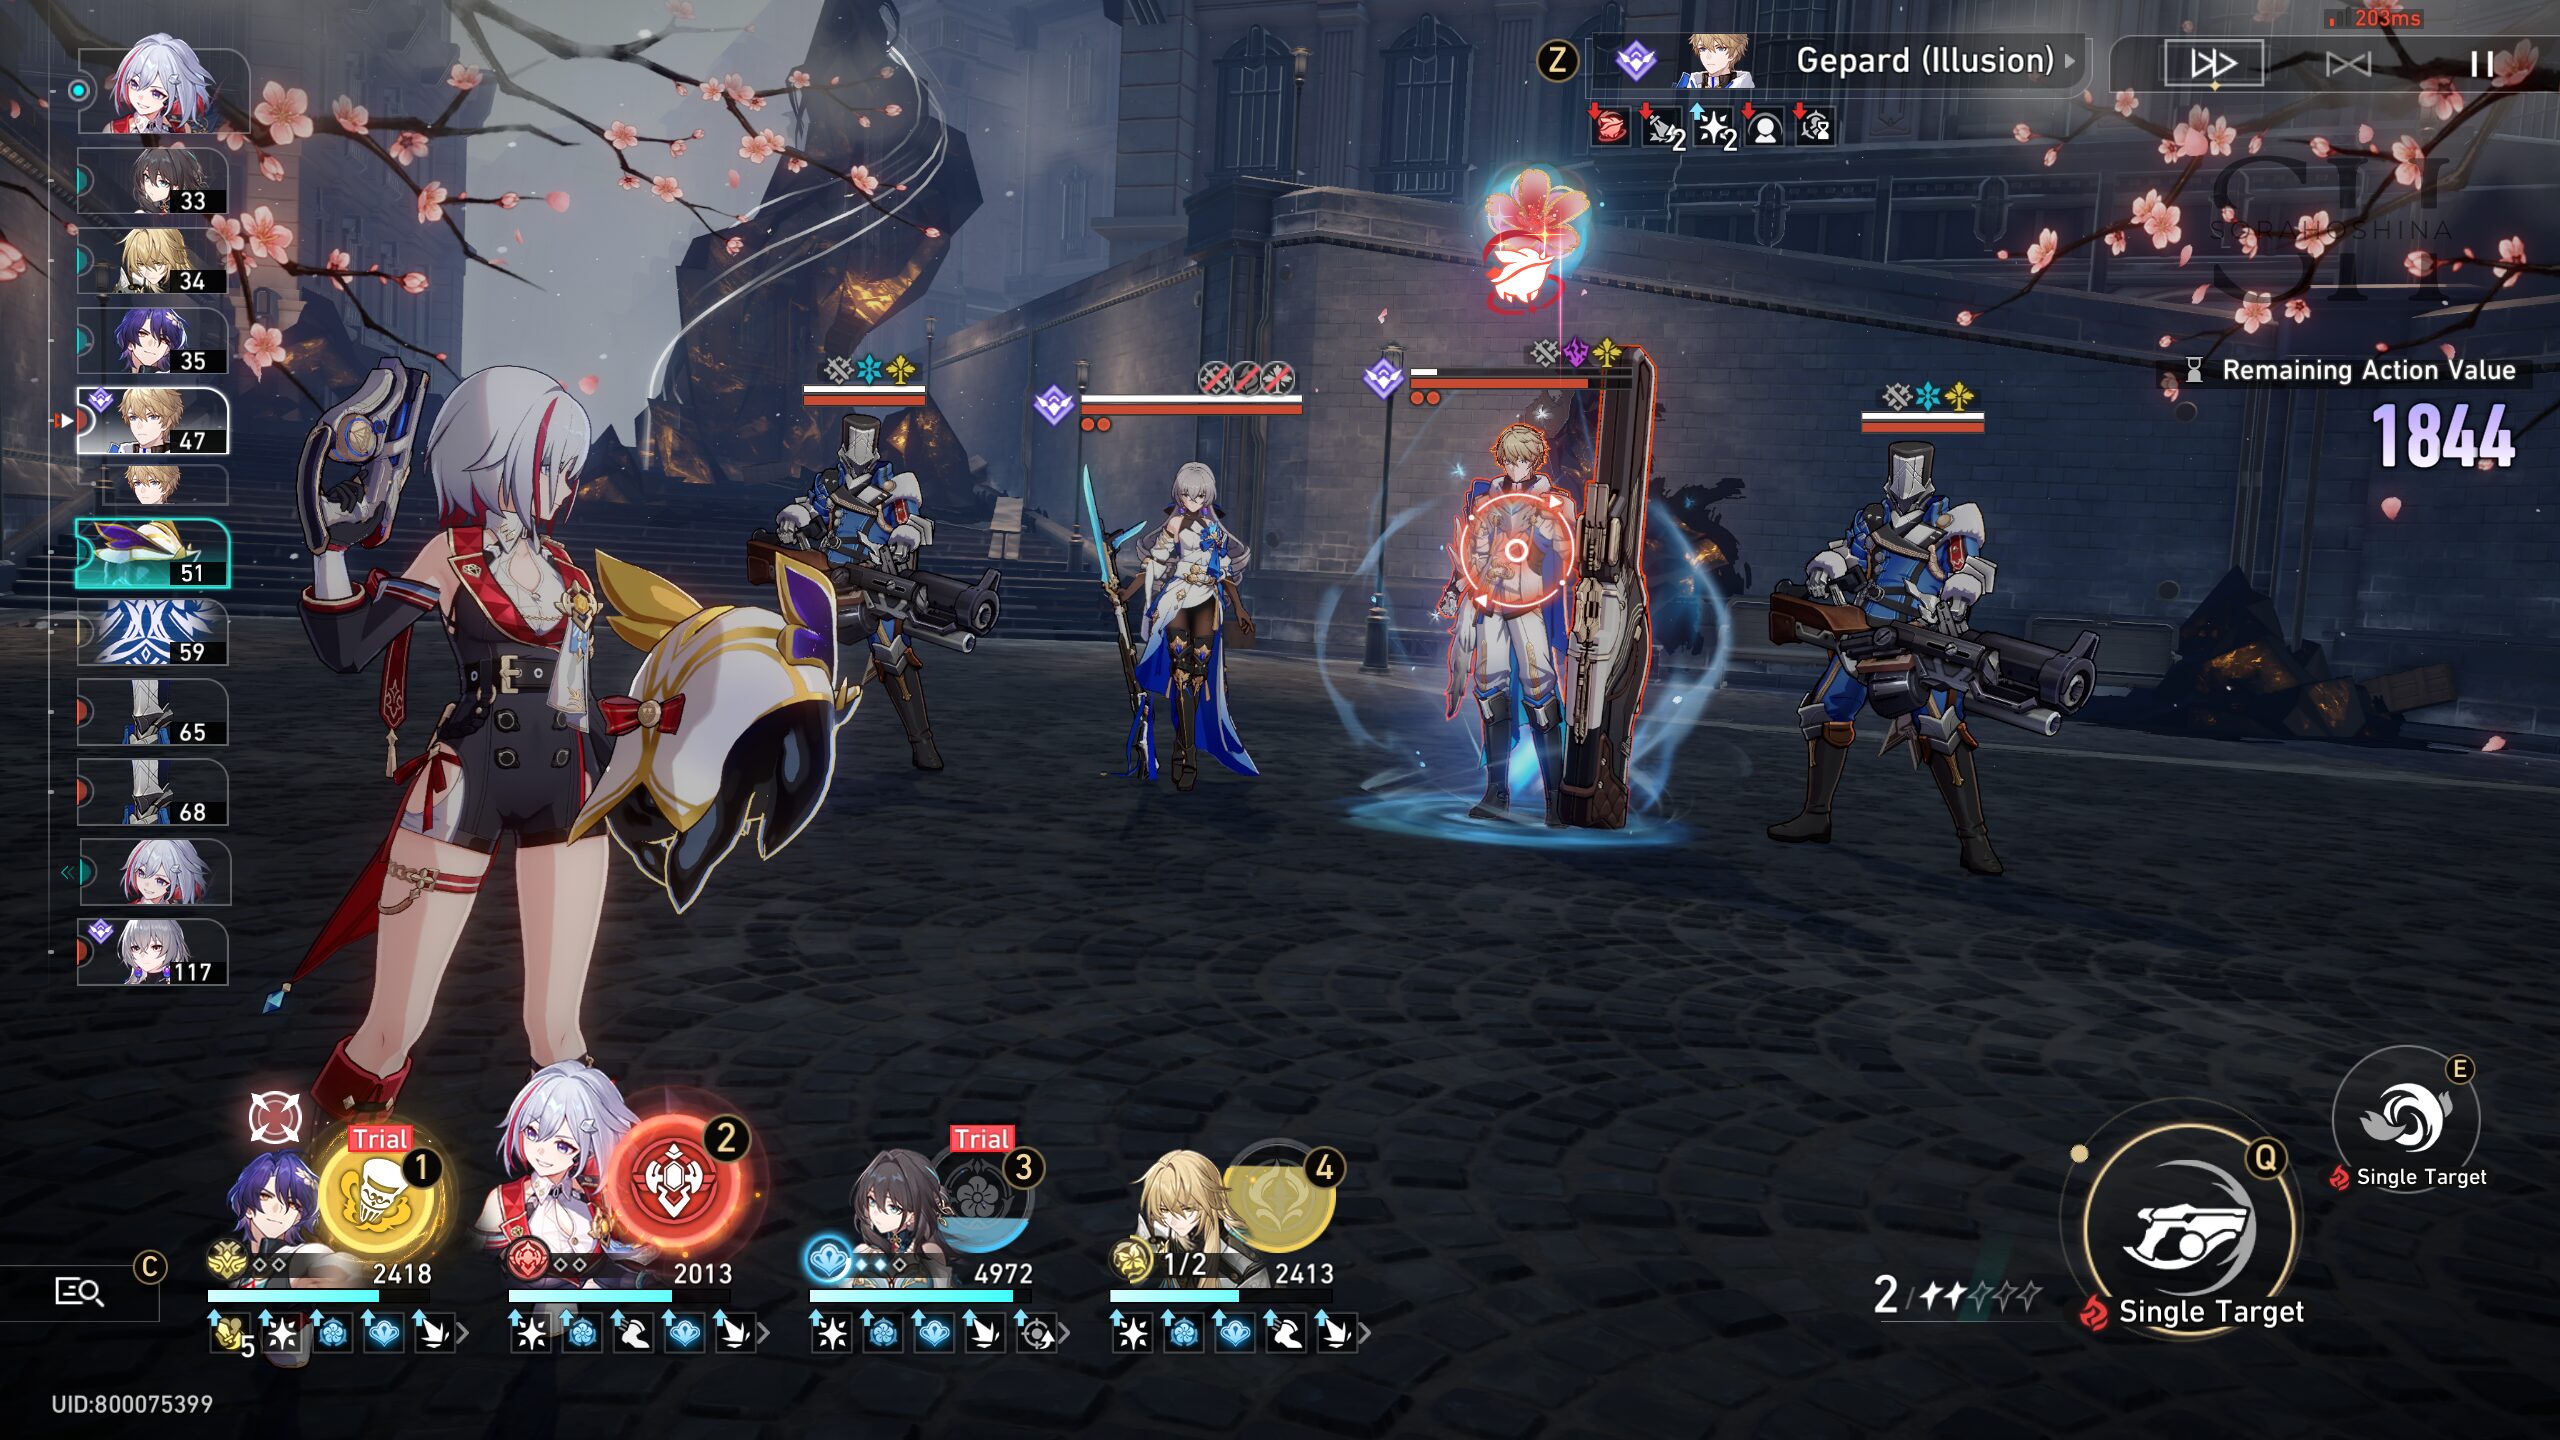
3) Heavenly Blade's Afterimage

- Yanqing takes less DMG. After Weakness is broken, additionally delays action and additionally increases DMG taken.
- When Yanqing's Weakness is broken, all allies will recover Energy and Skill Points.
- The Sword Formation summoned by Yanqing takes significantly less DMG from all sources and can only be removed by breaking its Weakness. Once the Sword Formation is removed, remove Yanqing's Toughness Protection effect.
- After a Flying Sword is Weakness Broken, its Weakness will be transferred to the remaining Flying Swords. In the second phase, the Weaknesses of Flying Swords are hidden initially and will be revealed after being attacked with the correct Type.
Team Recommendation

With the two trial characters given (Blade and Bronya), add another Sub-DPS that is one of the Weakness Types the sword has (Lightning/Wind/Quantum/Imaginary). For the last slot, it's for the healer or shielder. Yanqing and his swords often inflict Frozen on your character, so it's best if you have a healer or shielder who can cleanse debuff. Bronya's Skill also cleanses debuff!
Example: Blade + Bronya + Dr. Ratio + Huohuo
Buff: Garlic-Flavored + Onion-Flavored

This is the team that I use in the walkthrough video below and it gains higher points than in my previous recommendations. We got a huge help from Silver Wolf since she can add a Weakness to the swords so if you go with this team (Mono Quantum with side Imaginary), she has a high chance to inflict Quantum on the sword and you will have an easier time to remove the Sword Formation. Once all swords are destroyed, your only target is Yanqing, so Seele and Dr. Ratio work together to annihilate him.
Example: Seele + Silver Wolf + Dr. Ratio + Fu Xuan
Buff: Garlic-Flavored + Onion-Flavored
Walkthrough Video
Tips

At the start of each phase, each sword has one weakness only and it can be random (Wind, Lightning, Quantum, and Imaginary). Once you defeat one of the swords, that sword's weakness will be transferred to another random sword.
For example, as you see in the image above, the sword on the most right has Quantum Weakness. And once it's defeated, it transfers its Quantum Weakness to the second sword from the left. This way, you will have an easier time defeating the remaining swords since they will have multiple weaknesses.
Remember that raw damage doesn't work at all against the sword, only the right elemental attacks will do some damage to the sword.

In the second phase, you can't see the Weakness of the sword and it will only be revealed after being attacked with the correct element. This is where AoE attacks work perfectly as you can then uncover at least one of the sword's weaknesses with it. Another option is to use Silver Wolf's Skill to add a new Weakness to the sword, which in my opinion is a huge help in this stage.

From the start till the end, I suggest you focus on removing the Sword Formation first because Yanqing has high resistance and Weakness Protection. If you don't do this, you will never be able to take advantage of the stage's buff when Yanqing's Weakness is broken: Yanqing takes more damage, delays action, and all allies recover Energy and Skill Points.

Once the Sword Formation is gone, quickly attack Yanqing until he Weakness Break, or he will summon another Sword Formation. Once his Weakness is Broken, you will enjoy all those buffs and can deal huge damage to him.
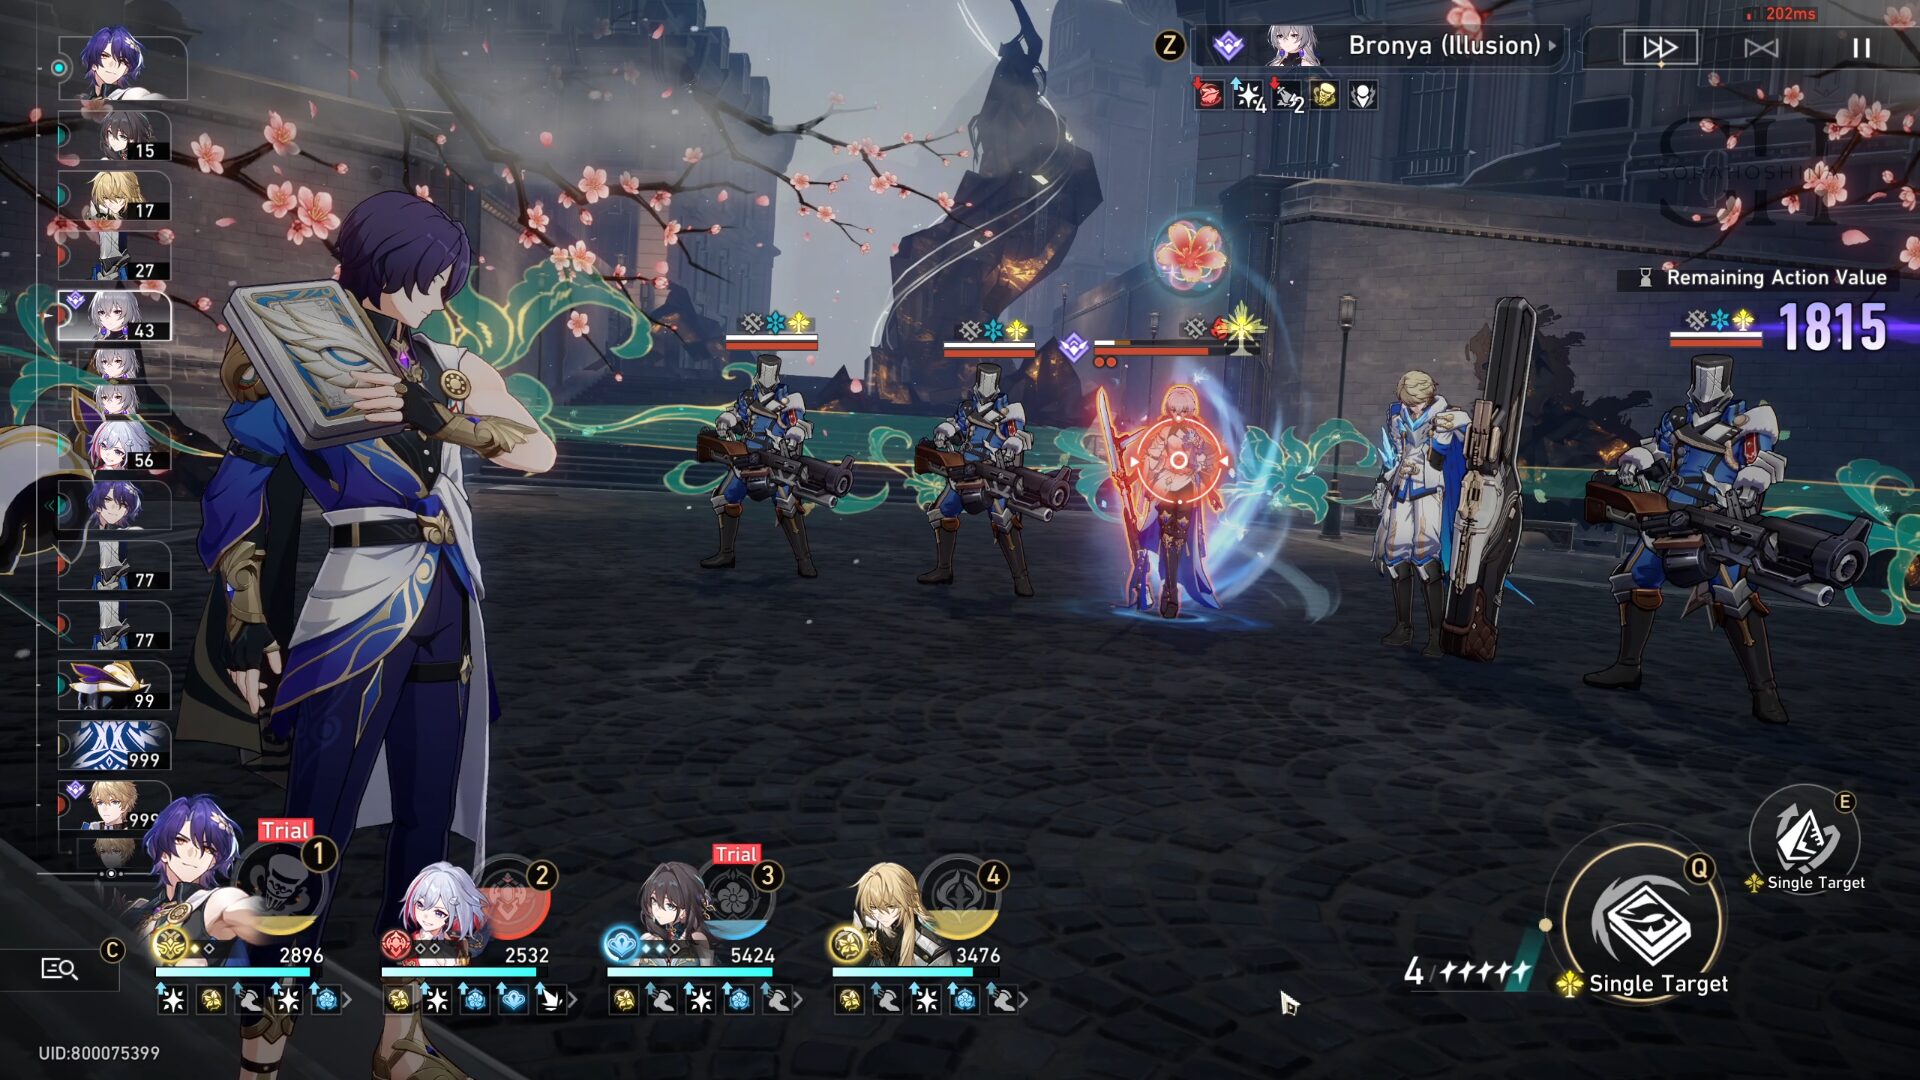
4) Old Memories of the Icy Post

- Bronya and Gepard take less DMG. After Weakness is broken, additionally delays action and additionally increases DMG taken.
- When Bronya or Gepard's Weakness is broken, all allies recover Energy and Skill Points.
- Bronya and Gepard will take turns to be the main attacker. While they are the main attacker, their Toughness Protection will be dispelled and they will use more powerful abilities.
- Bronya and Gepard become enhanced after each action. When either of them is knocked down, the other one will become greatly enhanced.
Team Recommendation

They gave us 2 great trial characters so bring them along: Ruan Mei and Dr. Ratio. After that, you can add another sub-DPS, preferably Topaz & Numby since she has a superb synergy with Dr. Ratio and they can also provide debuff to an enemy where they will take increased Follow-Up DMG. The last slot can be given to any healer or shielder, preferably Luocha as he is Imaginary-type and both bosses have these as one of their Weaknesses.
Example: Dr. Ratio + Ruan Mei + Topaz & Numby + Luocha
Buff: Gardenia-Scented + Agarwood

If you don't have other suitable Sub-DPS, you can also add Asta to the team replacing Topaz as a buffer. I tried this and the result is pretty good. Only a hundred points behind the team above. If you don't have Luocha, add another healer like Natasha. She's also considerably good since she's Physical and all enemies have this Weakness.
Example: Dr. Ratio + Ruan Mei + Asta + Natasha
Buff: Gardenia-Scented + Agarwood
Walkthrough Video
Tips

The battle will start with Gepard as the main attacker. When Gepard is the main attacker, his Toughness Protection will disappear and you can attack him to Weakness Break. On the other, Bronya who is not the main attacker will have Toughness Protection and you can't Weakness Break here. The same will occur when they swap roles (Bronya as the main attacker will have her Weakness revealed while Gepard will have Toughness Protection). So focus on attacking the main attacker to Weakness Break them and get the stage's buff.
Whenever the boss summons more Silvermane soldiers, ignore them and just focus on the main attacker. Dr. Ratio (and Topaz if you bring her) is a single-target DPS and they don't have the time to play around with mobs, just boss.
When Gepard gets his Weakness broken (or if you let Gepard be the main attacker for ~3 turns), Bronya will be the main attacker. Now, you can't attack Gepard at all since he is in the state of recovery to enter his second phase. It's the same with Gepard, just focus on Bronya and ignore other mobs.

When one of them dies (Gepard or Bronya), the remaining one on the field will gain Thick and Thin buff where they will gain 30% SPD. It's actually dangerous since it means they can keep attacking while you don't have a chance to heal or create a shield, so take care of your health!
5) Cry of the Frozen Fantasy Land

- Cocolia and Gepard take less DMG. After Weakness is broken, additionally delays action and additionally increases DMG taken.
- When Cocolia or Gepard's Weakness is broken, all allies will recover Energy and Skill Points.
- Cocolia's summons will mark a unit as an additional attack target for Cocolia's control ability. The mark will last until the summon is Weakness Broken or defeated.
- Each successful Freeze or Imprisonment effect on the target increases Cocolia's DMG.
Team Recommendation

Since Topaz is added as a trial character, I thought of bringing Dr. Ratio in with the help of Silver Wolf to add Imaginary Weaknesses and this team works wonders (Got 3400+ Points). But since there's Huohuo in this team - which in my opinion is extremely important for her debuff removal skill and healing - there's only a 50/50 chance that Silver Wolf will add Imaginary Weakness as it can also be Wind.
Example: Dr. Ratio, Topaz & Numby, Silver Wolf, Huohuo
Buff: Gardenia-Scented + Onion-Flavored

If you don't have Silver Wolf, then you can try using this much cheaper team since all you need left is 4-star characters: Asta and Tingyun. With this team, your sole main DPS is Topaz and the others can only help in buffing her.
Example: Topaz & Numby, Asta, Tingyun,Huohuo
Buff: Gardenia-Scented + Onion-Flavored
Walkthrough Video
Tips

Right from the start till the end of the battle, use Huohuo's Skill and make sure her Divine Provision stacks are always available. When the stack run out, immediately use her Skill again to stock it. This is so your team will be healed from any debuff (Freeze or Imprisonment) whenever their turn starts, which will lead to Cocolia not getting her buffs.

Cocolia will summon her icicle to help mark the enemy. I recommend you ignore the summon (because Huohuo will help clean the debuff) and just focus your damage to Cocolia to Weakness Break her.

In the second phase, Gepard will appear the Cocolia's summon will be 2 now. But, the strategy is still the same. I suggest focusing solely on Cocolia and Weakness Break her as fast as possible so she can't use her Ultimate. A small reminder that Gepard will create a shield for everyone (enemies, not yours) on his first turn. You just need to dish out damage to anyone to break that shield to 0% and it will disappear.
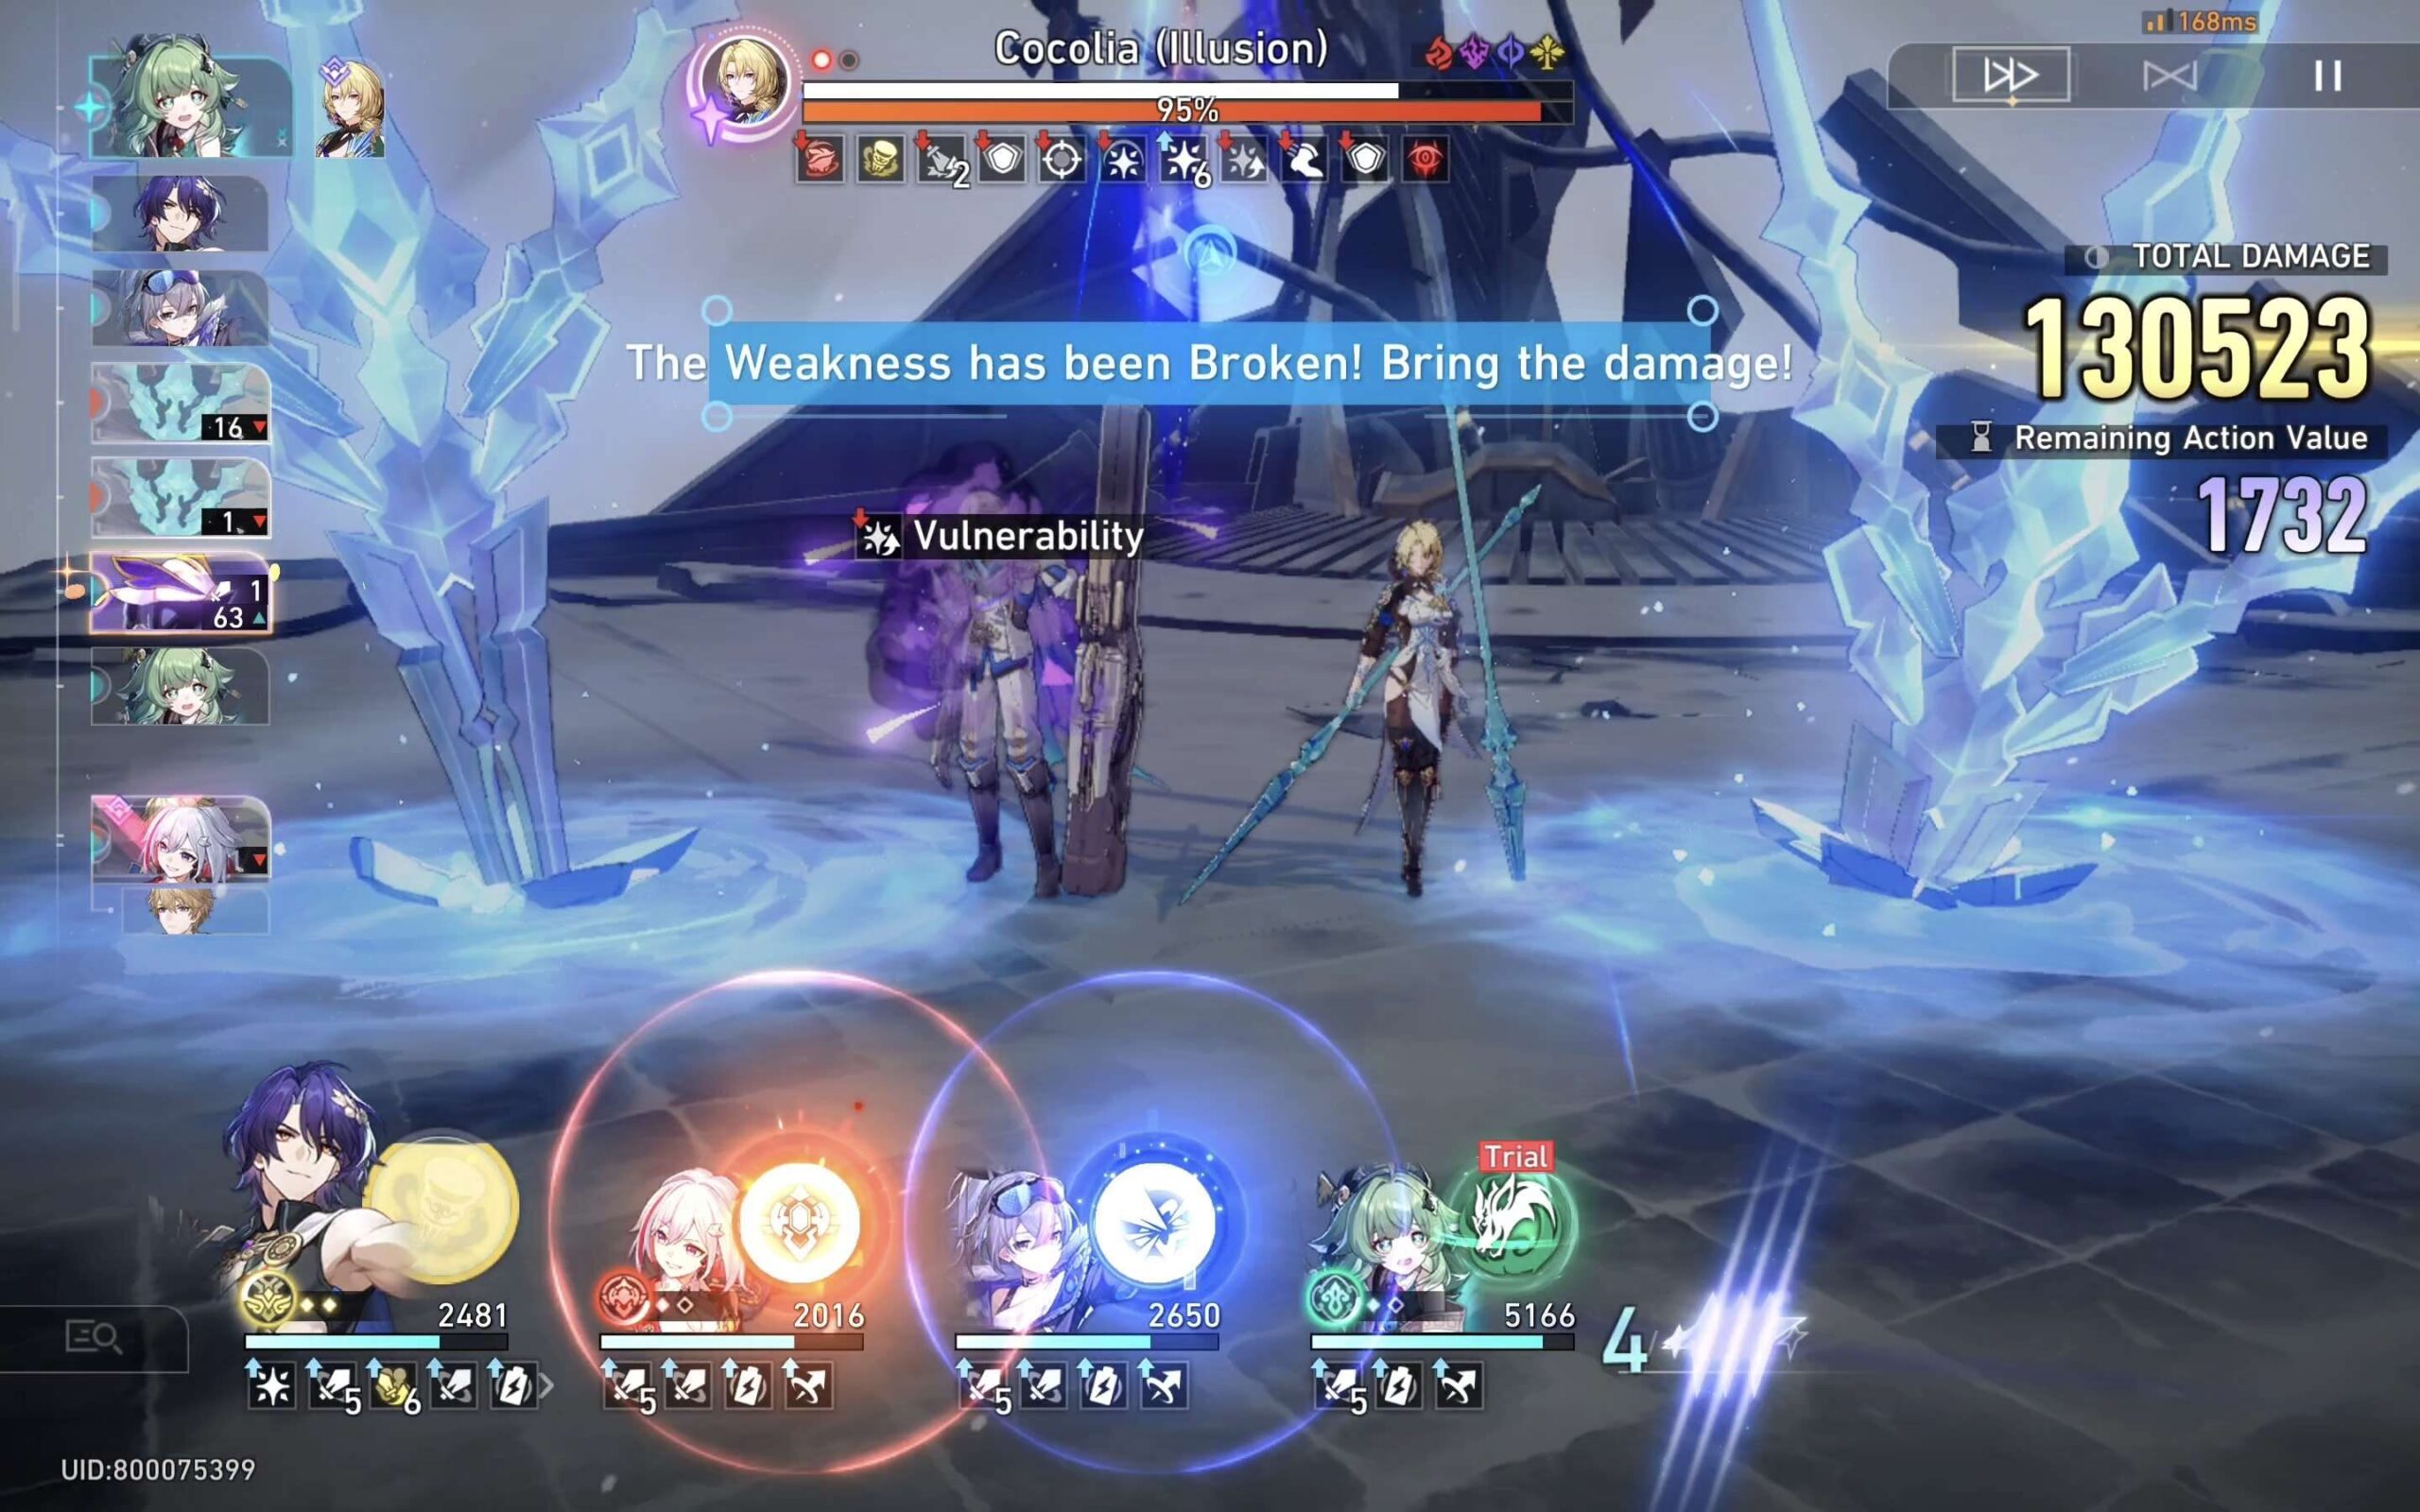
Even better is that once the shield disappears, it will count as a Weakness Break for Gepard and you can get the Energy and Skill Points for everyone. Now you may think this is the last phase, but you're wrong. There's another phase with Cocolia (her last form) and Gepard won't stay on the field in the 3rd phase even if you didn't defeat him in the 2nd phase. Another reason why I said to just focus on Cocolia.

Honestly, there's not much difference in the 3rd phase compared to the previous ones; there are 2 summons, and she will keep freezing your characters and using Ultimates. The difference is her bigger form and bigger damage. That's why my strategy stays the same. Attack Cocolia only and ignore her summons until the end. Topaz is a Hunt character for a reason, she's a single target character~
Gameplay Rewards

➥ Don’t forget to manually claim your rewards from the event page. By completing all the event challenges, you will get the following rewards:
- Stellar Jades
- Traveler's Guide
- Refined Aether
- Lost Crystal
- Relic Remains
- Credit

Sora
Articles: 233More Articles

Honkai: Star Rail Stellar Shimmer Event Guide

Honkai: Star Rail Redemption Codes – July 2024

Honkai: Star Rail Version 2.3 Tier List (July 2024)

Honkai: Star Rail Jade Character Guide

Honkai: Star Rail Boothill Character Guide

Honkai: Star Rail Xueyi Character Guide

Honkai: Star Rail Misha Character Guide

Honkai: Star Rail Gallagher Character Guide

Honkai: Star Rail Ruan Mei Character Guide

Honkai: Star Rail Firefly Character Guide

Honkai: Star Rail Memory of Chaos Stage 12 Guide (V2.2 – A Song’s True Theme)

Honkai: Star Rail Memory of Chaos Stage 11 Guide (V2.2 – A Song’s True Theme)

Honkai: Star Rail Memory of Chaos Stage 10 Guide (V2.2 – A Song’s True Theme)

Honkai: Star Rail Memory of Chaos Stage 9 Guide (V2.2 – A Song’s True Theme)

Honkai: Star Rail Memory of Chaos Stage 8 Guide (V2.2 – A Song’s True Theme)

Honkai: Star Rail Memory of Chaos Stage 7 Guide (V2.2 – A Song’s True Theme)

Honkai: Star Rail Stellar Jades Calculation in Version 2.3

Honkai: Star Rail Version 2.3 Special Program Livestream Overview

Honkai: Star Rail 3 New Redemption Codes from 2.3 Livestream