
Table of Contents
Introduction
In this article, I'll guide you on how to play Warcraft Rumble on PC. Warcraft Rumble is a mobile action strategy game set within the Warcraft universe. It's available on multiple platforms, including iOS and Android. However, there is no official way to play it on PC, so we'll have to use an emulator for it.
How to Steps
Here are the steps to play Warcraft Rumble on PC:

- Go to https://www.ldplayer.net/ and download LDPlayer 9.
- Once the download is complete, install LDPlayer 9 on your PC.
- Open the LDPlayer application and enter your Google account details.
- Open the Google Play Store within LDPlayer.
- Search for and download Warcraft Rumble.
- Install Warcraft Rumble, Open it and Enjoy playing the game!
LD Player System Requirements:
Minimum System Requirements:
- Intel or AMD CPU Processor x86 / x86_64
- Windows XP XP3 / Win7 / Win8 / Win8.1 / Win10
- Windows DirectX 11 / Graphic driver with OpenGL 2.0
- Minimum 2GB of system memory (RAM)
- Minimum 36GB of free hard disk space
- Hardware Virtualization Technology (Intel VT-x/AMD-V) enabled in BIOS
Recommended Specifications for LDPlayer 9:
- CPU: Intel i5 10500 or better
- RAM: 16GB or higher
- Disk Space: 100GB
- Graphics Card: NVIDIA GeForce GTX 1660 Ti or better
How to Improve Performance: Enable Virtualization on Windows
The emulator needs to run in an "independent" environment, separate from the Windows OS, and VT (Virtualization Technology) is designed for providing this environment. Enabling virtualization allows the emulator to access more computer resources for running apps or games, ensuring a smoother gaming experience on LDPlayer.
Enabling VT will not cause any harm to your computer. In fact, sometimes you can't even launch LDPlayer when it is disabled. On the contrary, after VT is enabled, the emulator runs 10 times faster, eliminating FPS lag and stutter in various games.
Steps to Enable VT on Windows 10 or 11
Please note that you have to perform all these steps to enable virtualization on your own because you will access the BIOS, and the Windows operating system won't run on your computer during this process. In other words, we cannot assist you remotely through TeamViewer, which only works on the Windows operating system.
Step 1: Enter BIOS After Rebooting Your PC
Restart your computer, and press the F2 or Del key repeatedly as soon as your computer shuts down.
If you still can't enter the BIOS after trying the above, please attempt pressing another key. You might be wondering which key you should press. Each brand of laptop, desktop, and motherboard has different BIOS entry keys. Please refer to the table below to find the key for your specific laptop, desktop, or motherboard. If you can't find this information, please search on Google for an accurate answer that applies to your specific brand of laptop, desktop, or motherboard.
Step 2: Enable Virtualization Technology in Your BIOS Settings
After entering the BIOS, use the ←, →, ↑, or ↓ key to navigate between items if you don't see your cursor on the screen. Additionally, pressing the Enter key will allow you to select an item.
Find the VT item, which is typically named Intel(R) Virtualization Technology, Virtualization, Virtual, VT-X, or SVM. In general, you can locate it in the following menu path: Advanced > Processor Configuration/Security.
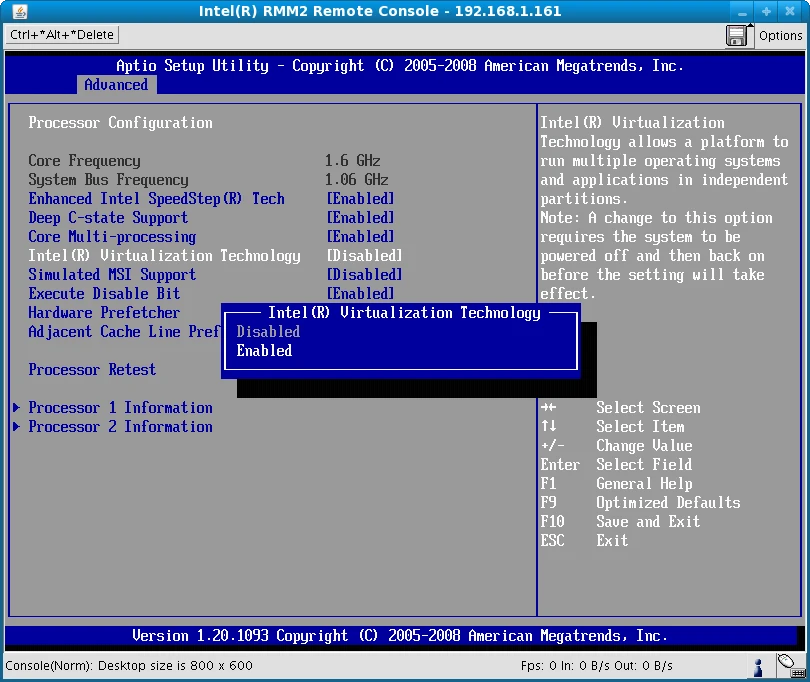
Select Intel(R) Virtualization Technology and change it to Enabled.
Conclusion
Here you have it, how to play Warcraft Rumble on PC. Hopefully, it will get an official PC client soon, but for now, we're stuck with using an emulator. I hope this guide was helpful.