Table of Contents
Baizhu is a 5-Star Dendro support character who can heal and protect his teammates. His Elemental Skill will unleash a Gossamer Sprite to pursue nearby opponents, dealing several instances of Dendro DMG before returning to him and restoring HP to all nearby party members.
When his Elemental Burst is unleashed, Baizhu will periodically generate a Seamless Shield. When the Seamless Shield’s effects expire, or when it is shattered, it will heal Baizhu’s own active character and unleash Spiritvein attacks against nearby opponents.
This guide uses the Community Character Builds by the Genshin Helper Team as guidance.
Skills Overview
Normal Attack: The Classics of Acupuncture

Normal Attack: Performs up to 4 attacks that deal Dendro DMG to opponents in front of him.
A small note to keep in mind is that he needs to be very close to the target to actually land a hit (which is relatively bad to use).
Charged Attack: Consumes a certain amount of Stamina to deal AoE Dendro DMG to opponents in front of him after a short casting time.
Plunging Attack: Calling upon the might of Dendro, Baizhu plunges toward the ground from mid-air, damaging all opponents in his path. Deals AoE Dendro DMG upon impact with the ground.
Elemental Skill: Universal Diagnosis

Controls a Gossamer Sprite that cruises and attacks nearby opponents, dealing Dendro DMG. After it performs 3 attacks or if there are no opponents nearby, the Sprite will return, healing all nearby party members based on Baizhu's Max HP.
His Elemental Skill has a 2-3 second delay between cast time and healing received, keep this in mind when swapping to low HP allies after Baizhu's rotation.
Cooldown: 10 seconds
Elemental Burst: Holistic Revivification

Enters the Pulsing Clarity state, creating a Seamless Shield that absorbs Dendro DMG with 250% effectiveness. While in this state, Baizhu will generate a new Seamless Shield every 2.5s.
- Pulsing Clarity duration 14s
- Shield duration 2.5s
- Cooldown 20s
- Energy Cost 80
The Seamless Shield will heal your own active character based on Baizhu's Max HP and attack opponents by unleashing Spiritveins, dealing Dendro DMG under the following circumstances:
• When a character is under the protection of a Seamless Shield and a new Seamless Shield is generated.
• When the Seamless Shield's effects expire, or when it is shattered.
Ascension 1: Five Fortunes Forever
Baizhu gains different effects according to the current HP of your current active character:
• When their HP is less than 50%, Baizhu gains 20% Healing Bonus.
• When their HP is equal to or more than 50%, Baizhu gains 25% Dendro DMG Bonus.
Ascension 4: All Things Are of the Earth
Characters who are healed by Seamless Shields will gain the Year of Verdant Favor effect: Each 1,000 Max HP that Baizhu possesses that does not exceed 50,000 will increase the Burning, Bloom, Hyperbloom, and Burgeon reaction DMG dealt by these characters by 2%, while the Aggravate and Spread reaction DMG dealt by these characters will be increased by 0.8%. This effect lasts 6s.
Confused? Here's an example:
Baizhu with 30,000 HP will provide the following bonus to the active character with a Seamless Shield:
• Burning, Bloom, Hyperbloom, and Burgeon +60% DMG
• Aggravate and Spread +24% DMG
The maximum buff potential at 50,000 HP will provide the following bonus to the active character with a Seamless Shield:
• Burning, Bloom, Hyperbloom, and Burgeon +100% DMG
• Aggravate and Spread +40% DMG
Passive Talent: Herbal Nourishment

When Baizhu is in the party, interacting with certain harvestable items will heal your current active character for 2.5% of Baizhu's Max HP.
TLDR / Rotation
Baizhu is a full fledged off-field support (unless you're brave enough to use his extremely short-range normal attack to be the on-field driver) where you use his Elemental Skill and Burst then swap out to the next party member.
Remember that his Skill heals the whole team - which is really rare for a healer's case since teamwide healing often ties to Elemental Burst. But not this doctor.
Talent Priorities

Burst > Skill > NA
If you don't plan to use him on-field at all, you can leave his NA at level 1 to save resources.
Constellations

Best Constellations: C2 & C6
C1: Attentive Observation
• Universal Diagnosis (Elemental Skill) gains 1 additional charge.
• Great for extra healing, energy, and Ocean Hued Clam set holders.
C2: Incisive Discernment ⭐
• When your own active character hits a nearby opponent with their attacks, Baizhu will unleash a Gossamer Sprite: Splice.
• Gossamer Sprite: Splice will initiate 1 attack before returning, dealing 250% of Baizhu's ATK as Dendro DMG and healing for 20% of Universal Diagnosis's Gossamer Sprite's normal healing.
• DMG dealt this way is considered Elemental Skill DMG. This effect can be triggered once every 5s.
C3: All Aspects Stabilized
• Increases the Level of Holistic Revivification (Elemental Burst) by 3.
C4: Ancient Art of Perception
• For 15s after Holistic Revivification is used, Baizhu will increase all nearby party members' Elemental Mastery by 80.
C5: The Hidden Ebb and Flow
Increases the Level of Universal Diagnosis (Elemental Skill) by 3.
C6: Elimination of Malicious Qi ⭐
• Increases the DMG dealt by Holistic Revivification's Spiritveins by 8% of Baizhu's Max HP.
• Additionally, when a Gossamer Sprite or Gossamer Sprite: Splice hits opponents, there is a 100% chance of generating one of Holistic Revivification's Seamless Shields. This effect can only be triggered once by each Gossamer Sprite or Gossamer Sprite: Splice.
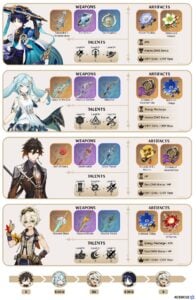
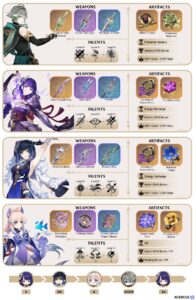
Recommended Weapons
- Jadefall's Splendor (5⭐)
- Prototype Amber (4⭐) [R5]
- Favonius Codex (4⭐)
- Hakushin Ring (4⭐)
- Thrilling Tales of Dragon Slayers (3⭐)
- A Thousand Floating Dreams (5⭐)*

1) Jadefall's Splendor (ATK 608 • HP 49.6%)
For 3s after using an Elemental Burst or creating a shield, the equipping character can gain the Primordial Jade Regalia effect: Restore 4.5/5/5.5/6/6.5 Energy every 2.5s, and gain 0.3/0.5/0.7/0.9/1.1% Elemental DMG Bonus for their corresponding Elemental Type for every 1,000 Max HP they possess, up to 12/20/28/36/44%. Primordial Jade Regalia will still take effect even if the equipping character is not on the field.
Note: This is his best-in-slot weapon. It will buff slightly buff his Elemental DMG but most importantly, restore energy when casting his Burst or creating a shield.

2) Prototype Amber (ATK 540 • HP 41.3%)
Using an Elemental Burst regenerates 4/4.5/5/5.5/6 Energy every 2s for 6s. Additionally, all party members will regenerate 4/4.5/5/5.5/6% HP every 2s for this duration.
Note: In addition to the amount of flat energy generation for the user, this weapon can provide significant team-wide healing when used in conjunction with Healing Bonus. It is a great option when using Baizhu with Furina for building Fanfare points from the second rotation onwards.

3) Favonius Codex (ATK 510 • ER 45.9%)
CRIT Hits have a 60/70/80/90/100% chance to generate a small amount of Elemental Particles, which will regenerate 6 Energy for the character. Can only occur once every 12/10.5/9/7.5/6s.
Note: This weapon really focuses on Energy Recharge. If your Baizhu already has around 50,000 HP only by artifacts, then this weapon is good for him. But don't forget to give him at least some Crit Rate so he can activate the passive skill.

4) Hakushin Ring (ATK 565 • ER 30.6%)
After the character equipped with this weapon triggers an electro elemental reaction, nearby party members of an Elemental Type involved in the elemental reaction receive a 10/12.5/15/17.5/20% Elemental DMG Bonus for their element, lasting 6s. Elemental Bonuses gained in this way cannot be stacked.
Note: This weapon is best used in Quicken teams with enough time in the rotation to swap to Baizhu to maintain uptime, or when Baizhu is the driver.

5) Thrilling Tales of Dragon Slayers (ATK 401 • HP 35.2%)
When switching characters, the new character taking the field has their ATK increased by 24/30/36/42/48% for 10s. This effect can only occur once every 20s.
Note: Its sub-stat of HP% enhances Baizhu’s healing and shield strength. It also buffs Baizhu’s teammates by increasing their ATK when switching characters.

6) A Thousand Floating Dreams (ATK 542 • Elemental Mastery 265)
Party members other than the equipping character will provide the equipping character with buffs based on whether their Elemental Type is the same as the latter or not. If their Elemental Types are the same, increase Elemental Mastery by 32/40/48/56/64. If not, increase the equipping character's DMG Bonus from their Elemental Type by 10/14/18/22/26%. Each of the aforementioned effects can have up to 3 stacks. Additionally, all nearby party members other than the equipping character will have their Elemental Mastery increased by 40/42/44/46/48. Multiple such effects from multiple such weapons can stack.
Note: This weapon can be considered in certain teams for the modest Elemental Mastery team buff it provides, though there are generally better uses for it.
Recommended Artifacts
- Deepwood Memories (4)
- Ocean-Hued Clam (4)
- Instructor (4)
- Noblesse Oblige (4)
- Song of Days Past (4)
- Tenacity of the Millelith (2) / Vourukasha's Glow (2) / Emblem of Severed Fate (2) [Choose Two]

1) Deepwood Memories
2-Piece: Dendro DMG Bonus +15%.
4-Piece: After Elemental Skills or Bursts hit opponents, the targets’ Dendro RES will be decreased by 30% for 8s. This effect can be triggered even if the equipping character is not on the field.
Note: Deepwood Memories should only be used if there are no other characters in the team who have this artifact set equipped. Under AoE situations, it may be better for another party member to hold this set as Baizhu has lackluster AoE.

2) Ocean-Hued Clam
2-Piece: Healing Bonus +15%.
4-Piece: When the character equipping this artifact set heals a character in the party, a Sea-Dyed Foam will appear for 3 seconds, accumulating the amount of HP recovered from healing (including overflow healing). At the end of the duration, the Sea-Dyed Foam will explode, dealing DMG to nearby opponents based on 90% of the accumulated healing.
Ocean-Hued Clam focused more on making Baizhu's healing more powerful. But the 4-piece option makes him a decent Sub-DPS as its damage scales off the accumulated healing.

3) Instructor
2-Piece: Increases Elemental Mastery by 80.
4-Piece: Upon triggering an Elemental Reaction, increases all party members' Elemental Mastery by 120 for 8s.
Note: The Elemental Mastery gained from this set outweighs the reduction in A4 passive bonus from lower main stat values.

4) Noblesse Oblige
2-Piece: Elemental Burst DMG +20%.
4-Piece: Using an Elemental Burst increases all party members' ATK by 20% for 12s. This effect cannot stack.
Note: In teams that benefit from ATK%, this set can be run over Instructors (4) if the additional sustain from higher hp values is preferred.

5) Song of Days Past
2-Piece: Healing Bonus +15%.
4-Piece: When the equipping character heals a party member, the Yearning effect will be created for 6s, which records the total amount of healing provided (including overflow healing). When the duration expires, the Yearning effect will be transformed into the "Waves of Days Past" effect: When your active party member hits an opponent with a Normal Attack, Charged Attack, Plunging Attack, Elemental Skill, or Elemental Burst, the DMG dealt will be increased by 8% of the total healing amount recorded by the Yearning effect. The "Waves of Days Past" effect is removed after it has taken effect 5 times or after 10s. A single instance of the Yearning effect can record up to 15,000 healing, and only a single instance can exist at once, but it can record the healing from multiple equipping characters. Equipping characters on standby can still trigger this effect.

6) Tenacity of the Millelith (2) / Vourukasha's Glow (2) / Emblem of Severed Fate (2)
Main & Sub Stats Priority
| Artifact Main Stats | Artifact Sub Stats |
|---|---|
| Sands - HP% / Energy Recharge Goblet - HP% Circlet - HP% / Healing Bonus* You can stop focusing on HP when at the 50,000 HP cap for his Ascension 4 Passive to focus on Energy recharge or other offensive stats. | Energy Recharge* HP% Flat HP Crit Rate* *Prioritize Energy Recharge until requirement is met. Crit Rate is only recommended when using Favonius Codex. |
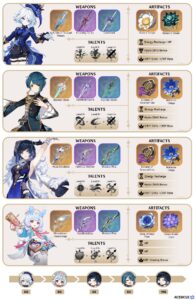
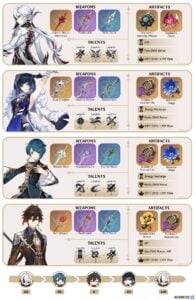
Team Compositions
Hyperbloom Team

Baizhu able to easily drive Hyperbloom teams. He brings a high degree of survivability and comfort to the team and on-demand Dendro applications. However, few things to note:
• His attacks lack AoE and require him to be very very close to the enemy.
• His healing can be redundant when bringing a Kuki into the team for Hyperbloom. But hey, two healers mean your characters can be called immortal with all the healings.
Nahida / Alhaitham: Driver / Main DPS
Yelan / Xingqiu: Hydro off-field application
Kuki Shinobu / Raiden Shogun: Hyperbloom trigger
Baizhu: Healer
Catalyze/Quicken Team

Cyno relies heavily on his Elemental Burst which immediately becomes invalid when swapping characters, making him give up the Burst. With Baizhu on the team, Cyno can go all-out. This is because Baizhu’s Elemental Burst provides a single-target Dendro application, anti-interruption, and HP recovery.
The Resonance of Double Dendro (Preferably Nahida as she's too powerful) and Double Electro can also effectively alleviate the team’s Energy Recharge pressure, while also increasing the DPS to a certain extent.
Cyno (Other Dendro/Electro DPS like Raiden/Yae Miko/Alhaitham): Main DPS
Fischl / Yae Miko: Sub-DPS
Nahida: Dendro off-field application || Kazuha / Sucrose: VV set + Grouper
Baizhu: Healer
Bounty Bloom Team

With the release of Baizhu, the Bounty Bloom team no longer needs to consider survival issues, and the lineup is more flexible and versatile. After all, the explosion from Dendro Cores not only damages the enemies but also our characters.
Nilou and Xingqiu are responsible for applying Hydro aura, while Nahida and Baizhu are responsible for reducing Dendro RES, applying Dendro, and survival (for Baizhu of course). Even if the entire team is low on health in high-pressure environments, Baizhu can use the E skill to lift the entire team’s health.
Nahida: Driver
Yelan / Xingqiu: Hydro off-field application
Nilou: Bounty Bloom queen
Baizhu: Healer
Baizhu-Furina Team

Neuvillette / Wanderer: Main DPS
Furina / Faruzan: Buffer + Sub-DPS
Kazuha: VV set + Grouper
Baizhu: Healer

Sora
Articles: 233More Articles

Genshin Impact Codes – July 2024
Sigewinne Team Compositions

Genshin Impact: Version 4.7 Tier List (July 2024)

Genshin Impact: Sigewinne Quick Character Guide
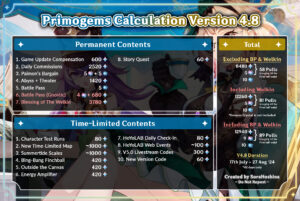
Genshin Impact: Primogems Calculation Version 4.8
Arlecchino Team Compositions

Baizhu Team Compositions
Wanderer Team Compositions
Alhaitham Team Compositions

Genshin Impact: Spiral Abyss V4.7 Floor 12 Complete Guide

Genshin Impact: Spiral Abyss V4.7 Floor 11 Complete Guide
Genshin Impact: Thoma Quick Character Guide

Genshin Impact: Sethos Quick Character Guide
Genshin Impact: Alhaitham Quick Character Guide

Genshin Impact: Clorinde Quick Character Guide

Genshin Impact: Primogems Calculation Version 4.7

Genshin Impact 4.7 Special Program Livestream Overview
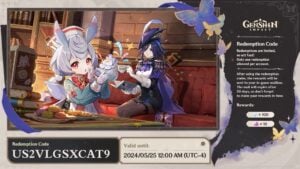
3 New Redemption Codes from 4.7 Special Program
Genshin Impact 4.7 Livestream Countdown
