Table of Contents

This is the main quest in Genshin Impact version 4.4 where you will learn about the main story in the new area of Liyue; by helping Fujin to restore the quality of soil and water in Qiaoying Village. By completing this quest, you will unlock some small underground areas (Chenlong Cleft), a whole sub-region (Mt. Laixin), and the Carp's Rest: Votive Rainjade. The last one is where you will offer the 50 Spirit Carp to get rewards.
Qiaoying of the Sacred Mountain
| Rewards | Amount |
|---|---|
| Primogem | x30 |
| Mora | x33000 |

You will start this quest automatically after walking for a while in Chenyu Vale: Upper Vale. After the pep talk with Fujin, use the newly learned mechanism (Golden Carp's Leap) in front of you to get out of her domain.

Once you're out of the domain, go to Qiaoying Village and you will be approached by an old man. He will ask you to pretend to be Xingqiu and help solve the soil & water issue in the village (How about we bring the real Xingqiu?). After that, just keep following the quest navigation because there's no puzzle yet and just lots of dialogue.


Once you follow a golden carp into a pond west of Qiaoying Village, you need to solve a simple puzzle. For this puzzle, you need to take the Lotus Lamps (by pressing T on the keyboard) and light all the nearby lotus lanterns. There are 2 options: the (1) is to stand in the middle of the pond or (2) you can throw the Lotus Lamp into the middle of the pond.
After that, follow the navigation once again until you meet the Fontainian technician and Little Mao.
Floating Jade, Treasure of Chenyu
| Rewards | Amount |
|---|---|
| Primogem | x40 |
| Mora | x33500 |
| Hero's Wit | x4 |
| Mystic Enhancement Ore | x4 |

Follow Little Mao to the waterfall near Yilong Wharf. You need to enter a hidden path behind the waterfall but it's blocked, so now it's puzzle time.

Use Elemental Sight and you should see a breakable rock at the bottom of the waterfall. Destroy it to uncover a floating platform and it will help divide the waterfall for you to pass through. After that, just follow the quest navigation until you need to go to Jademouth.

At the Jademouth, you need to create a whirlpool by solving 2 puzzles in different stone shrines (marked by the quest navigation). Use the Golden Carp's Leap nearby to swiftly move to the shrines.

For the shrine in the southwest, the puzzle is to light all the censers using the Jade Incense Cauldron. You need to stand behind the last censers so the adeptal power will pass through in the shape of an X. Look at the GIF above if you're having a problem understanding the puzzle.

For the shrine in the northeast, just defeat the enemy to light up the shrine. Once both shrines are lit up, follow the quest navigation to create the whirlpool in the middle of Jademouth (You will unlock the area: Chenlong Cleft).

You need to collect 4 adeptal energy in the Chenlong Cleft for the Votive Rainjade. The quest didn't mark their specific location so you can look at the image above for their precise spot.
First Adeptal Energy

1. From the Votive Rainjade, walk forward (east) toward the pot with a glowing spot with 2 Hilichurl nearby. Investigate and pot and multiple other pots will appear. Investigate the furthest pot for the adeptal energy.
Second Adeptal Energy

1. From your previous spot at the pot, look southeast and you will see an adeptal energy.

2. Press T on the keyboard and follow it until the end where you need to fight Hydro Mimic Boar.
Third Adeptal Energy

1. Look up after defeating the boar (towards the northeast) and you should notice the Golden Carp's Leap in the air. Follow it until you reach the previous spot near the pots of first adeptal energy.

2. Look to your right to see a group of Hilichurls. Defeat all of them and release the Seelie in the cage. Follow the Seelie until the end and you will get the adeptal energy.
Fourth Adeptal Energy

1. Follow the path from where the Seelies stop and you will see Pyro monument puzzles.

2. Stand at the protruding rock at the pond and get your Pyro bow characters ready to aim at the monument.

3. Press T on both platforms so they will float above the water and immediately use Pyro to light the monuments.

Now, follow the quest navigation again until you're out of the underground area and complete the sub-quest.
An Ancient Sacrifice of Sacred Brocade
| Rewards | Amount |
|---|---|
| Primogem | x50 |
| Mora | x54500 |
| Hero's Wit | x5 |
| Mystic Enhancement Ore | x4 |

Once the sub-quest starts, keep following the quest navigation and you will meet "Bluey." Then, enter the cavern until you reach a miasma.

For the miasma puzzle, you need to defeat the spawned enemies first. After a number of enemies are defeated, you will get a prompt "The source of the miasma has been exposed! Use your adeptal power to purify it!" at the top of the screen. Look at the miasma (tree branch) and press T on the keyboard to remove the miasma.

Once all 3 miasma disappear, so does the barrier in front of the small cavern with the mural inside it. Enter it and listen to more lore about this area and Fujin. After that, keep following the (Golden Carp) quest navigation again.

Now, you need to prepare for the Rainjade Rite. There are 2 stone carvings you need to go to and complete the puzzle there (both marked by the quest navigation).

Go to the bottom one first, and investigate the moving creature across the seabed twice + approach the Seelie. Hydro Mimic will appear and you need to defeat them so the Seelie can return to its court.

Once the Seelie is back to the court, a stone carving will spawn. Move it to the only tile on that small land and you will complete the puzzle.

Now for the top one, a floating platform will appear. Stand on that platform and a wind current will appear. Glide on the wind current and keep gliding to the platforms above until you get the stone carving.

Once you get the stone carving, go back to the land below and place it to the tile beside the tree to complete the puzzle.

Talk to Fujin and keep following the quest navigation. You will need to clear another miasma to unlock a new underground area: Adeptus's Repose.

Once you enter the Adeptus's Repose, there will be a stone carving beside the water, Pick it up and place it on the tile beside the living area (near the huge pot and stone slate).

Talk to the Simulacrum and only then can you interact with the stone slate beside the huge pot. You will be teleported to a hidden area in Chizhang Wall for another set of lore (You can go to this location again even after the quest is finished as this location is not locked or sealed whatsoever).

Continue following the quest navigation until you reach Mt. Xuanlian. Here, you need to collect 3 spirit pearls. There's a new type of puzzle here: Jade Cascade.
Spirit Pearl 1 (Directly below the pavilion)

This is the main mechanism.

Take the Jade Hairpin (the branch) at the northwest from the main mechanism to increase the position of the floating rock.

Look to your south and you will notice a high floating rock. Move the Jade Hairpin there to lower the position of the rock.

After that, use the 2 Jade Incense Cauldron to light up all the censers in the path.
Spirit Pearl 2 (North of the previous location)

Use the Golden Carp's Leap to head to the next Spirit Pearl location (or the teleport waypoint). This puzzle is much easier than before.

First, take the Jade Hairpin on top of the carving stone (This is on your right).

Now look to your left and place the Jade Hairpin on the empty slot.

Pick up the stone carving and place it on the floating platform beside it (it was submerged under water before because of the Jade Hairpin).

Lastly, pick up the golden carp statue and place it right below the Jade Hairpin to complete the puzzle.
Spirit Pearl 3 (East of the previous location)

From the previous spot, walk to the southeast towards the last Spirit Pearl. First, all you need to do is to defeat the enemies.

The golden carp statue will be unlocked once the enemies are defeated. Pick it up and place it on the platform in front of it.

Lastly, look up and move the Jade Hairpin to the other side to complete the puzzle.

Go back to the pavilion and place all the Spirit Pearls on the carp statue around the pavilion. After that, continue following the navigation and you will then unlock the sub-region: Mt. Laixin.

At the new area, follow Fujin and clean up miasma until you reach the top of the mountain. Even at the top, there will still be lots of miasma so bring your best team.

Once all the miasma has been taken care of, you will be teleported to another area and have to fight the new boss, Lingyuan. After the last talk-no-jutsu, bring Little Mao back to Qiaoying Village to complete the quest.
The Cloud-Padded Path to the Chiwang Repose
| Rewards | Amount |
|---|---|
| Primogem | x20 |
| Mora | x11000 |

Now that the main quest is completed, the last thing you need to do is return back to the summit of Mt. Laixin and speak to Lingyuan (If they are not here, change your in-game time to the day after tomorrow).

Lingyuan will bring you to Carp's Rest to look for Fujin and you will unlock the Rainjade Rite. Collect 50 Spirit Carps and give them here to get rewards.

Sora
Articles: 233More Articles
Genshin Impact Codes – July 2024
Sigewinne Team Compositions

Genshin Impact: Version 4.7 Tier List (July 2024)

Genshin Impact: Sigewinne Quick Character Guide
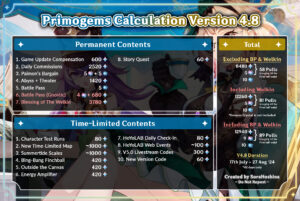
Genshin Impact: Primogems Calculation Version 4.8
Arlecchino Team Compositions

Baizhu Team Compositions
Wanderer Team Compositions
Alhaitham Team Compositions

Genshin Impact: Spiral Abyss V4.7 Floor 12 Complete Guide

Genshin Impact: Spiral Abyss V4.7 Floor 11 Complete Guide
Genshin Impact: Thoma Quick Character Guide

Genshin Impact: Sethos Quick Character Guide
Genshin Impact: Alhaitham Quick Character Guide

Genshin Impact: Clorinde Quick Character Guide
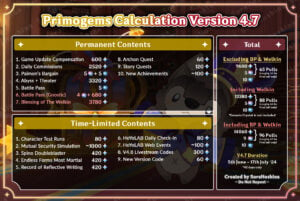
Genshin Impact: Primogems Calculation Version 4.7

Genshin Impact 4.7 Special Program Livestream Overview
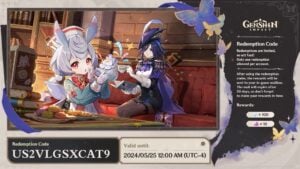
3 New Redemption Codes from 4.7 Special Program
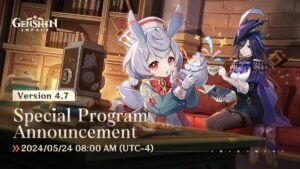
Genshin Impact 4.7 Livestream Countdown
